How To Reface Veneer Kitchen Cabinets: A Comprehensive Guide
Refacing veneer kitchen cabinets is a cost-effective way to update the appearance of a kitchen without the expense and hassle of a complete cabinet replacement. This process involves replacing the existing cabinet doors and drawer fronts and applying a new veneer to the exposed cabinet boxes. However, it's crucial to understand the nuances of working with veneer, as it can be more delicate than solid wood. This article provides a comprehensive guide to refacing veneer kitchen cabinets, covering preparation, material selection, installation, and troubleshooting.
Evaluating the Existing Veneer Cabinets
Before embarking on a refacing project, it is essential to thoroughly assess the existing veneer cabinets. This evaluation will determine if refacing is a viable option and help identify any potential challenges. Inspect the cabinet boxes for structural integrity. Look for signs of water damage, such as swelling, warping, or delamination of the veneer. If the cabinet boxes are significantly damaged, refacing may not be a worthwhile investment. Consider replacing the entire cabinet instead.
Next, examine the existing veneer surface. Minor scratches and dents can be addressed during the preparation phase. However, if the veneer is severely chipped, peeling, or lifting, it may require more extensive repairs or removal before new veneer can be applied. Furthermore, assess the hardware (hinges, drawer slides, and pulls) to determine if it needs replacement. New hardware can significantly enhance the updated look of the cabinets.
Finally, consider the overall layout and functionality of the kitchen. Refacing only addresses the aesthetic appearance of the cabinets. If the kitchen layout is inefficient or if there are functional issues with the cabinets (e.g., insufficient storage space or poorly designed layouts), refacing will not solve these problems. In such cases, a complete kitchen remodel may be a more suitable solution.
Preparing the Cabinet Boxes for Refacing
Proper preparation is critical for a successful veneer refacing project. The goal is to create a clean, smooth, and stable surface for the new veneer to adhere to. Begin by removing all the existing cabinet doors, drawer fronts, and hardware. Label each door and drawer front with its corresponding cabinet opening to ensure proper reinstallation later.
Clean the cabinet boxes thoroughly with a degreasing cleaner to remove any grease, dirt, or grime. This step is essential for ensuring proper adhesion of the new veneer. Rinse the cleaned surfaces with clean water and allow them to dry completely. Once dry, inspect the cabinet boxes for any imperfections, such as scratches, dents, or gouges. Fill these imperfections with wood filler and allow it to dry according to the manufacturer's instructions. Sand the filled areas smooth, blending them seamlessly with the surrounding veneer surface. Use progressively finer grits of sandpaper, starting with 120-grit and finishing with 220-grit, to achieve a smooth, even surface.
If the existing veneer is peeling or lifting, carefully remove it with a heat gun and putty knife. Apply heat to the veneer to soften the adhesive and gently peel it away from the cabinet box. Be careful not to damage the underlying substrate. After removing the loose veneer, sand the surface smooth to remove any residual adhesive. Before applying the new veneer, consider priming the cabinet boxes with a primer specifically designed for veneer. This will help to improve adhesion and create a more uniform surface for the new veneer. Allow the primer to dry completely before proceeding to the next step.
Selecting the Right Veneer and Materials
Choosing the appropriate veneer and other materials is crucial for achieving the desired aesthetic and ensuring the longevity of the refaced cabinets. Veneer is available in various wood species, grains, and thicknesses. Consider the overall style of the kitchen and select a veneer that complements the existing decor. Wood veneer offers a natural wood appearance and can be stained or finished to match the desired color.
For refacing, typically two types of veneer are used: paper-backed veneer and wood-backed veneer. Paper-backed veneer is more flexible and easier to work with, making it suitable for curved surfaces or intricate details. Wood-backed veneer, on the other hand, is more rigid and durable, making it a better choice for flat surfaces that are subject to heavy wear. Self-adhesive veneer is an option, but the adhesive is generally not strong enough for long term use. Contact cement and wood glue are better choices.
In addition to the veneer, you will also need contact cement, a J-roller, a utility knife, sandpaper, and a veneer saw or router with a veneer trimming bit. Contact cement is used to adhere the veneer to the cabinet boxes. A J-roller is used to apply even pressure to the veneer, ensuring a strong bond. A utility knife and veneer saw are used to trim the veneer to size. Sandpaper is used to smooth any rough edges or imperfections. Consider purchasing a veneer trimming bit for a router for a professional, clean edge.
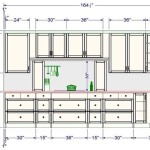
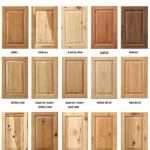
When selecting new cabinet doors and drawer fronts, consider the style, material, and finish that best suits the overall design of the kitchen. Shaker-style doors are a popular choice for their clean, simple lines. Raised-panel doors offer a more traditional look. The doors can be made of solid wood, MDF, or a combination of both. Ensure the new doors and drawer fronts are properly sized to fit the existing cabinet openings. It is recommended to measure the existing doors and drawer fronts carefully and provide these measurements to the manufacturer or supplier.
Applying the New Veneer to the Cabinet Boxes
Applying the new veneer requires patience and attention to detail. Begin by cutting the veneer to the appropriate size, allowing for a slight overlap on all sides. It is generally advisable to cut oversized and trim to the exact sizes later. Apply contact cement to both the back of the veneer and the surface of the cabinet box. Follow the manufacturer's instructions for application and drying time. Allow the contact cement to dry until it is tacky to the touch.
Carefully align the veneer with the cabinet box, ensuring that it is positioned correctly. Once the veneer is in place, use a J-roller to apply even pressure to the entire surface, starting from the center and working outwards. This will ensure a strong bond between the veneer and the cabinet box. Pay particular attention to the edges and corners, as these are the areas most prone to peeling.
After the veneer has been applied, use a utility knife or veneer saw to trim the excess veneer from the edges of the cabinet box. Be careful not to damage the surrounding veneer. Sand the edges smooth with fine-grit sandpaper. If using a router with a veneer trimming bit, use light pressure and follow the grain direction to prevent tear-out. For inside corners, a sharp utility knife combined with a careful hand works best.
Installing New Cabinet Doors, Drawer Fronts, and Hardware
Once the new veneer has been applied to the cabinet boxes, the next step is to install the new cabinet doors, drawer fronts, and hardware. Begin by installing the hinges on the cabinet doors and cabinet boxes. Ensure the hinges are properly aligned and securely fastened. Hang the cabinet doors and adjust the hinges as needed to ensure they are aligned properly and swing smoothly.
Next, install the drawer fronts on the drawer boxes. Align the drawer fronts with the drawer boxes and secure them with screws. Adjust the drawer fronts as needed to ensure they are flush with the cabinet boxes and operate smoothly. Finally, install the new hardware, such as knobs, pulls, and handles, on the cabinet doors and drawer fronts. Choose hardware that complements the style. Typically, hardware is installed with screws or bolts. Verify the stability of any installations.
Troubleshooting Common Refacing Problems
Despite careful planning and execution, some common problems may arise during the refacing process. One common issue is veneer peeling or lifting. This can be caused by improper surface preparation, inadequate application of contact cement, or exposure to moisture. To fix this problem, reapply contact cement to the affected area and use a J-roller to apply even pressure. In severe cases, the veneer may need to be removed and replaced.
Another common problem is uneven or misaligned cabinet doors and drawer fronts. This can be caused by improper hinge or drawer slide installation. To fix this problem, adjust the hinges or drawer slides as needed to ensure the doors and drawer fronts are aligned properly and operate smoothly. Consider using shims behind the hinge plates for finer adjustments.
Bubbles, ridges, or bumps can be caused by inadequate adhesive or an uneven surface. Puncture the bubble and apply adhesive under the veneer, then use a roller to work the air out and smooth the surface. If the surface is uneven, consider additional sanding and leveling before applying the veneer.

Diy Cabinet Refacing Budget Friendly Made Easy Wisewood

How To Reface Kitchen Cabinets With Veneer

Diy Cabinet Refacing Budget Friendly Made Easy Wisewood

How To Use Wood Veneer Reface Kitchen Cabinets Diy Cabinet Update

Refinishing Kitchen Cabinets Modern Refacing Made Easy Wisewood

How To Use Wood Veneer Reface Kitchen Cabinets Give Them A Whole New Look Time On Our Hands

Cabinet Refacing How To Reface Kitchen Cabinets Diy

How To Use Wood Veneer Reface Kitchen Cabinets Give Them A Whole New Look Time On Our Hands

Refinishing Kitchen Cabinets Modern Refacing Made Easy Wisewood

How To Reface Kitchen Cabinets Affordable Cabinet Update On A Budget Anika S Diy Life
Related Posts