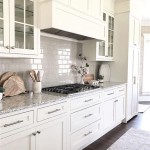
How to Refinish Kitchen Cabinets With Paint
Refinishing kitchen cabinets with paint is a cost-effective and impactful way to transform the look of a kitchen without the expense and disruption of a full remodel. This process involves more than simply applying a fresh coat of paint; it requires careful preparation, meticulous execution, and the right materials to achieve a durable and aesthetically pleasing finish. A well-executed paint job can revitalize dated cabinets, brightening the entire kitchen space and increasing the home's overall value.
The success of refinishing kitchen cabinets hinges heavily on the initial preparation. Neglecting this stage can lead to paint adhesion problems, uneven surfaces, and an overall unprofessional appearance. This article provides a comprehensive guide to refinishing kitchen cabinets with paint, covering all necessary steps to ensure a long-lasting and beautiful result. This includes surface preparation, paint selection, application techniques, and reassembly considerations.
Key Point 1: Surface Preparation – The Foundation of a Lasting Finish
Proper surface preparation is the most critical aspect of refinishing kitchen cabinets. It ensures the paint adheres correctly and creates a smooth, even surface. This involves removing hardware, cleaning the cabinets, sanding, and priming. Each step is crucial to achieving a professional-looking result.
Removing Hardware: The first step is to remove all hardware, including knobs, pulls, hinges, and any other decorative elements. Place these items in labeled bags to ensure easy reinstallation. This prevents paint from getting on the hardware and allows for a clean, unobstructed painting surface. Consider replacing old hardware with new pieces to further update the look of the cabinets.
Cleaning the Cabinets: Kitchen cabinets accumulate grease, grime, and food splatters over time. A thorough cleaning is essential before sanding. Use a strong degreaser specifically designed for kitchen surfaces. Apply the degreaser according to the manufacturer's instructions and scrub the cabinets with a non-abrasive sponge or cloth. Rinse thoroughly with clean water and allow the cabinets to dry completely. Failure to remove grease will prevent the paint from adhering properly.
Sanding: Sanding creates a slightly rough surface that allows the primer and paint to bond effectively. Use a medium-grit sandpaper (around 120-grit) to lightly scuff the existing finish. Focus on areas that are particularly glossy or have imperfections. After sanding, use a fine-grit sandpaper (around 220-grit) to smooth out any rough edges and create a more even surface. Dust thoroughly with a tack cloth to remove all sanding residue. For cabinets with a very smooth or glossy finish, consider using a liquid deglosser as an alternative or supplement to sanding. This chemical treatment etches the surface, providing better adhesion.
Priming: Primer is a crucial intermediate layer between the sanded surface and the paint. It seals the wood, provides a uniform base for the paint, and improves adhesion. Use a high-quality primer specifically designed for cabinets. Apply the primer in thin, even coats, following the manufacturer's instructions. Allow the primer to dry completely before applying the paint. Sand the primed surface lightly with fine-grit sandpaper (around 320-grit) to remove any imperfections and ensure a smooth finish. Dust thoroughly with a tack cloth before proceeding to the painting stage. Tinting the primer to a similar color as the topcoat can improve the opacity of the finish and reduce the number of paint coats required.
Key Point 2: Selecting the Right Paint and Application Techniques
The choice of paint and the method of application significantly impact the final appearance and durability of the refinished cabinets. Select a paint formulated for cabinets and apply it using appropriate techniques for a professional finish.
Paint Selection: Several types of paint are suitable for kitchen cabinets, each with its own advantages and disadvantages. Alkyd (oil-based) paint offers excellent durability and a smooth, hard finish, but it requires mineral spirits for cleanup and has a longer drying time. Latex (water-based) paint is easier to clean up and has lower VOCs (volatile organic compounds), making it a more environmentally friendly option. However, some latex paints may not be as durable as alkyd paints. Acrylic paints are another option, offering good durability and color retention. Consider using a paint specifically formulated for cabinets and trim, as these paints are designed to withstand the wear and tear of a kitchen environment. Look for paints that offer good scrubbability and resistance to moisture and grease.
Paint Finish: The paint finish also affects the overall look and feel of the cabinets. High-gloss finishes are very durable and easy to clean, but they can also highlight imperfections in the surface. Semi-gloss finishes offer a good balance between durability and aesthetics, providing a slight sheen without being overly reflective. Satin finishes are less glossy and can help to conceal imperfections, but they may not be as easy to clean. Matte finishes are the least reflective and offer a modern, sophisticated look, but they are also the least durable and can be more difficult to clean. Consider the overall style of the kitchen and the desired level of maintenance when selecting a paint finish.
Application Techniques: There are several ways to apply paint to kitchen cabinets, including brushing, rolling, and spraying. Brushing is the most common method for DIY projects, but it can leave brushstrokes on the surface. Use a high-quality brush with synthetic bristles for best results. Apply the paint in thin, even strokes, following the grain of the wood. Rolling can provide a smoother finish than brushing, but it is best suited for flat surfaces. Use a small, dense foam roller for best results. Spraying provides the most professional-looking finish, but it requires specialized equipment and a well-ventilated workspace. An airless sprayer or HVLP (high-volume, low-pressure) sprayer can be used to apply the paint in a fine, even mist. Mask off surrounding areas to protect them from overspray.
Regardless of the application method, apply the paint in thin, even coats. Multiple thin coats are better than one thick coat, as they are less likely to drip or sag. Allow each coat to dry completely before applying the next. Lightly sand between coats with fine-grit sandpaper (around 320-grit) to remove any imperfections and ensure a smooth finish. Dust thoroughly with a tack cloth before applying the next coat.
Key Point 3: Reassembly and Final Touches
After the paint has dried completely, the final step is to reassemble the cabinets and add any finishing touches. This includes reinstalling the hardware, adjusting the doors and drawers, and cleaning up the workspace.
Reinstalling Hardware: Reinstall the hardware using the original screws. If the screws are stripped or damaged, replace them with new ones. Consider using new hardware to update the look of the cabinets. New knobs and pulls can dramatically change the style of the kitchen. Before reinstalling any screws, apply a small amount of wood glue to the holes ensuring the screws have good purchase and don’t loosen over time.
Adjusting Doors and Drawers: After reinstalling the doors and drawers, check their alignment. Adjust the hinges if necessary to ensure that the doors hang straight and close properly. Check the drawer slides to ensure that the drawers slide smoothly. If the drawers are sticking, apply a lubricant such as silicone spray to the slides. Sometimes the paint finish can make drawers snug going back into cabinets, in these cases, lightly sand down the sides of the drawers to allow for better fit.
Cleaning Up: Clean up the workspace thoroughly. Remove any masking tape or plastic sheeting. Dispose of paint cans and other materials according to local regulations. Clean brushes and rollers with the appropriate solvent (water for latex paint, mineral spirits for alkyd paint). Store leftover paint in a cool, dry place for future touch-ups.
Final Inspection: Inspect the finished cabinets carefully for any imperfections. Touch up any areas where the paint is thin or uneven. If necessary, apply a clear coat of polyurethane to protect the paint and add durability. This is especially important for cabinets that are frequently exposed to water or grease. Allow the clear coat to dry completely before using the cabinets.
By following these steps, homeowners can successfully refinish their kitchen cabinets with paint, achieving a professional-looking result that enhances the beauty and functionality of their kitchen. This project requires patience and attention to detail, but the rewards are well worth the effort. A fresh coat of paint can transform outdated cabinets into a stunning focal point, adding value and style to the entire home.
Ultimately, refinishing kitchen cabinets with paint is a manageable DIY project that offers significant cost savings compared to replacing the cabinets entirely. While it requires a commitment of time and effort, the transformation achieved can be dramatic, breathing new life into a tired kitchen and creating a space that homeowners can be proud of.

Cabinet Refinishing Guide

Avoid These Mistakes How To Paint Cabinets That Are Already Painted Grace In My Space

How To Paint Kitchen Cabinets Like The Pros

Should I Paint Or Refinish My Kitchen Cabinets

How To Paint Kitchen Cabinets A Step By Guide Confessions Of Serial Do It Yourselfer

Refinish Kitchen Cabinets With Kilz Restoration Primer

Diy Painting Your Kitchen Cabinets The Right Way

Step By How To Paint Kitchen Cabinets Like A Pro And On Budget The American Patriette

How To Refinish Cabinets Like A Pro

How To Paint Kitchen Cabinets
Related Posts