How To Refinish Your Kitchen Cabinets: A Comprehensive Guide
Refinishing kitchen cabinets is a popular home improvement project undertaken to refresh a dated or worn kitchen aesthetic without the expense and disruption of a complete remodel. The process involves stripping the existing finish, repairing any damages, and applying a new finish to revitalize the appearance of the cabinetry. It's a cost-effective way to update the kitchen's style, enhance its value, and personalize the space to your preferences.
Before embarking on this project, it's crucial to understand the scope of work, required materials, and the potential challenges involved. Proper planning and execution are essential for achieving a professional-looking result that will endure for years to come. This guide provides a detailed walkthrough of the refinishing process, covering each step from preparation to final coat application.
1. Preparation and Assessment
Thorough preparation is paramount for the success of any cabinet refinishing project. This phase ensures a clean, stable surface for the new finish and protects surrounding areas from damage and mess. The first step is to empty all cabinets and drawers completely. Remove all hardware, including knobs, pulls, hinges, and any interior shelving or roll-out trays. Taking photographs of how the doors and hardware are arranged before disassembly can be helpful for reassembly later.
Label each door and drawer with a corresponding number and its location in the kitchen. This will prevent confusion during reinstallation and ensure that the doors are reattached to the same mounting points. The labeling can be done with painter’s tape and a permanent marker, adhering the tape to the back of each piece.
Protect countertops, flooring, appliances, and walls using drop cloths or plastic sheeting. Secure the coverings with painter’s tape to prevent them from shifting during the work. Good ventilation is essential, so open windows and doors, and consider using a fan to circulate air. If using chemical strippers or spray finishes, wearing a respirator is strongly recommended to protect against harmful fumes.
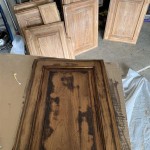
Next, inspect the cabinets and drawer fronts for any damage, such as scratches, dents, loose joints, or water damage. Minor scratches and dents can be filled with wood filler, while loose joints may require gluing and clamping. Severely damaged cabinets may require replacement, but often they can be repaired using wood replacement products or by consulting with a professional cabinet repair service.
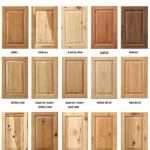
Consider the existing finish type. Is it paint, varnish, lacquer, or something else? This will influence the choice of stripping method. Test a small inconspicuous area with different strippers to determine which one works best. Avoid harsh chemicals that can damage the wood itself. After the assessment, create a shopping list of all the necessary materials and tools, based on the identified needs and the chosen refinishing approach.
2. Stripping the Old Finish
Removing the old finish is a critical step in the refinishing process, as it provides a clean and even surface for the new finish to adhere to. There are several methods for stripping cabinets, each with its own advantages and disadvantages. The most common methods include chemical stripping, sanding, and heat gun removal.
Chemical Stripping: Chemical strippers are available in liquid, gel, or paste form. Gel and paste strippers are particularly useful for vertical surfaces, as they cling better and prevent dripping. Apply the stripper liberally to the cabinet surfaces, following the manufacturer's instructions regarding dwell time. After the recommended time has elapsed, use a putty knife or scraper to remove the softened finish. Multiple applications may be necessary for stubborn finishes. After scraping, neutralize the surface with a solvent recommended by the stripper manufacturer. Use a brush and steel wool to remove any remaining residue and ensure a smooth, clean surface.
Sanding: Sanding is a more labor-intensive method but can be effective for removing thin finishes or for preparing the surface after chemical stripping. Start with a coarser grit sandpaper (e.g., 80-grit) to remove the bulk of the finish, then gradually move to finer grits (e.g., 120-grit, 220-grit) to smooth the surface. Use a sanding block or orbital sander for flat surfaces and a detail sander for corners and intricate areas. Be careful not to over-sand, which can damage the wood veneer or create uneven surfaces. Wearing a dust mask is essential when sanding to prevent inhalation of wood dust and finish particles.
Heat Gun Removal: A heat gun can be used to soften the finish, making it easier to scrape away. Hold the heat gun several inches from the surface and move it slowly and evenly to avoid scorching the wood. Use a putty knife or scraper to remove the softened finish as you go. Be careful when using a heat gun, as it can easily overheat and damage the wood or pose a fire hazard. Work in a well-ventilated area and wear heat-resistant gloves.
Regardless of the stripping method used, it is important to thoroughly clean the cabinets after stripping to remove any residue. Use a tack cloth to remove any dust or particles before proceeding to the next step. A final wipe with mineral spirits can help to ensure a clean and grease-free surface.
3. Repairing and Sanding
After the old finish has been removed, carefully inspect the cabinets for any remaining imperfections or damages. Now is the time to make necessary repairs before applying the new finish. Fill any holes, dents, or scratches with wood filler, applying it in thin layers and allowing it to dry completely before sanding smooth. For larger repairs, consider using wood epoxy or wood replacement compounds, following the manufacturer’s instructions.
Once the wood filler is dry, sand it smooth to blend seamlessly with the surrounding wood. Use progressively finer grits of sandpaper to achieve a smooth and even surface. Pay particular attention to edges and corners, ensuring they are smooth and rounded. Be careful not to over-sand, which can create dips or uneven areas.
Even if there is no obvious damage, a light sanding of all surfaces is recommended to create a better bond for the new finish. This process, often referred to as "scuff sanding," involves using a fine-grit sandpaper (e.g., 220-grit) to lightly abrade the surface. Scuff sanding creates microscopic scratches that provide "tooth" for the new finish to grip onto, resulting in a more durable and long-lasting finish.
After sanding, remove all dust and debris with a tack cloth. A vacuum cleaner with a brush attachment can also be used to remove dust from crevices and hard-to-reach areas. A final wipe with a damp cloth or mineral spirits can help to ensure that the surface is completely clean and ready for priming.
4. Priming and Painting/Staining
Priming is an essential step in the cabinet refinishing process, as it provides a uniform base for the paint or stain and helps to seal the wood. A good primer will also improve the adhesion of the topcoat and prevent the underlying wood grain from bleeding through. Choose a primer that is compatible with the type of finish you plan to use. For painting, a latex-based primer is generally recommended. For staining, a stain-blocking primer may be necessary to prevent uneven staining.
Apply the primer in thin, even coats using a brush, roller, or spray gun. A brush is suitable for smaller areas and intricate details, while a roller is more efficient for larger, flat surfaces. A spray gun provides the most even and professional-looking finish but requires more setup and cleanup. If using a brush or roller, avoid applying too much primer at once, as this can lead to drips and runs. Apply multiple thin coats rather than one thick coat.
Allow the primer to dry completely according to the manufacturer's instructions before proceeding to the next step. Once the primer is dry, lightly sand it with fine-grit sandpaper (e.g., 320-grit) to remove any imperfections and create a smooth surface. Remove any dust with a tack cloth before applying the paint or stain.
If painting, choose a high-quality cabinet paint in your desired color and sheen. Acrylic latex paints are a popular choice for cabinets due to their durability, ease of cleaning, and low VOC content. Apply the paint in thin, even coats using a brush, roller, or spray gun. Allow each coat to dry completely before applying the next. Multiple coats may be necessary to achieve full coverage and a uniform color. Lightly sand between coats with fine-grit sandpaper to remove any imperfections and create a smooth finish.
If staining, choose a wood stain that complements your kitchen decor. Oil-based stains penetrate the wood better and provide a richer color, while water-based stains are easier to clean up and have lower VOC content. Apply the stain evenly with a brush, cloth, or sponge. Allow the stain to penetrate the wood for the recommended amount of time, then wipe off any excess with a clean cloth. The longer the stain sits on the wood, the darker the color will be. Apply a clear topcoat, such as polyurethane or lacquer, to protect the stained surface and enhance its durability. Apply the topcoat in thin, even coats, allowing each coat to dry completely before applying the next. Lightly sand between coats with fine-grit sandpaper to remove any imperfections and create a smooth finish.
5. Reassembly and Hardware Installation
After the paint or stain and topcoat have fully dried and cured, it is time to reassemble the cabinets and install the hardware. Carefully reattach the doors and drawers to their corresponding cabinets, using the labels you created during disassembly. Ensure that the doors are aligned properly and that the hinges are securely fastened. Adjust the hinges as needed to achieve a flush and even fit.
Install the hardware, such as knobs, pulls, and handles, using the original screw holes. If you are replacing the hardware, you may need to drill new holes. Use a template or guide to ensure that the holes are accurately positioned and that the hardware is installed straight and evenly. Consider using new screws that are the correct length for the new hardware.
Reinstall any interior shelving or roll-out trays that were removed during disassembly. Ensure that the shelves are level and securely fastened. Clean the interior of the cabinets with a damp cloth before replacing any items. Inspect all surfaces to ensure no drips or imperfections and touch up any areas as necessary.
Once the reassembly is complete, inspect the cabinets for any remaining imperfections or adjustments that need to be made. Clean the surrounding area and remove any drop cloths or plastic sheeting. Step back and admire your newly refinished kitchen cabinets, which will provide a fresh and updated look to your kitchen.

Cabinet Refinishing Guide

The Fast Affordable Way To Upgrade Your Kitchen Cabinet Refinishing

Refinishing Kitchen Cabinets A Beautiful Mess

Cabinet Refinishing An 8 Step Guide For Pro Painters Ppc

The Easy Way To Refinish Kitchen Cabinets

How To Refinish Cabinets Like A Pro

Refinishing Kitchen Cabinets Modern Refacing Made Easy Wisewood

How To Refinish Wood Cabinets The Easy Way Love Remodeled

How To Refinish Kitchen Cabinets Diy

How To Refinish Wood Cabinets The Easy Way Love Remodeled
Related Posts