How to Refurbish Kitchen Cupboards: A Comprehensive Guide
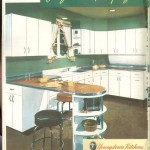
Transforming your kitchen cupboards can elevate the aesthetics and functionality of your kitchen space. Whether you're seeking a complete makeover or a subtle refresh, refurbishing your cupboards is a highly rewarding DIY project. This comprehensive guide will navigate you through the essential aspects of cupboard refurbishment, providing step-by-step instructions and valuable tips to ensure a successful outcome.
1. Preparation: Disassembly and Cleaning
Start by carefully disassembling your cupboards. Remove all doors, drawers, and hardware. Wash all removable components thoroughly with a mild detergent to remove grease and grime. Protect your work surfaces with a drop cloth to prevent scratches.
2. Repair and Reinforcement
Inspect your cupboard frames and boxes for any damage. Fill minor holes with wood filler, and use wood glue to secure loose joints. For more extensive damage, consider using wood clamps or biscuit jointers to reinforce the joints.
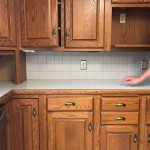
3. Refinishing: Painting or Staining
Prepare your surfaces for refinishing by sanding them lightly with medium-grit sandpaper. For a painted finish, apply a coat of primer to ensure the paint adheres well. Use a high-quality paintbrush or sprayer to apply two or three coats of your desired color. If staining, apply the stain evenly and remove any excess promptly to achieve the desired intensity.
4. Updating Hardware
Replace your old hardware with new and stylish handles, knobs, or pulls. Consider the style and finish of your cupboards and choose hardware that complements their aesthetics. Ensure the hardware fits properly and is well-secured.
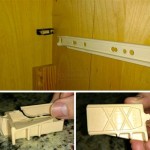
5. Upgrading Hinges and Drawers
Replace worn-out hinges with self-closing or soft-close hinges to enhance the functionality and durability of your cupboards. Upgrade drawers with full-extension slides to maximize storage capacity and improve accessibility.
6. Add Functional Accessories
Consider adding functional accessories such as lazy Susans, pull-out shelves, or drawer dividers to enhance the organization and accessibility of your cupboards. These accessories can make efficient use of space and keep your kitchen clutter-free.
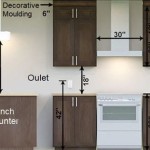
7. Reassembly and Installation
Once all components have been refurbished, reassemble your cupboards carefully. Ensure that doors and drawers align properly and open smoothly. Install the updated hardware and any accessories you have added. Finally, stand back and admire the results of your hard work.
Additional Tips:
*Use high-quality materials for durability and a professional finish.
*Allow ample drying time between coats to prevent smudging and ensure proper adhesion.
*If you are unsure about any step, consult a professional carpenter or painter.
*Remember that cupboard refurbishment is a gradual process. Take your time, and enjoy the transformation.

Cabinet Refinishing An 8 Step Guide For Pro Painters Ppc

Cabinet Refinishing Guide

The Fast Affordable Way To Upgrade Your Kitchen Cabinet Refinishing

Refinishing Kitchen Cabinets Modern Refacing Made Easy Wisewood

Refinishing Kitchen Cabinets A Beautiful Mess

The Easy Way To Refinish Kitchen Cabinets

How To Refinish Kitchen Cabinets Diy

How To Refinish Cabinets Like A Pro

Avoid These Mistakes How To Paint Cabinets That Are Already Painted Grace In My Space

How To Paint Kitchen Cabinets Without Sanding Or Priming
Related Posts