How To Rejuvenate Old Kitchen Cabinets
Kitchen cabinets often bear the brunt of daily life, enduring spills, stains, and general wear and tear. Instead of opting for a costly replacement, rejuvenating old kitchen cabinets can significantly refresh the space and extend the life of these essential features. This process involves several steps, ranging from thorough cleaning to refinishing or repainting, each contributing to a revitalized aesthetic.
Before embarking on the rejuvenation project, it is crucial to assess the condition of the cabinets. Look for signs of water damage, warping, or structural instability. Addressing these underlying issues is paramount before proceeding with cosmetic enhancements. Ignoring structural problems may lead to further deterioration and necessitate more extensive repairs down the line. A careful inspection will also help determine the most appropriate rejuvenation techniques for the specific cabinet material and damage present.
The success of any cabinet rejuvenation project hinges on proper preparation. This involves removing all hardware, such as knobs, pulls, and hinges. Labeling each piece and its corresponding location is beneficial for reassembly. The cabinets should then be thoroughly cleaned to remove grease, grime, and any existing coatings. Depending on the nature of the surface, various cleaning agents can be employed, ranging from mild detergents to specialized degreasers. Thorough rinsing and drying are essential after cleaning to ensure optimal adhesion of subsequent finishes.
Key Point 1: Deep Cleaning and Surface Preparation
Deep cleaning constitutes a critical initial step. Over time, kitchen cabinets accumulate layers of grease, food splatters, and dust, which can hinder the adhesion of paint or stain. A solution of warm water and dish soap is often sufficient for light cleaning. However, for more stubborn grime, a stronger degreaser may be necessary. Ensure the chosen cleaner is compatible with the cabinet material to prevent damage or discoloration.
For cabinets with a particularly heavy buildup of grease, consider using a commercial kitchen degreaser. Follow the manufacturer's instructions carefully, and always test the product in an inconspicuous area first to ensure it does not damage the finish. Apply the degreaser with a soft cloth or sponge, allowing it to sit for the recommended time before wiping it away with a clean, damp cloth. Rinse thoroughly with clean water and allow the cabinets to dry completely before moving on to the next step.
Surface preparation is equally important. This often involves sanding the cabinets to create a smooth and even surface for paint or stain to adhere to. The level of sanding required depends on the existing finish and the desired outcome. If the cabinets have a glossy finish, sanding is necessary to dull the surface and provide "tooth" for the new finish. For cabinets with a matte finish, light sanding may be sufficient to remove any imperfections and create a smooth surface.
Use appropriate sandpaper grits for the job. Start with a coarser grit, such as 120-grit, to remove any existing finish or imperfections. Then, move on to a finer grit, such as 220-grit, to smooth the surface and prepare it for painting or staining. Always sand in the direction of the wood grain, and be careful not to apply too much pressure, which can damage the cabinets.
After sanding, remove all dust and debris with a vacuum cleaner or tack cloth. This will ensure a clean surface for the new finish to adhere to. A tack cloth is a sticky cloth that effectively removes dust particles without leaving any residue. Consider using a primer after sanding. Primer helps to create a uniform surface, seals the wood, and improves the adhesion of the paint or stain.
Key Point 2: Refinishing vs. Repainting: Choosing the Right Approach
Once the cabinets are clean and prepared, the next crucial decision is whether to refinish or repaint them. Refinishing typically involves stripping the existing finish and applying a new stain or clear coat to highlight the natural wood grain. Repainting, on the other hand, involves applying a coat of paint to completely cover the existing finish. The choice depends on the desired aesthetic, the condition of the cabinets, and personal preference.
Refinishing is often the preferred option for cabinets made of high-quality wood with an attractive grain pattern. This approach allows the natural beauty of the wood to shine through, creating a warm and inviting atmosphere. However, refinishing requires more extensive preparation, including stripping the existing finish, sanding the wood smooth, and applying multiple coats of stain or clear coat. It is also important to note that refinishing may not be suitable for cabinets with significant damage or imperfections, as these will be visible through the new finish.
Repainting is a more versatile option that can be used to transform cabinets made of any material. It allows for a wide range of color choices and can effectively cover up imperfections or damage. Repainting is also a relatively straightforward process that can be completed by most homeowners with basic painting skills. However, it is important to choose a high-quality paint specifically designed for cabinets to ensure a durable and long-lasting finish.
When choosing between refinishing and repainting, consider the existing style of the kitchen and the desired overall look. If the goal is to maintain a traditional or rustic aesthetic, refinishing may be the best option. If the goal is to create a more modern or contemporary look, repainting may be more suitable. Consider the amount of time and effort that each approach requires. Refinishing typically takes longer and requires more skill than repainting. Ultimately, the best approach depends on individual needs and preferences.
When repainting, choose a paint formulated for kitchen cabinets. These paints often contain additives that make them more durable and resistant to grease and moisture. Consider using a primer before painting to ensure proper adhesion and a uniform finish. Apply thin, even coats of paint, allowing each coat to dry completely before applying the next. Avoid applying too much paint at once, which can lead to drips and runs.
Key Point 3: Hardware Selection and Installation
The final touch in rejuvenating old kitchen cabinets is the selection and installation of new hardware. New knobs, pulls, and hinges can dramatically change the look of the cabinets and enhance the overall aesthetic of the kitchen. Consider the style of the cabinets and the desired overall look when choosing new hardware. Options range from sleek and modern to classic and traditional, ensuring a wide variety of choices.
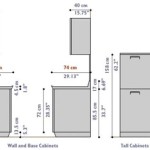
Before purchasing new hardware, measure the existing hardware to ensure that the new hardware will fit properly. Pay attention to the spacing between the screw holes and the size of the mounting screws. If replacing knobs with pulls, or vice versa, it may be necessary to drill new holes in the cabinet doors and drawers. Use a template to ensure accurate placement of the new holes.
When installing the new hardware, use a screwdriver or drill to securely attach the knobs, pulls, and hinges. Be careful not to overtighten the screws, which can damage the cabinets. If the screws are loose, consider using wood glue to secure them in place. Ensure that all the hardware is properly aligned and functioning smoothly. Misaligned hardware can be both unsightly and difficult to use.
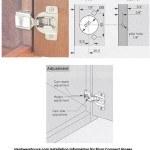
Beyond knobs and pulls, consider replacing the hinges. New hinges can not only update the look of the cabinets but also improve their functionality. Self-closing hinges, for example, can prevent doors from slamming shut and reduce wear and tear on the cabinet frames. Soft-close hinges are particularly popular, providing a quiet and smooth closing action. When replacing hinges, ensure that the new hinges are compatible with the existing cabinet frames and doors.
The choice of hardware finish can also significantly impact the overall look of the kitchen. Popular finishes include brushed nickel, stainless steel, oil-rubbed bronze, and matte black. Consider the existing appliances and fixtures in the kitchen when choosing a hardware finish. For example, if the kitchen has stainless steel appliances, brushed nickel or stainless steel hardware may be a good choice. If the kitchen has a more traditional aesthetic, oil-rubbed bronze hardware may be more suitable. The consistent application of a single, cohesive hardware style delivers the most uniform result.
Ultimately, rejuvenating old kitchen cabinets can be a cost-effective and rewarding project. By following these steps and paying attention to detail, homeowners can transform their kitchens and extend the life of their cabinets for years to come. The improvements made contribute significantly to the overall appeal and value of the home.

How To Re Worn Kitchen Cabinets Without A Complete Overhaul The Seattle Times

Cabinet Refinishing Guide

Refinishing Kitchen Cabinets Modern Refacing Made Easy Wisewood

Refacing Old Cabinets Premium

How To Re Wood Cabinets Trends Finishing

How To Refinish Cabinets Like A Pro

Refinish Kitchen Cabinets With Kilz Restoration Primer

25 Easy Ways To Update Kitchen Cabinets

How To Refinish Kitchen Cabinets N Hance

How To Re Varnish Cabinets Dans Le Lakehouse Refinishing Wood Kitchen Refacing
Related Posts