How to Remove Kitchen Cabinet Doors: A Comprehensive Guide
Removing kitchen cabinet doors is a common project undertaken for various reasons, including painting, refinishing, replacing hardware, or completely renovating the kitchen. While seemingly straightforward, the process requires careful attention to detail to avoid damaging the cabinets or the doors themselves. This article provides a comprehensive guide to safely and effectively remove kitchen cabinet doors, covering the necessary tools, preparation steps, and specific instructions for different types of hinges.
Before commencing any removal process, it's crucial to understand the anatomy of your kitchen cabinets. Cabinet doors are attached to the cabinet frame using hinges, which come in various styles and configurations. The most common types include concealed hinges (also known as European hinges), surface-mounted hinges, and mortise hinges. Identifying the type of hinge used in your kitchen is the first step toward a successful and damage-free removal.
Understanding the hardware involved is also beneficial. Screws are the primary fasteners, and knowing their type and size will aid in selecting the appropriate tools. Additionally, some hinges may feature adjustment screws that require specific handling during the removal process.
Preparing for Kitchen Cabinet Door Removal
Proper preparation is paramount to a successful removal project. This involves gathering the necessary tools, preparing the workspace, and taking precautionary measures to protect both the cabinets and the surrounding area.
The essential tools include:
- Screwdriver set: A variety of screwdrivers, including Phillips head and flathead, are essential for removing different types of screws.
- Drill/Driver (optional): A power drill with screwdriver bits can expedite the process, especially when removing numerous doors. However, caution should be exercised to avoid stripping the screws.
- Pencil: For marking the position of hinges and doors.
- Painter's tape: For labeling doors and hardware.
- Utility knife: For scoring paint or caulk around the hinges.
- Safety glasses: To protect your eyes from debris.
- Work gloves: To protect your hands and provide a better grip.
- Step ladder (if needed): For reaching upper cabinets.
- Drop cloths or blankets: To protect the floor and countertops.
- Small containers or bags: For storing screws and hardware.
Before starting, clear the countertop space around the cabinets. Remove any items that could obstruct your work or be damaged during the process. Cover the countertops and floor with drop cloths or blankets to protect them from scratches and dust. Ensure adequate lighting to clearly see the screws and hinges.
A crucial step in preparation is labeling. Use painter's tape and a pencil to label each door and its corresponding cabinet. This will simplify the reinstallation process when the time comes. Also, label the hinges themselves, indicating which door and cabinet they belong to. This is particularly important if the hinges are adjustable, as their specific settings should be maintained.
For painted cabinets, carefully score the paint around the edges of the hinges with a utility knife. This will prevent the paint from chipping or peeling when the screws are removed. Be gentle and avoid cutting into the wood.
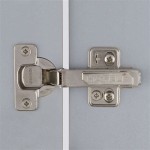
Removing Concealed (European) Hinges
Concealed hinges are commonly found in modern kitchens. These hinges are typically adjustable and are hidden from view when the door is closed. Removing them requires a specific technique.
Locate the screws that secure the hinge to the cabinet door and the cabinet frame. Typically, there are two to three screws on each side. These screws usually have a Phillips head.
Using a screwdriver or drill/driver, carefully remove the screws from the hinge that is attached to the cabinet door first. Support the door with your free hand as you remove the last screw to prevent it from falling. Gently detach the door from the cabinet frame.
Once the door is removed, unscrew the remaining portion of the hinge from the cabinet frame. Store the screws and hinges in labeled containers or bags. Pay attention to any adjustment screws on the hinge. These screws are used to fine-tune the alignment of the door. Avoid disturbing these screws unless you intend to adjust the door alignment during reinstallation. If you do intend to adjust the alignment, mark the original position of the screws before making any changes.
Concealed hinges often have a clip-on mechanism that allows the door to be easily detached. In some cases, there will be a small lever or button on the hinge. Pressing this lever or button releases the door from the hinge plate that is attached to the cabinet frame. Inspect the hinge closely to identify the release mechanism before attempting to force anything.
Remember to document the position and orientation of each hinge before removing it. This can be done by taking photos or making sketches. This will be invaluable when reinstalling the doors, ensuring that they are properly aligned.
Removing Surface-Mounted Hinges
Surface-mounted hinges are visible when the door is closed. They are typically more straightforward to remove than concealed hinges, but still require careful execution.
Identify the screws that secure the hinge to the cabinet door and the cabinet frame. These screws are usually located on the surface of the hinge and are visible from both the front and the back of the door.
Using a screwdriver or drill/driver, carefully remove the screws from the hinge that is attached to either the cabinet door or the cabinet frame. Supporting the door with your free hand, detach the door from the cabinet frame. Repeat the process to remove the remaining screws from the other side of the hinge. Store the screws and hinges in labeled containers or bags.
For older cabinets, the screws may be rusted or painted over. If the screws are difficult to remove, try applying a penetrating oil, such as WD-40, to loosen them. Allow the oil to sit for a few minutes before attempting to remove the screws. Be cautious when applying penetrating oil, as it can stain the wood. Wipe away any excess oil immediately.
Surface-mounted hinges can come in a variety of styles, including wrap-around hinges and butterfly hinges. The removal process is generally the same for all types of surface-mounted hinges. However, pay attention to the specific configuration of the hinge and ensure that you remove all of the screws before attempting to detach the door.
Inspect the hinge for any signs of damage or wear. If the hinge is damaged, consider replacing it during the reinstallation process. Replacements hinges are readily available at most hardware stores.
Removing Mortise Hinges
Mortise hinges are recessed into both the cabinet door and the cabinet frame. Removing them requires a bit more care to avoid damaging the surrounding wood.
Locate the screws that secure the hinge to the mortise in the cabinet door and the cabinet frame. These screws are typically countersunk flush with the surface of the hinge.
Using a screwdriver or drill/driver, carefully remove the screws from the hinge. Support the door as you remove the last screw. Since the hinge is mortised into the wood, it may be necessary to gently pry the door away from the cabinet frame. Use a thin, flat object, such as a putty knife or a thin piece of wood, to avoid damaging the wood. Insert the object between the door and the frame and gently apply pressure to separate the door from the frame.
Once the door is detached, carefully remove the hinge from the mortise in the cabinet frame. Again, use a thin, flat object to gently pry the hinge out of the mortise if necessary. Store the screws and hinges in labeled containers or bags.
Mortise hinges are often held in place with a tight fit. If the hinge is difficult to remove, avoid using excessive force, as this could damage the mortise. Instead, try tapping the hinge gently with a hammer to loosen it. Protect the hinge with a piece of wood to prevent marring the surface.
Before reinstalling mortise hinges, ensure that the mortise is clean and free of debris. If the mortise is damaged, it may be necessary to repair it before reinstalling the hinge. Wood filler can be used to fill any gaps or cracks in the mortise.
After removing all the doors, thoroughly clean the cabinet frames and the surrounding area. This will prepare the cabinets for painting, refinishing, or any other planned renovations.
Remember to keep all the hardware organized and labeled to simplify the reinstallation process. Taking photographs or making sketches of the hinge positions can also be extremely helpful.
By following these instructions carefully, you can safely and effectively remove your kitchen cabinet doors without causing damage. This will allow you to proceed with your planned renovations with confidence.

How To Remove Kitchen Cabinets Budget Dumpster

Do You Have A Maid And Other Q S About Open Shelving The Inspired Room

Open Kitchen Display Shelves

Removing Cabinet Doors Without Causing Damage Now

Do You Have A Maid And Other Q S About Open Shelving The Inspired Room

Budget Kitchen Remove Doors On Cabinets For Instant Open Shelving Houzz

Add Function And Style To Your Kitchen By Removing Cabinet Doors Steven Miller

Removing Kitchen Cabinet Doors For Open Shelving Google Search Home Decor Painting Cabinets Renovation

Do You Have A Maid And Other Q S About Open Shelving The Inspired Room

Budget Kitchen Remove Doors On Cabinets For Instant Open Shelving Houzz Au
Related Posts