How To Remove Kitchen Wall Tiles
Removing kitchen wall tiles can seem like a daunting task, but it's actually quite straightforward with the right tools and techniques. Whether you're updating your kitchen decor or repairing damaged tiles, this guide will provide you with a step-by-step approach to removing kitchen wall tiles safely and efficiently.
1. Safety First
Before you begin, it's crucial to ensure your safety. Wear protective gear, including gloves, safety glasses, and a dust mask, as removing tiles can generate dust and debris. Additionally, turn off the power to the kitchen and disconnect any electrical appliances in the area.
2. Gather the Necessary Tools
To remove kitchen wall tiles effectively, you'll need the following tools:
- Tile removal tool (e.g., oscillating multi-tool, hammer and chisel)
- Putty knife or scraper
- Grout removal tool
- Sponge or damp cloth
- Bucket
- Safety glasses
- Gloves
- Dust mask
3. Remove the Grout
The first step is to remove the grout around the tiles. Use a grout removal tool or a utility knife to carefully scrape out the grout along the edges of the tiles. Avoid damaging the tiles or the wall surface.
4. Score the Tiles
If the tiles are particularly stubborn, you may need to score them before removing them. Use a sharp utility knife or a tile scorer to make shallow cuts in the glaze of the tiles. These cuts will create weak points that will help you break the tiles apart.
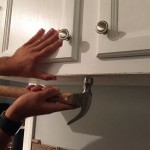
5. Remove the Tiles
Now it's time to remove the tiles. Use a tile removal tool, such as an oscillating multi-tool with a tile removal blade or a hammer and chisel, to carefully pry the tiles loose from the wall. Start at a corner tile and work your way towards the center. Apply gentle pressure and avoid breaking the tiles.
6. Clean the Wall Surface
Once all the tiles are removed, you'll need to clean the wall surface thoroughly. Use a damp sponge or cloth to wipe away any remaining grout or adhesive. If necessary, you can use a mild cleaning solution to remove stubborn residue.
7. Repair Any Damage
Inspect the wall surface for any damage caused during tile removal. If there are any holes or cracks, you'll need to repair them before installing new tiles. Use a patching compound or caulk to fill in any gaps or uneven areas.
8. Dispose of the Tiles
Finally, dispose of the old tiles properly. Wrap them in plastic or cardboard and place them in a designated disposal bin. Do not throw the tiles in your regular trash, as they can damage the equipment at the landfill.
Additional Tips
- If the tiles are particularly large or heavy, consider using a pry bar or crowbar to assist in removal.
- Be patient and take your time. Avoid rushing the process, as this can lead to damage or injury.
- If you encounter any electrical wires or plumbing lines behind the tiles, stop immediately and contact a qualified electrician or plumber.
- If you're not confident in your ability to remove the tiles yourself, don't hesitate to hire a professional tile installer.
Removing kitchen wall tiles can be a satisfying and rewarding DIY project. By following these steps and taking the necessary precautions, you can safely and effectively update your kitchen with new tiles.

How To Remove A Tile Backsplash Homeserve Usa

Easy Diy Guide On Removing Tiles From Walls Fantastic Handyman Au

How To Remove Kitchen Backsplash Tiles Belk Tile

How To Remove Tile Backsplash Without Damaging Drywall Twelve On Main

How To Remove A Tile Backsplash From Kitchen Simply2moms

How To Remove Kitchen Backsplash Tiles Belk Tile

How To Remove Tile Backsplash In The Kitchen Making Maanita

How To Remove Tile Backsplash Without Damaging Drywall Twelve On Main

Removing Backsplash And Repairing Drywall Made With Grace Grit

How To Remove Old Tiles A Step By Guide Walls And Floors
Related Posts