How to Repair the Bottom of a Sink Cabinet
A common problem in many homes is damage to the bottom of a sink cabinet. This is frequently caused by water leaks, condensation, or spills from cleaning products. Over time, this moisture can lead to wood rot, mold growth, and structural weakening of the cabinet base. Repairing the bottom of a sink cabinet is a manageable task for many homeowners, saving the cost of replacing the entire cabinet. This article provides a detailed guide on how to assess the damage, gather necessary materials, and execute effective repair strategies.
The initial step involves a thorough inspection to determine the extent of the damage. This examination will dictate the necessary course of action, ranging from simple cleaning and sealing to more extensive repairs involving wood replacement. Ignoring the problem can lead to further deterioration, making the repair process more complex and expensive in the long run.
Assessing the Damage and Identifying the Cause
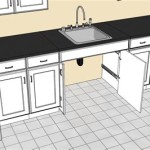
The first step is to empty the cabinet completely. Remove all items stored under the sink, including cleaning supplies, plumbing tools, and any other stored goods. This will provide a clear view of the cabinet floor and allow for a comprehensive assessment of the damage.
Next, visually inspect the cabinet floor. Look for signs of water damage, such as discoloration, staining, swelling, or warping of the wood. Pay close attention to areas around the plumbing fixtures, as these are common points of leakage. Probe the wood with a screwdriver or similar tool to check for soft spots or rot. If the screwdriver penetrates the wood easily, it indicates significant decay.
Once the visual inspection is complete, it is crucial to identify the source of the moisture. Check the plumbing connections under the sink, including the supply lines, drain pipes, and garbage disposal (if applicable). Look for any signs of leaks, such as dripping water or mineral deposits. Even small, slow leaks can cause significant damage over time. Examine the sink itself for cracks or leaks around the edges. Also, consider condensation; in humid environments, condensation can form on cold pipes and drip onto the cabinet floor.
If mold is present, it is important to address it safely. Wear a mask and gloves to prevent inhaling spores or coming into contact with the mold. Clean the affected area with a mold-killing solution, following the manufacturer's instructions carefully. Ensure adequate ventilation during and after the cleaning process. If the mold growth is extensive, it may be necessary to consult with a professional mold remediation specialist.
Based on the assessment, categorize the damage as minor, moderate, or severe. Minor damage might involve superficial staining or slight swelling of the wood. Moderate damage could include localized areas of rot and more significant swelling. Severe damage would involve extensive rot, structural weakening of the cabinet floor, and potential damage to the surrounding cabinet structure.
Gathering the Necessary Materials and Tools
The materials and tools required will depend on the extent of the damage and the chosen repair method. The following is a comprehensive list of commonly needed items:
Safety Gear: Safety glasses, gloves, and a dust mask or respirator are essential to protect against dust, debris, and potential hazards from cleaning solutions or mold.
Cleaning Supplies: A mild detergent, water, and a scrub brush are needed for cleaning the cabinet interior. Mold-killing solution is required if mold is present.
Measuring and Cutting Tools: A measuring tape, pencil, utility knife, saw (circular saw, jigsaw, or hand saw), and square are needed for measuring and cutting replacement wood.
Wood Repair Materials: For minor repairs, wood filler or epoxy putty can be used to fill small holes or cracks. For moderate to severe damage, replacement wood is required. This could be plywood, solid wood, or a composite material like PVC board. Choose a material that is resistant to moisture and suitable for the cabinet's construction.
Adhesives and Fasteners: Wood glue, construction adhesive, screws, or nails are needed to secure the replacement wood in place.
Sealing and Finishing Materials: Primer, paint or sealant, and a paintbrush or roller are needed to protect the repaired area from future moisture damage. Silicone caulk is useful for sealing gaps around the sink and plumbing fixtures.
Other Tools: A scraper, sandpaper, putty knife, drill, and screwdriver may also be needed, depending on the specific repair tasks.
Before starting the repair, ensure all materials and tools are readily available and organized. This will streamline the process and minimize delays.
Repairing Minor, Moderate, and Severely Damaged Cabinets
The repair process varies significantly depending on the extent of the damage. Here are detailed instructions for addressing minor, moderate, and severe levels of damage:
Minor Damage Repair: For minor damage, such as superficial staining or small cracks, the following steps can be taken:
1. Clean the affected area thoroughly with a mild detergent and water. Allow it to dry completely.
2. Sand the area lightly to remove any loose particles or rough edges.
3. Apply wood filler or epoxy putty to fill any small cracks or holes. Follow the manufacturer's instructions for application and drying time.
4. Sand the filled area smooth once the filler has dried.
5. Apply a primer to the repaired area to seal the wood and provide a good surface for paint.
6. Paint the repaired area to match the existing cabinet finish. Apply multiple coats if necessary for proper coverage.
7. Seal any gaps around the sink and plumbing fixtures with silicone caulk to prevent future water damage.
Moderate Damage Repair: For moderate damage, such as localized areas of rot or swelling, a partial replacement of the damaged wood is typically required:
1. Identify and mark the area of damaged wood that needs to be removed.
2. Use a saw to carefully cut out the damaged section. Cut along the edges of the marked area, being careful not to damage the surrounding cabinet structure.
3. Clean the exposed edges of the surrounding wood. Remove any loose particles or debris.
4. Measure the opening created by the removal of the damaged wood.
5. Cut a piece of replacement wood to match the dimensions of the opening. Ensure the replacement wood is the same thickness as the original cabinet floor.
6. Apply wood glue to the edges of the opening and to the back of the replacement wood.
7. Insert the replacement wood into the opening, pressing it firmly against the surrounding wood.
8. Secure the replacement wood with screws or nails. Drive the fasteners through the replacement wood and into the surrounding cabinet structure.
9. Fill any gaps around the edges of the replacement wood with wood filler or caulk.
10. Sand the repaired area smooth.
11. Prime and paint the repaired area to match the existing cabinet finish.
12. Seal any gaps around the sink and plumbing fixtures with silicone caulk.
Severe Damage Repair: For severe damage, such as extensive rot or structural weakening of the cabinet floor, a complete replacement of the cabinet floor may be necessary:
1. If the cabinet floor is a separate piece from the sides, carefully detach it. This may involve removing screws, nails, or glue.
2. Measure the dimensions of the old cabinet floor.
3. Cut a new piece of wood to match the dimensions of the old cabinet floor.
4. If the cabinet floor is integrated into the sides of the cabinet, carefully cut away the damaged portion, leaving enough of the original structure to attach a new base.
5. Attach the new cabinet floor to the existing cabinet structure using screws or nails and construction adhesive.
6. Ensure the new floor is level and securely attached.
7. Fill any gaps around the edges of the new floor with caulk.
8. Prime and paint the new cabinet floor to match the existing cabinet finish.
9. Seal any gaps around the sink and plumbing fixtures with silicone caulk.
Regardless of the repair method chosen, it is essential to ensure the repaired area is properly sealed to prevent future water damage. Apply a generous amount of silicone caulk around the sink and plumbing fixtures, and consider installing a sink base protector to provide an additional layer of protection against spills and leaks. Regular inspection of the under-sink area can help identify and address potential problems before they escalate into more serious and costly repairs.

Repairing A Water Damaged Sink Base Cabinet Floor

How To Replace That Old Rotted Out Sink Base Floor Step By

How To Replace Under The Sink Cabinet Base

Replace Sink Cabinet Floor

Under Sink Cabinet Repair Our Bright Road

Replace Cabinet Floor Under Sink Diy

How To Replace A Rotten Cabinet Bottom

Diy Replace Bottom Of Sink Cabinet Without Cutting Pipes Or Face

Under Sink Cabinet Repair Our Bright Road

Repair Sink Cabinet Water Damage Rot