How to Repair Laminate on Kitchen Cabinets
Laminate kitchen cabinets are a popular choice due to their durability and affordability. However, despite their resilience, laminate surfaces are susceptible to damage such as chips, scratches, bubbling, and delamination. Understanding how to address these issues can significantly extend the lifespan and maintain the aesthetic appeal of kitchen cabinetry. This article provides a comprehensive guide on repairing laminate on kitchen cabinets, addressing various types of damage and outlining the necessary steps and materials.
Identifying the Damage and Required Materials
Before initiating any repair work, a thorough assessment of the damage is crucial. The type and extent of the damage will dictate the appropriate repair method and required materials. Common types of laminate damage include:
- Chips and Scratches: These are typically superficial surface imperfections that can be addressed with color-matched fillers or touch-up markers.
- Bubbling: This occurs when the adhesive bond between the laminate and the underlying substrate weakens, often due to moisture exposure.
- Delamination: This involves the complete separation of the laminate from the substrate, requiring re-adhesion using appropriate adhesives.
- Edge Banding Damage: This refers to damage specifically to the thin strip of laminate covering the exposed edges of the cabinet panels.
Once the damage is identified, the necessary materials can be gathered. Essential materials for laminate repair typically include:
- Laminate Repair Paste or Filler: Used to fill chips and scratches. Choose a color that closely matches the existing laminate.
- Color-Matched Markers or Pencils: For concealing minor scratches and blending filled areas.
- Laminate Adhesive: A contact adhesive specifically designed for bonding laminate to substrates.
- Wood Glue: Suitable for repairing edge banding or securing loose pieces of the substrate.
- Clamps: Used to apply pressure during the adhesion process.
- Putty Knife or Spreader: For applying and smoothing fillers and adhesives.
- Sandpaper (Various Grits): Used for surface preparation and smoothing.
- Clean Cloths: For wiping surfaces and cleaning up excess adhesive.
- Heat Gun or Iron (Optional): May be needed to reactivate adhesive in some cases.
- Razor Blade or Utility Knife: For trimming excess material.
- Safety Glasses and Gloves: To protect eyes and hands during the repair process.
Repairing Chips and Scratches in Laminate
Minor chips and scratches are the most common type of damage encountered on laminate surfaces. Addressing these imperfections promptly can prevent them from worsening and maintain the overall appearance of the cabinets.
The repair process involves the following steps:
- Cleaning the Area: Thoroughly clean the damaged area and surrounding surface with a mild detergent and water. Remove any dirt, grease, or debris that could interfere with the adhesion of the repair material. Allow the area to dry completely.
- Applying Laminate Repair Paste or Filler: Using a putty knife or spreader, apply a small amount of laminate repair paste or filler to the chip or scratch. Overfill the area slightly to allow for sanding.
- Allowing the Filler to Dry: Allow the filler to dry completely according to the manufacturer's instructions. Drying times can vary depending on the type of filler used.
- Sanding the Filled Area: Once the filler is dry, carefully sand the filled area with fine-grit sandpaper (e.g., 320-grit) to blend it seamlessly with the surrounding laminate surface. Avoid applying excessive pressure during sanding to prevent scratching the surrounding area.
- Color Matching (Optional): If the color of the filler does not perfectly match the existing laminate, use a color-matched marker or pencil to blend the filled area. Apply the marker or pencil sparingly and blend the color with a clean cloth.
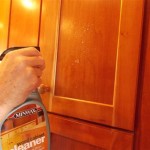
- Cleaning and Polishing: Clean the repaired area with a clean cloth to remove any sanding dust or residue. Polish the area with a laminate cleaner or polish to restore the surface shine.
Addressing Bubbling and Delamination
Bubbling and delamination indicate a more significant issue with the adhesive bond between the laminate and the underlying substrate. Repairing these problems requires re-establishing a strong adhesive bond.
The repair process for bubbling typically involves the following steps:
- Assessing the Bubble: Carefully examine the bubble to determine the extent of the delamination. If the bubble is small and the laminate is still relatively well-adhered, it may be possible to reactivate the existing adhesive.
- Applying Heat (Optional): If the adhesive appears to be weakened but not completely separated, use a heat gun or iron set to a low setting to gently heat the bubbling area. Apply heat in a circular motion to avoid scorching the laminate.
- Applying Pressure: While the adhesive is still warm, apply firm and even pressure to the bubbling area. Use a roller or a smooth, flat object to press the laminate firmly against the substrate. Hold the pressure for several minutes to allow the adhesive to re-bond.
- Clamping (If Necessary): If the bubble is large or the adhesive does not appear to be re-bonding with heat and pressure alone, use clamps to hold the laminate in place while the adhesive sets. Place a piece of wood or cardboard between the clamps and the laminate surface to prevent damage.
- Allowing Adhesive to Set: Allow the adhesive to set completely according to the manufacturer's instructions. This may take several hours or even overnight.
For delamination, where the laminate has completely separated from the substrate, the repair process is slightly different:
- Cleaning Surfaces: Thoroughly clean both the back of the laminate and the surface of the substrate. Remove any loose debris, old adhesive, or contaminants that could interfere with the new adhesive bond.
- Applying Laminate Adhesive: Apply a thin, even coat of laminate adhesive to both the back of the laminate and the surface of the substrate. Follow the manufacturer's instructions regarding drying time and application techniques.
- Aligning the Laminate: Carefully align the laminate with the substrate, ensuring that it is properly positioned.
- Applying Pressure: Apply firm and even pressure to the entire surface of the laminate. Use a roller or a smooth, flat object to press the laminate firmly against the substrate.
- Clamping: Use clamps to hold the laminate in place while the adhesive sets. Place a piece of wood or cardboard between the clamps and the laminate surface to prevent damage.
- Allowing Adhesive to Set: Allow the adhesive to set completely according to the manufacturer's instructions. This may take several hours or even overnight.
- Trimming Excess Adhesive: Once the adhesive has set, use a razor blade or utility knife to carefully trim away any excess adhesive that has squeezed out from the edges of the laminate.
Repairing Damaged Edge Banding
Edge banding is a thin strip of laminate that covers the exposed edges of cabinet panels, providing a finished look and protecting the substrate from moisture. Damaged edge banding can detract from the overall appearance of the cabinets. Repairing or replacing damaged edge banding is a relatively straightforward process.
The repair process depends on the extent of the damage. If the edge banding is only slightly damaged (e.g., chipped or peeling), it may be possible to repair it with adhesive.
- Cleaning the Area: Clean the damaged area and the surrounding surface with a clean cloth. Remove any loose debris or old adhesive.
- Applying Wood Glue: Apply a small amount of wood glue to the back of the loose edge banding and to the surface of the substrate.
- Clamping: Clamp the edge banding in place until the glue sets. Use a piece of wood or cardboard between the clamp and the edge banding to protect the surface.
- Wiping Excess Glue: Wipe away any excess glue that squeezes out from the edges of the edge banding with a damp cloth.
If the edge banding is severely damaged or missing, it will need to be replaced. You can purchase replacement edge banding from most home improvement stores. To replace edge banding:
- Removing Old Edge Banding: Carefully remove the old edge banding using a heat gun or iron to soften the adhesive. Use a putty knife or scraper to gently pry the edge banding away from the substrate.
- Cleaning the Surface: Clean the surface of the substrate thoroughly to remove any remaining adhesive or debris.
- Cutting the New Edge Banding: Cut the new edge banding to the correct length using a utility knife or scissors.
- Applying Contact Cement: Apply contact cement to both the back of the new edge banding and to the edge of the cabinet. Allow the contact cement to dry for a few minutes until it is tacky to the touch.
- Applying the Edge Banding: Carefully align the new edge banding with the edge of the cabinet and press it firmly into place. Use a J-roller or similar tool to apply even pressure to the entire surface of the edge banding.
- Trimming Excess Edge Banding: Use a utility knife or edge banding trimmer to trim away any excess edge banding.
- Finishing the Edges: Smooth the edges of the edge banding with a file or sandpaper to remove any sharp edges.
By following these detailed instructions, individuals can effectively repair various types of damage to laminate kitchen cabinets, prolonging their lifespan and maintaining their aesthetic appeal. Proper preparation, selection of appropriate materials, and careful execution are essential for achieving successful and long-lasting repairs.

How Do I Fix Laminate Cabinets Hometalk

My Laminate Drawers And Doors Are Ling Ing Help Hometalk

Painting Laminate Kitchen Cabinets Cuckoo4design

How Do You Paint Laminate Kitchen Cupboards When They Re Ling Hometalk

Painting Laminate Kitchen Cabinets Cuckoo4design

The Easiest Way To Repair Laminate Countertop Chips Exquisitely Unremarkable

How To Repair Ling Veneer On Particle Board Cabinets Handhills

How Do I Fix Laminate Cabinets Hometalk

How Can I Repair Ling Kitchen Cabinet Laminate Hometalk

How To Paint Water Damaged Laminate Kitc Bunnings Work Community