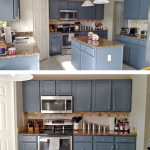
How to Repair Old Kitchen Cupboards
Are your kitchen cabinets looking a little worse for wear? Don't despair! With some effort and the right materials, you can refresh your cabinets and give them a new life. Here's a step-by-step guide to help you restore your old kitchen cupboards and enhance the look of your kitchen.
Materials Required:
* Sandpaper (various grits) * Tack cloth * Wood filler * Putty knife * Primer * Paint or stain * Paintbrush or roller * Clear finish (optional) * Screwdriver (for hardware removal) * Cleaning solution (for cleaning surfaces) * Safety goggles * Dust maskStep 1: Prepare the Cabinets
Begin by removing all the cabinet doors and hardware. Clean the surfaces of the cabinets thoroughly with a cleaning solution. Remove any existing paint or finish by sanding with medium-grit sandpaper. Use a tack cloth to wipe away the dust from sanding.
Step 2: Repair Damage
Inspect the cabinets for any dents, scratches, or cracks. Fill in the damaged areas with wood filler using a putty knife. Allow the wood filler to dry completely and sand it smooth with fine-grit sandpaper.
Step 3: Prime and Paint
Apply a coat of primer to the cabinets to create a smooth base for the paint or stain. Allow the primer to dry thoroughly. Once the primer is dry, apply two to three coats of paint or stain. Use a paintbrush or roller for smooth, even application. Allow each coat to dry completely before applying the next one.
Step 4: Apply Clear Finish (Optional)
For added durability and protection, you can apply a clear finish over the paint or stain. This step is optional, but it can help seal and protect the cabinets from wear and tear.
Step 5: Reassemble the Cabinets
Once the paint or stain is dry and the clear finish is applied (if desired), reassemble the cabinets. Attach the doors and hardware back onto the cabinets. Adjust the hinges and knobs as needed to ensure proper functionality.
Tips for Painting Kitchen Cabinets:
* Use high-quality paint or stain for better coverage and durability. * Brush or roll the paint in thin, even coats. * Allow ample drying time between coats. * Consider using a specialized cabinet paint for increased resistance to wear and tear. * Protect the surrounding surfaces and floors from paint splatters. * Open windows or use a fan for ventilation while painting.Tips for Repairing Kitchen Cabinets:
* Use wood filler that matches the color of the wood for seamless repairs. * Allow the wood filler to dry completely before sanding to prevent tearing. * If the damage is extensive, consider consulting a professional cabinet repair specialist. * Regularly clean and maintain your cabinets to prevent further deterioration.
Cabinet Restoration Painting Old Peg Furniture Services

Cabinet Refinishing Guide

Avoid These Mistakes How To Paint Cabinets That Are Already Painted Grace In My Space

Kitchen Cabinets 9 Easy Repairs Diy Family Handyman

How To Re Wood Cabinets Trends Finishing

Refinishing Kitchen Cabinets Modern Refacing Made Easy Wisewood

Refinish Kitchen Cabinets With Kilz Restoration Primer

Kitchen Cabinet Repair 101 Woodworking Services Fort Collins

15 Diy Kitchen Cabinet Makeovers Before After Photos Of Cabinets

Painted Kitchen Cabinets One Year Later The Palette Muse
Related Posts