How to Replace a Kitchen Sink Base Cabinet
Replacing a kitchen sink base cabinet can significantly improve the functionality and aesthetics of a kitchen. This project, while potentially time-consuming, is achievable for homeowners with basic carpentry skills and a willingness to learn. This article outlines the steps involved in safely and effectively removing an old sink base cabinet and installing a new one.
Preparation and Planning
Before beginning any demolition or installation, careful planning is essential. This stage involves assessing the existing situation, selecting the appropriate replacement cabinet, and gathering the necessary tools and materials.
Assessing the Existing Situation: Begin by thoroughly inspecting the existing sink base cabinet. Note its dimensions, how it is attached to adjacent cabinets, and the condition of the plumbing and electrical connections (if any). Photographing the setup before disassembly can be invaluable for reassembly. Document the type of countertop, how it's attached to the cabinet, and the position of the sink drain and water supply lines. Identify any potential challenges, such as damaged flooring, uneven walls, or concealed plumbing.
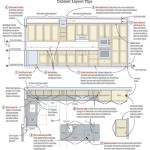
Selecting the Replacement Cabinet: Choosing the right replacement cabinet is critical. Measure the existing cabinet's width, depth, and height to ensure the new cabinet will fit seamlessly into the existing space. Consider the style, material, and finish of the new cabinet to match the overall kitchen design. Confirm the new cabinet can accommodate the existing sink and plumbing configurations. Options range from standard pre-fabricated cabinets available at home improvement stores to custom-built cabinets tailored to specific dimensions and design preferences.
Gathering Tools and Materials: A comprehensive toolkit is necessary for a successful cabinet replacement. Essential tools include:
*Screwdrivers (Phillips and flathead)
*Adjustable wrench and pipe wrench
*Pliers
*Utility knife
*Safety glasses
*Work gloves
*Level
*Stud finder
*Measuring tape
*Pencil
*Reciprocating saw or oscillating multi-tool (for cutting caulk and potentially removing stubborn fasteners)
*Drill with various drill bits (for pilot holes and attaching the new cabinet)
*Shims (for leveling the cabinet)
*Caulk gun and construction adhesive
*Paper towels or rags
*Buckets
*New shut-off valves (optional, but recommended if the existing ones are old or corroded)
*New supply lines (optional, but recommended for a fresh start)
*Plumber's putty or silicone sealant (for sealing the sink)
*Construction screws or cabinet screws
Additionally, ensure you have the necessary safety equipment, including safety glasses and work gloves, to protect yourself during the project.
Removing the Old Cabinet
The removal process requires careful disconnection of plumbing and electrical services, followed by detaching the cabinet from the countertop and adjacent cabinets.
Disconnecting Plumbing and Electrical: This is a crucial step and should be performed with extreme caution. Start by shutting off the water supply to the sink. Locate the shut-off valves under the sink and turn them clockwise until they are completely closed. Open the faucet to relieve any remaining pressure in the lines. Place a bucket beneath the shut-off valves to catch any residual water. Disconnect the supply lines from the shut-off valves using an adjustable wrench. If the existing shut-off valves are old or corroded, now is the ideal time to replace them. Disconnect the drain line from the sink drain using a pipe wrench or pliers. Have a bucket ready to catch any water remaining in the P-trap. If there's a garbage disposal, disconnect it from the sink flange and the electrical outlet. If the cabinet contains any electrical wiring for the disposal or other appliances, disconnect the power at the breaker box and carefully disconnect the wiring, following all electrical safety guidelines. Use a voltage tester to confirm the power is off before handling any wiring.
Detaching the Countertop: The method for detaching the countertop depends on its material and how it was installed. Solid surface countertops (granite, quartz, etc.) are often attached with construction adhesive and screws from underneath. Carefully inspect the underside of the countertop for screws and remove them. Use a utility knife or oscillating multi-tool to cut through any caulk or adhesive that may be holding the countertop in place. If the countertop is tile, it might be set in mortar. In this case, professional assistance may be required to avoid damaging the surrounding tiles. For laminate countertops, the process is similar, but the adhesive may be less strong. Once the fasteners and adhesive are removed, carefully lift the countertop off the cabinet. This may require assistance, especially for heavier countertops. Place the countertop in a safe location to prevent damage.
Removing the Cabinet: Once the countertop is removed, the cabinet can be detached from its surroundings. Remove any screws or fasteners that are holding the cabinet to the adjacent cabinets or the wall studs. Use a stud finder to locate the studs behind the cabinet. If the cabinet is attached to the wall with nails, use a pry bar to gently separate it from the wall. Be careful not to damage the drywall. Once the cabinet is detached, carefully lift it out of the space. This may require some maneuvering, especially if the cabinet is heavy or awkwardly shaped. Inspect the floor beneath the old cabinet for any damage or leaks. If necessary, repair the flooring before installing the new cabinet.
Installing the New Cabinet
The installation process involves ensuring the new cabinet is level, securing it to the wall and adjacent cabinets, and reconnecting the plumbing and electrical services.
Leveling the Cabinet: Before securing the new cabinet, ensure it is perfectly level. Place the cabinet in the designated space and use a level to check its alignment both horizontally and vertically. If the cabinet is not level, use shims to adjust its height. Place the shims under the base of the cabinet until it is level. Once the cabinet is level, mark the locations of the shims. Secure the shims to the cabinet with construction adhesive or screws to prevent them from shifting. Double-check the level after securing the shims.
Securing the Cabinet: Once the cabinet is level, secure it to the wall studs and adjacent cabinets. Use a stud finder to locate the studs behind the cabinet. Drill pilot holes through the back of the cabinet into the studs. Use construction screws or cabinet screws to attach the cabinet to the studs. Ensure the screws are long enough to penetrate the studs securely. If the cabinet is being installed between two existing cabinets, use screws to attach it to the adjacent cabinets. Clamp the cabinets together before drilling to ensure they are aligned properly. Use shims if necessary to ensure the cabinets are flush.
Reconnecting Plumbing and Electrical: With the cabinet securely in place, reconnect the plumbing and electrical services. Begin by reinstalling the countertop. Follow the reverse of the removal process, applying construction adhesive and securing it with screws from underneath. Apply a bead of caulk along the back edge of the countertop where it meets the wall to prevent water from seeping behind the cabinet. Reconnect the sink drain and supply lines. Use plumber's putty or silicone sealant to seal the sink drain to the sink. Ensure all connections are tight to prevent leaks. Turn the water supply back on slowly and check for leaks. If any leaks are detected, tighten the connections or replace the fittings as necessary. Reconnect the garbage disposal and any other electrical appliances that were disconnected. Ensure all wiring is properly connected and insulated. Turn the power back on at the breaker box and test the appliances.
Final Adjustments and Cleanup: Once the plumbing and electrical connections are complete, make any necessary final adjustments. Check the alignment of the cabinet doors and drawers and adjust the hinges or slides as needed. Clean up any debris or spills and dispose of the old cabinet and materials properly. Apply caulk along any gaps or seams to create a clean and finished look.
By following these steps carefully, homeowners can successfully replace a kitchen sink base cabinet and significantly improve the functionality and appearance of their kitchen.

How To Replace A Kitchen Sink Base Cabinet Vevano

How To Replace A Kitchen Sink Base Cabinet Vevano

Diy Replace Bottom Of Sink Cabinet Without Cutting Pipes Or Face

How To Replace A Kitchen Sink Base Cabinet Vevano

How Can I Replace A Kichen Island Sink Base Cabinet Hometalk

When Repairing The Bottom Of Cabinet Below Kitchen Sink Do I Need To Take Damaged Section Out Or Can Simply Put Plywood On Top It Quora

How To Install An Apron Sink In A Stock Cabinet Pneumatic Addict

Kitchen Removing Base Cabinet Countertops Backsplash

Replace Sink Cabinet Floor

How To Replace A Kitchen Sink Base Cabinet Vevano