How to Replace Cabinets in a Mobile Home
Replacing cabinets in a mobile home can significantly enhance its aesthetic appeal and functionality. However, it is important to acknowledge that mobile home construction often differs from traditional residential building practices. This necessitates a tailored approach to cabinet replacement, considering factors such as space constraints, wall construction, and potential plumbing or electrical considerations. This detailed guide provides a comprehensive overview of the process, enabling homeowners to undertake the project successfully.
Assessing the Existing Situation and Planning
Before embarking on the cabinet replacement process, a thorough assessment of the existing situation is crucial. This involves evaluating the condition of the current cabinets, identifying any underlying issues, and developing a detailed plan for the replacement.
First, inspect the existing cabinets for signs of damage, such as water damage, warping, or structural weaknesses. Document any areas requiring repair or attention beyond simple cabinet replacement. Addressing these issues proactively can prevent future problems and ensure the longevity of the new installation.
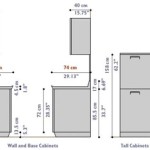
Next, take precise measurements of the existing cabinets, including the height, width, and depth of each unit. These measurements will serve as a reference point when selecting new cabinets and ensuring a proper fit. It is also essential to document the location of any plumbing or electrical fixtures that may be affected by the cabinet replacement. This allows for planning around these utilities and minimizing the risk of damage during the installation process.
Furthermore, it is advisable to create a detailed layout plan showing the placement of the new cabinets. This plan should consider the overall flow of the room, the location of appliances, and the desired functionality of the space. Utilizing design software or sketching a detailed diagram can aid in visualizing the finished product and making informed decisions regarding cabinet selection and placement. Consider the placement of electrical sockets and light switches, as well as other utilities that might be affected by the new cabinets. Ensure that all outlets are still accessible and that the new cabinet layout does not obstruct any essential services.
Finally, establish a budget for the project. This should include the cost of the new cabinets, any necessary tools or materials, and potential labor costs if professional assistance is required. Thorough planning and budgeting can help prevent unexpected expenses and ensure that the project remains within financial constraints.
Selecting the Right Cabinets
Choosing the appropriate cabinets is a critical step in the replacement process. Mobile home cabinets often differ in size and construction from standard residential cabinets. Therefore, selecting cabinets specifically designed for mobile homes or adapting standard cabinets to fit the available space is essential.
Consider the construction materials of the cabinets. Options range from particleboard and MDF (Medium-Density Fiberboard) to solid wood. While solid wood offers superior durability and aesthetic appeal, it can also be more expensive. Particleboard and MDF are more affordable options but may be more susceptible to water damage and wear and tear. Evaluate the trade-offs between cost and durability to determine the best material for the specific needs and budget.
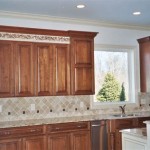
Explore various cabinet styles and finishes to complement the overall aesthetic of the mobile home. Options include traditional, contemporary, and minimalist designs, each offering a unique look and feel. Consider the existing décor and color scheme of the room when selecting cabinet styles and finishes to ensure a cohesive and visually appealing result. Sample cabinet doors and finishes can be obtained from most retailers to visualize the actual product in the space and make an informed decision.
Pay close attention to the dimensions of the new cabinets to ensure they fit within the available space. Mobile homes often have limited space, so choosing cabinets that maximize storage without overcrowding the room is crucial. Consider utilizing space-saving features such as pull-out shelves, corner cabinets, and vertical storage solutions to optimize the functionality of the cabinets.
Once the appropriate cabinets have been selected, carefully inspect them upon delivery to ensure they are free from damage or defects. Verify that all components are included and that the cabinets match the specified dimensions and finishes. Addressing any issues promptly can prevent delays and complications during the installation process.
Removing the Existing Cabinets
The removal of the existing cabinets requires careful attention to avoid damaging the surrounding walls, flooring, or plumbing and electrical fixtures. A systematic approach is essential for a smooth and efficient removal process.
Prior to beginning the removal, disconnect any plumbing or electrical fixtures that are connected to the cabinets. This may involve shutting off the water supply to the sink or disconnecting electrical wiring to under-cabinet lighting. Exercise caution when working with plumbing and electrical systems and consider consulting with a qualified professional if unsure about any aspect of the process.
Next, remove any doors, drawers, and hardware from the existing cabinets. This will lighten the load and make the cabinets easier to maneuver. Use a screwdriver or drill to remove hinges, screws, and other fasteners. Label each component to ensure proper reassembly if they are to be reused.
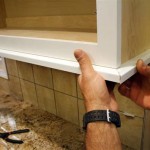
Locate the screws or fasteners that secure the cabinets to the wall. These are typically located along the top and bottom of the cabinet frame. Use a drill or screwdriver to remove these fasteners, taking care not to damage the wall behind the cabinets. If the cabinets are glued to the wall, use a utility knife to carefully score along the edges to break the adhesive bond.
Once the cabinets are detached from the wall, carefully lift them away, supporting their weight to prevent them from falling and causing damage. If the cabinets are particularly heavy or unwieldy, enlist the help of another person to assist with the removal. Take care when removing upper cabinets, as they can be heavier and more difficult to maneuver.
After the cabinets have been removed, inspect the wall behind them for any damage or issues that need to be addressed. Repair any holes, cracks, or water damage before installing the new cabinets. Clean the wall thoroughly to remove any dust, debris, or adhesive residue.
Installing the New Cabinets
The installation of the new cabinets requires precision and attention to detail to ensure a secure and level fit. Following a systematic approach and utilizing appropriate tools and techniques is essential for a successful installation.
Start by locating the wall studs using a stud finder. Mark the location of the studs on the wall, as these will serve as anchor points for attaching the cabinets. Ensure the cabinets are level by using shims as necessary. Level cabinets are crucial for the proper functioning of doors and drawers, and for the overall aesthetic appeal of the installation.
Begin by installing the upper cabinets first. Lift each cabinet into place, aligning it with the marked stud locations. Use a drill to pre-drill pilot holes through the cabinet frame and into the wall studs. Secure the cabinet to the wall with screws, ensuring they are long enough to penetrate deeply into the studs.
Once the upper cabinets are installed, proceed with the installation of the base cabinets. Position each cabinet in its designated location, aligning it with the wall and ensuring it is level. Use shims to adjust the height of the cabinets as needed. Secure the base cabinets to the wall studs using screws, similar to the upper cabinets.
After the cabinets are securely attached to the wall, install the doors, drawers, and hardware. Attach the hinges to the cabinet frames and doors, aligning them carefully to ensure smooth operation. Insert the drawers into their respective slots and secure them with screws. Install handles, knobs, and other hardware according to the manufacturer's instructions.
Finally, reconnect any plumbing or electrical fixtures that were disconnected during the removal process. Ensure all connections are secure and leak-free. Test the functionality of the plumbing and electrical systems to verify they are working properly. If any issues are encountered, consult with a qualified professional for assistance.
Addressing Specific Mobile Home Considerations
Mobile homes present unique challenges when it comes to cabinet replacement due to their construction methods and space constraints. Addressing these specific considerations is crucial for a successful installation.
Mobile home walls are often thinner and less structurally sound than those in traditional homes. Therefore, it is essential to use appropriate fasteners and reinforcement techniques when attaching the cabinets to the wall. Consider using toggle bolts or molly bolts to provide additional support, especially for heavier upper cabinets. Distributing the weight of the cabinets evenly across multiple studs can also help prevent damage to the walls.
Mobile homes often have limited space, which can make it difficult to maneuver large cabinets. Measure doorways and hallways carefully to ensure the new cabinets can be brought into the room without obstruction. Consider disassembling the cabinets partially to make them easier to handle. Utilizing compact or space-saving cabinet designs can also help maximize the available space.
Mobile home plumbing and electrical systems may differ from those in traditional homes. Be aware of the location of any water pipes or electrical wiring that may be affected by the cabinet replacement. Take precautions to avoid damaging these systems during the installation process. If necessary, consult with a qualified plumber or electrician to ensure the work is done safely and correctly.
Mobile homes are often subject to significant temperature and humidity fluctuations. Choose cabinets made from materials that are resistant to moisture and warping. Consider sealing the edges of the cabinets to prevent water damage. Proper ventilation can also help regulate humidity levels and protect the cabinets from damage.
By carefully planning and addressing these specific mobile home considerations, homeowners can successfully replace their cabinets and enhance the functionality and aesthetic appeal of their living space.

Complete Mobile Home Kitchen Makeover Only 200

Double Wide Mobile Home Kitchen Cabinets Rocky Hedge Farm

Mobile Home Cabinet Makeover Re Fabbed

Gutting Our Double Wide Kitchen Rocky Hedge Farm

Mobile Home Kitchen Demo First Phase Steps Cabinet Counter Top Removal Plumbing Disconnect

Double Wide Mobile Home Kitchen Cabinets Rocky Hedge Farm

How We Made It Easy To Put Up Cabinets Mobile Home Renovation 32

Double Wide Mobile Home Kitchen Cabinets Rocky Hedge Farm

How To Take Cabinets Off The Wall In A Mobile Home Hometalk

Shocking Secrets Of Diy Kitchen Remodel In A Mobile Home Watch Now
Related Posts