```html
How To Replace Kitchen Cabinet Bottom Shelf
Replacing the bottom shelf of a kitchen cabinet is a common home renovation task that can significantly improve the functionality and aesthetics of a kitchen. Whether the existing shelf is damaged due to water exposure, excessive weight, or general wear and tear, replacing it can prevent further damage to the cabinet structure and provide a cleaner, more organized storage space. This article provides a comprehensive guide on how to replace a kitchen cabinet bottom shelf, covering the necessary tools, materials, and step-by-step instructions.
Prior to beginning the replacement process, a thorough assessment of the existing shelf and cabinet is essential. This assessment will help determine the type of replacement material needed, the appropriate tools, and any potential challenges that may arise. It is also crucial to consider the overall design and style of the kitchen to ensure that the replacement shelf integrates seamlessly with the existing cabinetry.
Key Point 1: Preparation and Assessment
The first step in replacing a kitchen cabinet bottom shelf is meticulous preparation. This involves gathering the necessary tools and materials, as well as carefully assessing the condition of the existing cabinet and shelf.
Tools and Materials: The following tools and materials are typically required for this project:
- Measuring tape
- Pencil
- Safety glasses
- Gloves
- Circular saw or table saw (for cutting the new shelf)
- Jigsaw (for intricate cuts or adjustments)
- Drill with various drill bits
- Screwdriver (or drill with screwdriver bits)
- Wood glue
- Clamps (various sizes)
- Level
- Sandpaper (various grits)
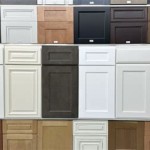
- Paint or stain (matching the existing cabinetry)
- Primer (if painting)
- Paintbrushes or rollers
- New shelf material (plywood, particleboard, or solid wood)
- Wood screws (appropriate length for the cabinet and shelf thickness)
- Optional: Shelf supports (shelf pins or cleats)
- Optional: Utility knife or scraper
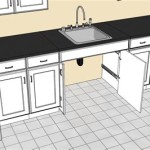
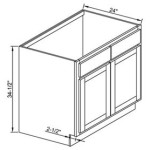
Assessing the Existing Shelf and Cabinet: Carefully inspect the existing bottom shelf and the surrounding cabinet structure. Look for signs of water damage, such as swelling, warping, or discoloration. Check for structural damage, such as cracks, splits, or loose joints. Note the dimensions of the existing shelf, including its length, width, and thickness. This will ensure that the replacement shelf is the correct size. Also, determine how the existing shelf is attached to the cabinet. Common methods include screws, nails, glue, or a combination of these. Identifying the attachment method will inform the removal process.
Safety Precautions: Prioritize safety throughout the entire process. Wear safety glasses to protect eyes from sawdust and debris. Use gloves to protect hands from splinters and chemicals. When using power tools, follow the manufacturer's instructions and take necessary precautions to prevent accidents.
Key Point 2: Removing the Old Shelf
Once the preparation phase is complete, the next step is to carefully remove the old bottom shelf. This process requires patience and attention to detail to avoid damaging the surrounding cabinet structure.
Loosening Fasteners: Begin by identifying and removing any screws or nails that are holding the shelf in place. Use a screwdriver or drill with appropriate bits to remove screws. If nails are used, a nail punch and hammer can be used to drive the nails through the shelf from the inside of the cabinet. If the nails are too difficult to remove from the inside, a small pry bar can be used to carefully lift the shelf, but exercise caution to avoid damaging the surrounding cabinet walls.
Dealing with Glued Shelves: If the shelf is glued in place, it may be necessary to use a utility knife or scraper to carefully separate the shelf from the cabinet walls. Run the utility knife along the edges of the shelf where it meets the cabinet walls, cutting through the glue. A heat gun, used with extreme caution, can sometimes soften the glue, making it easier to separate the shelf. Ensure the heat gun is used sparingly and kept moving to avoid scorching the wood or damaging the finish. Avoid using excessive force, as this can damage the cabinet walls.
Removing the Shelf: Once the fasteners are removed and the glue is separated, carefully remove the old shelf from the cabinet. If the shelf is difficult to remove, gently pry it loose using a pry bar or flathead screwdriver. Be careful not to damage the cabinet walls or face frame. If the old shelf is in multiple pieces or severely damaged, remove each piece individually.
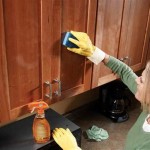
Cleaning and Preparing the Cabinet Interior: After removing the old shelf, thoroughly clean the interior of the cabinet. Remove any remaining debris, glue residue, or loose particles. Use a scraper or sandpaper to smooth any rough edges or surfaces. This will ensure a clean and smooth surface for the new shelf to rest upon.
Key Point 3: Installing the New Shelf
With the old shelf removed and the cabinet interior prepared, the final step is to install the new bottom shelf. This process involves cutting the new shelf to size, installing any necessary supports, and securing the shelf in place.
Measuring and Cutting the New Shelf: Accurately measure the interior dimensions of the cabinet to determine the size of the new shelf. Ensure to measure the length, width, and thickness of the space. It is generally advisable to cut the shelf slightly smaller than the measured dimensions to allow for some wiggle room and prevent the shelf from being too tight. Use a circular saw or table saw to cut the new shelf to the desired size. If intricate cuts are required, such as around pipes or other obstructions, use a jigsaw.
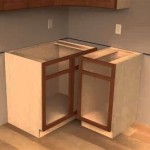
Installing Shelf Supports (Optional): Depending on the weight that the shelf will need to support, it may be necessary to install shelf supports. Common options include shelf pins or cleats. Shelf pins are small metal or plastic pins that insert into pre-drilled holes in the cabinet walls. Cleats are strips of wood that are attached to the cabinet walls, providing a solid support for the shelf. If using shelf pins, drill holes into the cabinet walls at the desired height, ensuring that the holes are evenly spaced and aligned. If using cleats, cut the cleats to the desired length and attach them to the cabinet walls using screws and wood glue. Ensure the cleats are level and securely attached.
Securing the New Shelf: Once the shelf is cut to size and any necessary supports are installed, carefully place the new shelf into the cabinet. Ensure that the shelf is level and fits snugly against the cabinet walls. If the shelf is being secured with screws, pre-drill pilot holes through the shelf and into the cabinet walls. This will prevent the wood from splitting. Apply wood glue to the edges of the shelf where it will contact the cabinet walls. Secure the shelf with screws, ensuring that the screws are driven straight and flush with the surface of the shelf. Use clamps to hold the shelf in place while the glue dries.
Finishing Touches: After the glue has dried, remove the clamps. Sand any rough edges or surfaces on the new shelf. Apply primer and paint or stain to match the existing cabinetry. Allow the paint or stain to dry completely before placing items on the shelf. Inspect the installation for any imperfections and make any necessary adjustments.
Alternatives and Considerations: Several alternative materials can be used for the replacement shelf, including solid wood, plywood, and particleboard. Solid wood is the most durable option but can be more expensive. Plywood is a good compromise between durability and cost. Particleboard is the least expensive option but is also the least durable and most susceptible to water damage. The choice of material will depend on the budget, the desired level of durability, and the overall aesthetic of the kitchen. Consider also adding edge banding to plywood or particleboard shelves for a more finished look and to protect the edges from chipping.
Furthermore, when replacing a bottom shelf, the weight capacity of the new shelf is crucial. Consider the types of items that will be stored on the shelf and choose a material and support system that can adequately handle the weight. For heavier items, consider using thicker material for the shelf and adding additional supports, such as cleats or metal brackets. It's also prudent to inspect the cabinet frame itself. If the frame is weakened, adding a new shelf might not solve the underlying problem and could lead to further structural issues. Consult a professional if the cabinet frame is significantly damaged.
```
Genius Diy Raising Kitchen Cabinets And Adding An Open Shelf The Crazy Craft Lady

Rotted Sink Cabinet Floor How To Fix

Replace A Cabinet Bottom Shelf Tiktok Search

How To Install Kitchen Cabinets Diy Family Handyman

10 Simple Ideas To Update Your Kitchen Cabinets Jenna Sue Design

How To Replace Rotted Sink Base Cabinet Floor Bottom Easy Home Mender

How To Make Simple Easy Sliding Shelves

How To Easily Add Drawers Kitchen Cabinets Small Stuff Counts

How To Install Pull Out Shelves In Kitchen Cabinets

Removing Some Kitchen Cabinets Rehanging One Young House Love
Related Posts