How To Replace Kitchen Cabinet Door Panel With Glass
Replacing a solid panel in a kitchen cabinet door with glass can dramatically transform the look of a kitchen, lending it an airier, more spacious feel. This modification allows for the display of dishware, collectibles, or simply architectural interest, creating a focal point within the room. This process, while achievable for a moderately skilled DIY enthusiast, requires meticulous planning, precise execution, and a commitment to safety, especially when working with glass and power tools. This article outlines the necessary steps for successfully replacing a cabinet door panel with glass, focusing on safety and quality.
Before embarking on this project, it is essential to assess the existing cabinet doors. Not all cabinet doors are suitable for this modification. The ideal candidate is a door with a recessed panel that is held in place by a frame. Doors constructed from solid slabs of wood are generally not amenable to this type of alteration. Furthermore, the style of the door will impact the overall aesthetic. A simple, shaker-style door will integrate seamlessly with a glass panel, while a more ornate or intricately carved door might require careful consideration to ensure the glass panel complements the existing design. The type of glass chosen is also a crucial factor. Clear glass provides unobstructed visibility, while frosted or textured glass offers a degree of privacy and can mask the appearance of clutter within the cabinet. Tinted glass can add a touch of sophistication and complement the kitchen's color scheme.
Safety is paramount throughout this process. Glass can be extremely dangerous if handled improperly, and power tools require careful operation to prevent injury. Safety glasses are essential to protect the eyes from flying debris when cutting wood or handling glass. Work gloves will provide a better grip and protect the hands from splinters and sharp edges. A dust mask or respirator is recommended to prevent the inhalation of sawdust and other airborne particles. Finally, ensure the work area is well-lit and free from obstructions.
Key Point 1: Preparation and Material Gathering
The initial phase of the project involves careful preparation and the gathering of necessary materials and tools. A thorough assessment of the cabinet door and a clear vision of the desired outcome are fundamental to a successful transformation.
First, remove the cabinet door from its hinges. This typically involves unscrewing the hinge screws from the cabinet frame. Keep the screws organized and labeled to ensure easy reinstallation. Place the door on a stable, flat work surface. Cover the surface with a drop cloth or old blanket to protect it from scratches and dents.
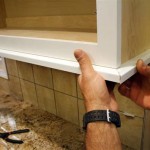
Next, carefully examine the method by which the panel is held in place. In many cabinet doors, the panel is secured within a groove in the frame. This can be accessed by removing the door frame itself. Older cabinet doors might have panels that are simply glued and nailed in place. In these cases, a more delicate approach is required to remove the panel without damaging the frame. A utility knife can be used to carefully score along the edges of the panel, breaking the seal of any glue or paint. A chisel and hammer can then be used to gently pry the panel away from the frame.
Once the panel is removed, carefully measure the opening to determine the required size of the glass panel. It is imperative to measure accurately, as a panel that is too small will not fit securely, and a panel that is too large will not fit at all. Measure the height and width of the opening at several points, as the opening may not be perfectly square. Use the smallest measurement as the basis for ordering the glass. It is generally advisable to subtract 1/8 inch from each dimension to allow for a small amount of clearance. This will prevent the glass from binding in the frame and make installation easier.
Gather the following materials: the chosen glass panel (cut to the exact dimensions), safety glass is a very wise choice and typically required by code, glass retainers (these can be flexible glazier points, small wood strips, or specialized glass retaining clips), clear silicone caulk, sandpaper (various grits), wood filler (if necessary to repair any damage to the frame), paint or stain (to match the existing cabinet finish), primer, and clean cloths.
The essential tools include: safety glasses, work gloves, a dust mask, a utility knife, a chisel, a hammer, a measuring tape, a pencil, a miter saw (optional, for cutting wood retainers), a drill (with a pilot hole bit and screwdriver bits), a caulk gun, and clamps (if necessary to secure the frame during reassembly).
Key Point 2: Preparing the Door Frame
The next stage focuses on preparing the door frame to receive the glass panel. This involves cleaning, repairing, and refinishing the frame to ensure a professional and aesthetically pleasing result.
After the panel has been removed, thoroughly clean the door frame. Remove any remaining glue, paint, or debris with a scraper or sandpaper. Pay particular attention to the groove or recess where the glass panel will sit. Ensure that this area is clean and smooth to allow for a secure and even fit. Sand the entire frame with progressively finer grits of sandpaper to create a smooth surface for painting or staining. Start with a coarser grit (e.g., 120-grit) to remove any imperfections and finish with a finer grit (e.g., 220-grit) for a smoother finish.
Inspect the door frame for any damage, such as cracks, dents, or splinters. Fill any imperfections with wood filler. Allow the wood filler to dry completely according to the manufacturer's instructions. Once the filler is dry, sand it smooth and flush with the surrounding surface. This step is crucial for achieving a seamless and professional finish.
If the door frame is painted, apply a coat of primer to the entire surface. Primer helps to seal the wood, provide a uniform surface for the paint, and improve adhesion. Allow the primer to dry completely before applying the paint. If the door frame is stained, apply a stain conditioner to the wood to help ensure even stain absorption. Stain the frame according to the manufacturer's instructions. Allow the stain to dry completely before applying a clear topcoat.
Apply two coats of paint or stain to the door frame, allowing each coat to dry completely before applying the next. Lightly sand the frame between coats with a fine-grit sandpaper to remove any imperfections and create a smoother finish. This attention to detail will significantly enhance the final appearance of the cabinet door.
Key Point 3: Installing the Glass Panel and Reassembling
The final step involves carefully installing the glass panel into the prepared door frame and reassembling the door. This requires precision and attention to detail to ensure a secure and aesthetically pleasing outcome.
Before installing the glass, apply a thin bead of clear silicone caulk to the groove or recess where the glass will sit. This will help to seal the glass and prevent it from rattling or shifting within the frame. Carefully position the glass panel into the opening. Ensure that the glass is centered and that it fits snugly within the frame. If the glass is too tight, it may be necessary to gently sand the edges of the opening to provide a little more clearance. Avoid forcing the glass into the frame, as this could cause it to break.
Secure the glass panel in place using glass retainers. These can be flexible glazier points, small wood strips, or specialized glass retaining clips. Glazier points are small, triangular pieces of metal that are pushed into the wood frame to hold the glass in place. Wood strips can be cut to size and nailed or screwed into the frame to create a rabbet that holds the glass. Glass retaining clips are small, plastic clips that snap onto the edge of the glass and are then screwed into the frame.
If using glazier points, use a glazier’s tool or a putty knife to gently push the points into the wood frame, evenly spaced around the perimeter of the glass. If using wood strips, cut the strips to the appropriate length and width. Apply a bead of wood glue to the back of the strips and position them around the perimeter of the glass. Secure the strips with small nails or screws. Ensure that the fasteners are countersunk to avoid protruding above the surface of the frame. If using glass retaining clips, snap the clips onto the edge of the glass and then screw them into the frame, evenly spaced around the perimeter of the glass.
Once the glass is securely in place, clean any excess silicone caulk with a damp cloth. Inspect the frame for any gaps or imperfections. Fill any gaps with wood filler and sand smooth. Touch up any painted or stained areas as needed. Allow the paint or stain to dry completely before reinstalling the cabinet door.
Finally, reattach the cabinet door to its hinges. Ensure that the door is aligned properly and that it swings freely. Tighten the hinge screws securely. Step back and admire the transformed kitchen cabinet door. The addition of a glass panel can dramatically enhance the look and feel of the kitchen, creating a brighter, more inviting space. With careful planning, precise execution, and a commitment to safety, this project can be a rewarding and cost-effective way to update the kitchen's aesthetic.

How To Add Glass Cabinet Doors Confessions Of A Serial Do It Yourselfer

How To Add Glass Cabinet Doors Confessions Of A Serial Do It Yourselfer

How To Add Glass Cabinet Doors Confessions Of A Serial Do It Yourselfer

How Do I Install Glass In Cabinet Doors

How Do I Install Glass In Cabinet Doors

How To Install Glass In Cabinet Doors

Diy Changing Solid Cabinet Doors To Glass Inserts Kitchen Cabinets

How To Add Glass Cabinet Doors Confessions Of A Serial Do It Yourselfer

How To Add Glass Cabinet Doors Honeybear Lane

Diy Changing Solid Cabinet Doors To Glass Inserts Wood
Related Posts