How To Replace Kitchen End Panels: A Comprehensive Guide
Kitchen end panels are the finishing touches that conceal the sides of base and wall cabinets, presenting a seamless and aesthetically pleasing appearance. Over time, these panels can become damaged, outdated, or simply not align with a desired kitchen renovation. Replacing kitchen end panels is a manageable DIY project that can dramatically improve the look of a kitchen without requiring a complete cabinet overhaul. This article provides a step-by-step guide on how to replace kitchen end panels, ensuring a professional and durable result.
Before embarking on this project, careful planning and preparation are essential. Improper execution can lead to misaligned panels, damage to existing cabinets, and a less-than-satisfactory outcome. The following sections outline the materials, tools, and methods required for successful end panel replacement.
Key Point 1: Assessing the Existing End Panels and Planning the Replacement
The first step involves a thorough assessment of the existing end panels. Observe how they are attached to the cabinets. Common methods include screws, nails, adhesive, or a combination of these. Note the type of material used for the original panels and the overall dimensions. This information is crucial for selecting appropriate replacement panels and determining the necessary removal techniques.
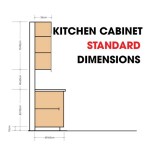
Carefully measure the height, width, and depth of the existing end panels. Accuracy is paramount to ensure the new panels fit seamlessly. It is highly recommended to create a detailed diagram with all dimensions clearly labeled. Pay attention to any cutouts or special features, such as toe kicks or decorative moldings. These details must be replicated in the replacement panels.
Determine the desired material for the new end panels. Common options include plywood, MDF (Medium-Density Fiberboard), and veneered particleboard. Each material has its advantages and disadvantages in terms of cost, durability, and ease of finishing. Plywood offers good strength and screw-holding ability, but may require more extensive surface preparation for a smooth finish. MDF provides a smooth, paintable surface, but is more susceptible to moisture damage. Veneered particleboard offers a cost-effective option with a pre-finished surface, but may be less durable than plywood or MDF.
Select a finish for the replacement panels that complements the existing kitchen cabinetry. Options include paint, stain, or veneer. If painting, choose a high-quality primer and paint specifically designed for kitchen cabinets. If staining, select a stain color that matches or complements the existing cabinetry and apply a durable topcoat for protection. If using veneer, ensure it is properly adhered and finished to prevent peeling or damage.
Once the measurements, material, and finish have been determined, source the replacement end panels. These can be purchased pre-cut from a home improvement store or custom-made to exact specifications. If purchasing pre-cut panels, ensure they are slightly larger than the required dimensions to allow for trimming and fitting. If having panels custom-made, provide accurate dimensions and specifications to avoid errors.
Key Point 2: Removing the Existing End Panels
Before removing the existing end panels, protect the surrounding surfaces with drop cloths or plastic sheeting. This will prevent damage from dust, debris, and accidental spills. Gather the necessary tools, including a screwdriver, pry bar, utility knife, and safety glasses. Safety glasses are essential to protect eyes from flying debris.
Begin by carefully removing any screws or nails that secure the end panel to the cabinet. Use the appropriate screwdriver bit to avoid stripping the screw heads. If nails are used, use a nail set and hammer to countersink them slightly below the surface of the panel before attempting to pry them out. This will minimize damage to the surrounding cabinetry.
If the end panel is adhered with adhesive, use a utility knife to score along the edges where the panel meets the cabinet. This will help to break the adhesive bond and prevent chipping or tearing of the cabinet surface. Gently insert a pry bar between the end panel and the cabinet, and slowly pry the panel away. Work along the edges of the panel, applying even pressure to avoid cracking or warping. If the adhesive is particularly stubborn, use a heat gun to soften it before prying.
Once the end panel is removed, thoroughly clean the cabinet surface to remove any residual adhesive, nails, or screws. Use a scraper or putty knife to remove stubborn adhesive residue. Sand the cabinet surface smooth to ensure a good bonding surface for the new end panel. Vacuum up any dust or debris to create a clean work area.
Inspect the cabinet frame for any damage or weakness. Repair any damage before installing the new end panel. If the cabinet frame is significantly damaged, consider replacing the entire cabinet instead of just the end panel. This will ensure a structurally sound and aesthetically pleasing result.
Key Point 3: Installing the Replacement End Panels
Before installing the replacement end panels, dry-fit them to ensure they fit properly. Hold the panel in place and check for any gaps or overlaps. If the panel is too large, trim it down using a saw or router. If the panel is too small, it may be necessary to shim it to create a flush fit.
Once the panel fits properly, prepare it for attachment to the cabinet. If painting or staining, apply the finish to the panel before installation. This will make it easier to achieve a consistent and even finish. Allow the finish to dry completely before proceeding.
Apply construction adhesive to the back of the replacement end panel. Use beads of adhesive along the edges and in the center of the panel. The adhesive will provide a strong and durable bond between the panel and the cabinet. Be careful not to apply too much adhesive, as this can cause it to squeeze out around the edges of the panel.
Position the replacement end panel against the cabinet, ensuring it is flush with the edges. Press the panel firmly against the cabinet and hold it in place for several minutes to allow the adhesive to set. Use clamps to hold the panel in place while the adhesive cures. This will ensure a strong and secure bond.
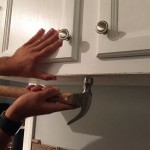
In addition to adhesive, use screws to further secure the end panel to the cabinet. Drill pilot holes through the end panel and into the cabinet frame. Use screws that are long enough to penetrate the cabinet frame, but not so long that they protrude through the other side. Countersink the screw heads to create a flush surface.
Fill any screw holes with wood filler and sand smooth. Touch up the finish to conceal the screw holes and create a seamless appearance. Inspect the edges of the end panel for any gaps or imperfections. Caulk any gaps with paintable caulk to create a waterproof seal. Allow the caulk to dry completely before painting.
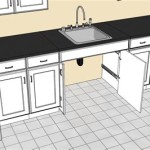
Finally, re-install any hardware or trim that was removed from the original end panel. This may include toe kicks, decorative moldings, or door and drawer pulls. Ensure the hardware is properly aligned and securely attached. Inspect the finished installation for any remaining imperfections. Touch up any areas that need attention to create a professional and polished look.
By following these steps carefully, individuals can successfully replace kitchen end panels, enhancing the appearance and functionality of kitchen cabinetry. Attention to detail and accurate measurements are key to achieving a professional and long-lasting result.

Installing Cabinet End Panels In Solid Oak Kitchens Wood Kitchen Cabinets Information Guides

Installing Cabinet End Panels In Solid Oak Kitchens Wood Kitchen Cabinets Information Guides

Diy Cabinet End Panels With Shaker Style Trim Average But Inspired

How To Fit End Panels Ideas Advice Diy At B Q

Diy Dishwasher End Panel Ana White

Diy Cabinet End Panels With Shaker Style Trim Average But Inspired

How To Install Dishwasher End Panel Step By

Installing Kitchen End Panels Between Appliances The Carpenter S Daughter

Diy Dishwasher End Panel Ana White

Diy Cabinet End Panels With Shaker Style Trim Average But Inspired
Related Posts