How To Replace Your Kitchen Cabinet Doors
Replacing kitchen cabinet doors is a cost-effective way to refresh the look of a kitchen without undertaking a full-scale renovation. It allows homeowners to update the style, color, and hardware of their cabinetry while retaining the existing cabinet boxes, saving time, money, and disruption. This article provides a comprehensive guide on how to successfully replace kitchen cabinet doors, covering everything from initial preparation to the final installation.
Assessing Your Existing Cabinets and Planning
The first step in replacing kitchen cabinet doors involves a thorough assessment of the existing cabinet boxes. This ensures the new doors will fit properly and function correctly. Begin by inspecting the cabinet boxes for any damage, such as warping, water damage, or loose joints. Addressing any structural issues before installing new doors is crucial for a successful outcome. Damage to the cabinet boxes may require professional repair or, in severe cases, replacement of the entire cabinet.
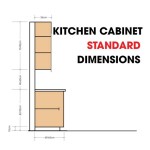
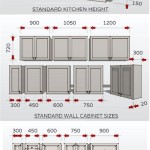
Once the cabinet boxes have been inspected, take precise measurements of the existing doors. Measure the height, width, and thickness of each door, and record these measurements accurately. It is essential to measure each door individually, as slight variations may exist. These measurements will be used to order the new doors. When ordering, specify whether the measurements are for the door itself or for the opening it needs to cover; typically, the door will be slightly larger than the opening.
Consider the style and design of the new cabinet doors in relation to the existing kitchen decor. Options include flat-panel, raised-panel, shaker-style, and glass-front doors, available in various materials such as wood, MDF (Medium-Density Fiberboard), and thermofoil. Selecting a style that complements the kitchen's overall aesthetic is important for achieving a cohesive and visually appealing result. Additionally, think about the hardware; new knobs and pulls can significantly impact the overall look of the cabinets.
Finally, create a detailed plan outlining the scope of the project. This plan should include a timeline, budget, and a list of all necessary materials and tools. Having a well-defined plan will help ensure the project stays on track and within budget. Consider any potential challenges, such as uneven walls or unique cabinet configurations, and plan accordingly.
Ordering the New Cabinet Doors and Hardware
After the assessment and planning phase, the next step is to order the new cabinet doors. Choose a reputable supplier that offers a wide selection of door styles, materials, and finishes. Provide the supplier with the precise measurements taken earlier, specifying the desired style, material, and finish for each door. Be sure to indicate the hinge placement if you are opting for pre-drilled hinge holes, as this will save time and effort during installation.
Many suppliers offer online ordering platforms with detailed product descriptions and customization options. Take advantage of these resources to ensure you are ordering the correct doors for your needs. If possible, request samples of the materials and finishes to ensure they meet your expectations. This is particularly important when matching existing cabinetry or countertops.
In addition to the doors themselves, order the necessary hardware, including hinges, knobs, and pulls. Choose hardware that complements the style and finish of the new doors and the overall kitchen design. Consider the functionality of the hardware as well; for example, soft-close hinges can prevent slamming and extend the lifespan of the cabinets. Ensure that you have the correct number of hinges for each door, typically two for smaller doors and three for larger doors to provide adequate support.
When ordering, factor in potential lead times for manufacturing and shipping. Custom-made doors may take several weeks to arrive, so plan accordingly. It is advisable to order all the necessary materials and hardware at the same time to avoid delays and ensure consistency in color and finish. Upon receiving the order, carefully inspect all doors and hardware for any damage or discrepancies. Contact the supplier immediately if any issues are identified.
Preparing for Installation and Removing Existing Doors
Before beginning the installation process, prepare the work area by clearing any obstructions and protecting the surrounding surfaces. Cover countertops and floors with drop cloths to prevent damage from dust, scratches, or spills. Gather all the necessary tools and materials, including a screwdriver (both manual and power), a drill, a level, a measuring tape, a pencil, safety glasses, and appropriate drill bits.
Begin by removing the existing cabinet doors. Use a screwdriver to loosen and remove the screws holding the hinges to the cabinet boxes. Support the door with one hand while removing the screws to prevent it from falling and causing damage. Once the screws are removed, carefully detach the door from the cabinet box. Repeat this process for all the remaining doors.
After removing the doors, inspect the hinges and hinge plates attached to the cabinet boxes. If the new hinges are compatible with the existing hinge plates, you may be able to reuse them. However, if the new hinges are different or if the existing hinge plates are damaged or worn, remove them using a screwdriver. Fill any screw holes with wood filler and allow it to dry completely before sanding smooth. This will provide a solid surface for attaching the new hinge plates.
Clean the cabinet boxes thoroughly to remove any dust, dirt, or grease. Use a mild detergent and water to wash the surfaces, then rinse with clean water and allow to dry completely. This will ensure proper adhesion of the new hardware and prevent any issues during installation. Once the cabinet boxes are clean and dry, you are ready to begin installing the new cabinet doors.
Installing the New Cabinet Doors and Hardware
The installation process begins by attaching the hinges to the new cabinet doors. If the doors are pre-drilled for hinges, align the hinges with the pre-drilled holes and secure them with screws. If the doors are not pre-drilled, use a template or measuring tape to accurately position the hinges and mark the screw holes. Drill pilot holes for the screws to prevent splitting the wood and ensure a secure attachment.
With the hinges attached to the doors, align the doors with the cabinet boxes. Hold the door in place and align the hinges with the corresponding hinge plates (either existing or new) on the cabinet box. Secure the hinges to the hinge plates with screws. Use a level to ensure the door is aligned vertically and horizontally. Make any necessary adjustments to ensure the door hangs straight and closes properly.
Once the doors are installed, attach the knobs or pulls. Use a template or measuring tape to accurately position the hardware on each door. Drill pilot holes for the screws and secure the knobs or pulls with screws. Ensure the hardware is securely attached and does not wobble. Consider using a backplate behind the knob or pull to protect the door finish and provide added stability.
After all the doors and hardware are installed, inspect the alignment and functionality of each door. Open and close each door several times to ensure it moves smoothly and closes securely. Make any necessary adjustments to the hinges or latches to achieve proper alignment and functionality. Tighten any loose screws and clean the doors and hardware to remove any fingerprints or smudges. If using soft-close hinges, follow the manufacturer's instructions for adjusting the closing speed.
Replacing kitchen cabinet doors is a manageable project for homeowners with basic carpentry skills. By following these steps carefully and paying attention to detail, it is possible to transform the look of a kitchen without the expense and hassle of a full renovation. Thorough planning, accurate measurements, and careful installation are key to achieving a professional and satisfying result.

Reface Or Replace Your Kitchen Units Dream Doors

Reface Or Replace Your Kitchen Units Dream Doors

How Can I Change The Look Of My Kitchen Cabinet Doors Now

5 Things To Consider When Replacing Your Kitchen Cabinet Doors Ikonni

Reface Or Replace Your Kitchen Units Dream Doors

Replace Your Kitchen Cabinet Doors

Transform Your Space How To Change Cabinet Doors Like Pro

Best Kitchen Cabinet Refacing For Your Home The Depot

How To Replace Your Kitchen Cabinet Doors Diy Hometalk

Replace Just Your Cabinet Doors And Be Amazed
Related Posts

