How To Restain Kitchen Cabinets With Gel Stain
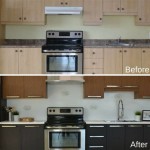
Restaining kitchen cabinets is a cost-effective method to revitalize the heart of the home, injecting new life and style without the expense of complete replacement. Gel stain presents a particularly suitable option for cabinets, especially those with existing finishes or non-wood surfaces, due to its unique properties and ease of application. This article provides a comprehensive guide on how to effectively restain kitchen cabinets using gel stain, outlining the necessary steps, materials, and considerations for a successful outcome. The process involves meticulous preparation, careful application, and diligent finishing, all of which contribute to a professional-looking and durable result.
Gel stain distinguishes itself from other types of stain by its thick, gel-like consistency. This consistency allows the stain to sit on the surface of the cabinet, rather than penetrating deeply into the wood grain. This characteristic makes it ideal for cabinets that have a veneer, laminate, or a pre-existing finish, as these surfaces may not readily absorb traditional stains. Furthermore, gel stain is excellent for vertical surfaces, as its viscosity minimizes dripping and running during application. The opacity of gel stain also provides better coverage, often requiring fewer coats than traditional stains to achieve the desired color and intensity.
Before embarking on the restaining process, it is crucial to gather all the necessary materials and tools. This proactive approach ensures a smooth and efficient workflow, minimizing interruptions and potential errors. The required supplies include gel stain in the chosen color, a cleaner-degreaser specifically designed for kitchen surfaces, sandpaper in various grits (typically 120, 220, and 320), tack cloths, lint-free cloths or foam brushes for applying the stain, a sealant or topcoat, painter's tape, drop cloths, safety glasses, and gloves.
Key Point 1: Thorough Preparation is Paramount
The success of any restaining project hinges on the quality of the preparation phase. Neglecting this crucial step can lead to adhesion problems, uneven color distribution, and a less-than-desirable final appearance. The preparation process encompasses cleaning, sanding, and masking, each contributing to a surface that is receptive to the gel stain and conducive to a professional finish.
The initial step is to remove all cabinet doors and drawers. Label each piece clearly with tape and a marker, indicating its original location. This prevents confusion during reassembly and ensures that each component returns to its corresponding position. Remove all hardware, such as knobs, pulls, and hinges. Place the hardware in labeled bags to prevent loss or misplacement. Thoroughly clean the cabinet doors, drawers, and frames with a kitchen cleaner-degreaser. This removes grease, grime, and any accumulated residue that could interfere with the stain's adhesion. Rinse all surfaces with clean water and allow them to dry completely.
Once the cabinets are clean and dry, sanding is the next critical step. Begin with 120-grit sandpaper to lightly scuff the existing finish. The goal is not to remove the existing finish entirely, but rather to create a textured surface that the gel stain can grip onto. For cabinets with a high-gloss finish, more sanding may be required to dull the surface. After sanding with 120-grit sandpaper, move to 220-grit sandpaper to smooth out any rough edges or scratches. For those using a very dark gel stain over a light original cabinet finish, a coarser grit might be needed to further dull the previous finish. Finally, use 320-grit sandpaper for a final, light sanding to prepare the surface for staining. After each sanding stage, wipe down the cabinets with a tack cloth to remove any sanding dust. Failure to remove the dust can result in a gritty or uneven finish.
Painter’s tape is used to protect adjacent surfaces, such as walls, countertops, and flooring, from accidental staining. Apply the tape carefully along the edges of the cabinets, ensuring a clean and straight line. Drop cloths should be placed on the floor to protect it from spills and drips. This meticulous masking process helps to contain the mess and ensures a professional-looking finish.
Key Point 2: Applying the Gel Stain with Precision
The application of gel stain requires a specific technique to achieve an even, consistent color and avoid issues such as streaking or blotching. The key is to apply thin, even coats and to work methodically across the surface of the cabinet. Two primary methods are commonly used for applying gel stain: using lint-free cloths and using foam brushes. The choice between these methods often depends on personal preference and the desired texture.
For the lint-free cloth method, apply a small amount of gel stain to a clean lint-free cloth. Gently rub the stain onto the surface of the cabinet in the direction of the wood grain, if visible, or in smooth, even strokes if the cabinet has a veneer or laminate surface. Work in small sections, and immediately wipe off any excess stain with a clean cloth. This prevents the stain from pooling or becoming too thick, which can result in an uneven finish. Apply the stain in thin coats, allowing each coat to dry completely before applying the next. The drying time will vary depending on the specific gel stain product and the environmental conditions, such as temperature and humidity. Consult the manufacturer’s instructions for recommended drying times.
If using foam brushes, dip the brush into the gel stain and apply a thin, even coat to the surface of the cabinet. Again, work in small sections and follow the direction of the wood grain, if present. Avoid applying too much pressure, as this can cause the foam brush to leave streaks or bubbles in the stain. Immediately wipe off any excess stain with a clean cloth. Foam brushes are particularly useful for covering intricate details or moldings on cabinet doors. As with the cloth method, allow each coat of gel stain to dry completely before applying the next. Multiple thin coats are preferable to one thick coat, as they result in a more even and durable finish.
Regardless of the application method chosen, it is essential to maintain a wet edge to prevent lap marks. This means overlapping each section of stain slightly as work progresses. Pay particular attention to corners and edges, ensuring that they are evenly coated. If any drips or runs occur, immediately wipe them away with a clean cloth. After the first coat of gel stain has dried completely, lightly sand the surface with 320-grit sandpaper to smooth out any imperfections. Wipe the surface with a tack cloth to remove any sanding dust before applying the second coat. The number of coats required will depend on the desired color intensity and the opacity of the gel stain. Typically, two to three coats are sufficient to achieve a rich, even color.
Key Point 3: Protecting the Restained Finish with a Topcoat
Once the gel stain has been applied and allowed to dry completely, the final step is to apply a sealant or topcoat. The topcoat provides a protective layer that shields the stain from scratches, moisture, and everyday wear and tear. It also enhances the durability of the finish and makes the cabinets easier to clean. Several types of topcoats are available, each with its own advantages and disadvantages. Common options include polyurethane, lacquer, and water-based sealants. The choice of topcoat will depend on the desired level of durability, the sheen (gloss, semi-gloss, satin, matte), and the specific requirements of the project.
Polyurethane is a popular choice for kitchen cabinets due to its excellent durability and resistance to water and chemicals. It is available in both oil-based and water-based formulations. Oil-based polyurethane provides a harder, more durable finish, but it has a stronger odor and takes longer to dry. Water-based polyurethane is lower in odor and dries more quickly, but it may not be as durable as oil-based versions. Lacquer is another option for kitchen cabinets, offering a smooth, glossy finish. It dries very quickly, which can speed up the project, but it is less durable than polyurethane and may be more susceptible to scratches and chemicals. Water-based sealants are an environmentally friendly option that is low in odor and easy to clean up. However, they may not provide the same level of durability as polyurethane or lacquer.
Before applying the topcoat, ensure that the surface of the cabinets is clean and free from any dust or debris. Lightly sand the surface with 320-grit sandpaper to create a smooth, even surface for the topcoat to adhere to. Wipe the surface with a tack cloth to remove any sanding dust. Apply the topcoat in thin, even coats, using a high-quality brush or sprayer. Follow the manufacturer’s instructions for recommended application techniques and drying times. Allow each coat of topcoat to dry completely before applying the next. Typically, two to three coats are sufficient to provide adequate protection and durability. After the final coat of topcoat has dried completely, inspect the cabinets for any imperfections, such as drips, runs, or bubbles. If any imperfections are found, lightly sand them out with 320-grit sandpaper and apply another thin coat of topcoat.
Once the topcoat has dried completely, the cabinet doors and drawers can be reinstalled. Carefully align each piece with its corresponding location, using the labels that were applied during the removal process. Reattach the hardware, such as knobs, pulls, and hinges. Ensure that all screws are tightened securely. After reinstalling the cabinet doors and drawers, allow the topcoat to cure completely before using the cabinets. The curing time will vary depending on the specific topcoat product, but it is typically several days to a week. During this time, avoid placing heavy objects on the cabinets or exposing them to excessive moisture. Once the topcoat has cured, the restained kitchen cabinets are ready to be enjoyed. Regular cleaning and maintenance will help to preserve the finish and extend the lifespan of the cabinets.

How To Gel Stain Cabinets She Buys He Builds

10 Best Gel Stain Tips For Beginners Budgeting Bliss

Gel Stain Kitchen Cabinets Without Sanding Fast Easy Diy

The Creative Cubby Diy Gel Stain Cabinet Makeover

Gel Staining Kitchen Cabinets For An Easy Thrifty Update

Java Gel Stain Kitchen Transformation General Finishes Design Center

Our Best Tips For Staining Cabinets Or Re

Gel Staining Kitchen Cabinets 6 Month Review Merrypad

Staining Your Wood Cabinets Darker Young House Love

How To Use Gel Stain On Cabinets The Good Bad
Related Posts