How to Resurface Kitchen Cabinets: A Comprehensive Guide
Kitchen cabinets often form the visual foundation of the room, and their aesthetic condition significantly impacts the overall feel and value of the space. Over time, cabinets can become worn, outdated, or simply no longer align with evolving design preferences. Rather than undertaking a full cabinet replacement, which can be a costly and disruptive project, resurfacing offers a practical and economical alternative. This process involves replacing the existing cabinet doors and drawer fronts while applying a new veneer or laminate to the exposed cabinet boxes. The result is a refreshed and updated kitchen without the extensive demolition and reconstruction associated with replacement.
Resurfacing is particularly well-suited for cabinets with solid, structurally sound boxes. If the existing framework exhibits signs of significant damage, warping, or rot, replacement might be the more appropriate solution. However, for cabinets primarily suffering from cosmetic issues, resurfacing can be a highly effective way to achieve a dramatic transformation at a fraction of the cost.
Understanding the Resurfacing Process
The resurfacing process involves several key steps, each requiring careful attention to detail to ensure a professional and lasting result. The first step is a thorough assessment of the existing cabinets to determine their suitability for resurfacing. This involves inspecting the boxes for any structural damage, such as loose joints, cracks, or water damage. The condition of the hinges, drawer slides, and other hardware components should also be evaluated. If any repairs are needed, they should be addressed before proceeding with the resurfacing process.
Once the cabinets have been assessed and any necessary repairs completed, the next step is to remove the existing doors, drawer fronts, and hardware. This provides unobstructed access to the cabinet boxes for surface preparation. All surfaces to be resurfaced must be thoroughly cleaned and degreased to ensure proper adhesion of the new veneer or laminate. Any imperfections, such as scratches or dents, should be filled with wood filler and sanded smooth. A light sanding of the existing surface is also recommended to create a slightly roughened texture, which will further enhance adhesion.
The application of the new veneer or laminate is a critical step that requires precision and accuracy. Veneer is a thin layer of real wood that is bonded to the cabinet boxes using contact cement. Laminate, on the other hand, is a synthetic material that is typically applied using a heat-activated adhesive. Both materials come in a wide variety of colors, patterns, and textures, allowing for a high degree of customization. When applying the veneer or laminate, it is important to carefully measure and cut the material to the exact dimensions of the cabinet boxes. The material should be applied smoothly and evenly, avoiding any air bubbles or wrinkles. Edges can be trimmed with a utility knife or router for a clean, professional finish.
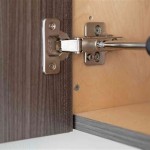
Finally, the new doors, drawer fronts, and hardware are installed. The new doors and drawer fronts should be carefully aligned and adjusted to ensure proper fit and function. New hinges and drawer slides may be necessary to ensure smooth operation. Once all of the components have been installed, the cabinets should be thoroughly cleaned and inspected to ensure that the resurfacing process has been completed to a high standard.
Choosing the Right Materials for Resurfacing
Selecting the appropriate materials is paramount to achieving a durable and aesthetically pleasing resurfaced kitchen. The choice between veneer and laminate largely depends on personal preference, budget, and lifestyle considerations. Veneer, being a natural wood product, offers a rich and authentic look that appeals to many homeowners. It can be stained or painted to match existing décor and provides a warm and inviting feel. However, veneer is generally more expensive than laminate and requires more careful maintenance to prevent damage from moisture and scratches.
Laminate, on the other hand, is a more durable and cost-effective option. It is resistant to scratches, stains, and moisture, making it a practical choice for busy kitchens. Laminate is also available in a wide range of colors, patterns, and textures, including realistic wood-grain finishes. While laminate may not have the same inherent warmth and character as veneer, advancements in manufacturing have resulted in high-quality laminates that closely mimic the look and feel of real wood.
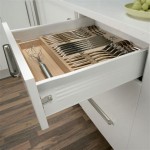
In addition to veneer and laminate, other materials can be used for resurfacing, such as thermofoil. Thermofoil is a thin layer of vinyl that is heat-bonded to a medium-density fiberboard (MDF) core. Thermofoil is a cost-effective option that is easy to clean and maintain. However, it is not as durable as veneer or laminate and can be prone to peeling or chipping over time. The choice of hardware is equally important. New hinges, drawer slides, and cabinet pulls can significantly enhance the overall look and functionality of the resurfaced cabinets.
Cabinet doors come in a multitude of styles, from traditional raised-panel designs to sleek, modern slab doors. The choice of door style should complement the overall aesthetic of the kitchen and reflect the homeowner's personal taste. Similarly, the choice of cabinet pulls and knobs should complement the door style and provide a comfortable and ergonomic grip. The finishes available for cabinet hardware are also diverse, ranging from traditional brushed nickel to contemporary matte black.
When selecting materials for resurfacing, it is important to consider the long-term durability and maintenance requirements. For kitchens that experience heavy use, durable materials such as laminate or solid wood are recommended. For kitchens with limited exposure to moisture or wear, veneer or thermofoil may be suitable options. Regular cleaning with mild soap and water is generally sufficient to keep resurfaced cabinets looking their best. Avoid using harsh chemicals or abrasive cleaners, as these can damage the surface of the veneer or laminate.
Preparation and Installation Techniques
Proper preparation is crucial for a successful cabinet resurfacing project. The work area must be adequately protected to prevent damage to surrounding surfaces. Drop cloths should be placed over countertops, floors, and appliances to catch dust and debris. Adequate ventilation is also essential, especially when working with adhesives or solvents. Open windows and doors or use a fan to circulate air. Safety glasses, gloves, and a dust mask should be worn to protect against inhalation of dust and fumes.
Removing the old doors and drawer fronts is a straightforward process, but it is important to be careful not to damage the cabinet boxes. Use a screwdriver or drill to remove the hinges and drawer slides. Label each door and drawer front with its corresponding location so that it can be easily reinstalled later. Store the old doors and drawer fronts in a safe place to prevent damage. Cleaning the cabinet boxes thoroughly is essential for proper adhesion of the new veneer or laminate. Use a degreasing cleaner to remove any grease, dirt, or grime. Rinse the surfaces with clean water and allow them to dry completely. Any imperfections, such as scratches or dents, should be filled with wood filler and sanded smooth. A light sanding of the entire surface will create a slightly roughened texture, which will further enhance adhesion.
Applying the new veneer or laminate requires careful attention to detail. Start by measuring and cutting the material to the exact dimensions of the cabinet boxes. Use a sharp utility knife or a laminate trimmer to ensure clean, precise cuts. When applying veneer, use a contact cement adhesive. Apply the adhesive to both the back of the veneer and the surface of the cabinet box. Allow the adhesive to dry until it is tacky to the touch. Carefully align the veneer with the cabinet box and press it firmly into place. Use a roller or a rubber mallet to ensure that the veneer is completely bonded to the cabinet box. When applying laminate, use a heat-activated adhesive. Apply the adhesive to both the back of the laminate and the surface of the cabinet box. Allow the adhesive to dry according to the manufacturer's instructions. Use a heat gun or a laminating press to activate the adhesive and bond the laminate to the cabinet box.
Trimming the edges of the veneer or laminate is an important step in achieving a professional-looking finish. Use a utility knife or a router with a flush-trimming bit to trim the edges of the material flush with the cabinet boxes. Sand the edges lightly to remove any sharp edges or burrs. Installing the new doors and drawer fronts is the final step in the resurfacing process. Use new hinges and drawer slides to ensure smooth operation. Align the doors and drawer fronts carefully and adjust them as needed to ensure proper fit and function. Install the new cabinet pulls and knobs. Clean the resurfaced cabinets thoroughly with a mild soap and water solution. Inspect the cabinets carefully to ensure that all of the components are properly installed and that there are no visible imperfections.
Resurfacing kitchen cabinets is a project that requires careful planning, preparation, and execution. By following these guidelines and taking the time to do the job right, homeowners can achieve a dramatic transformation of their kitchen without the expense and inconvenience of full cabinet replacement.

How Do I Prepare My Kitchen For A Cabinet Refacing Project

Our Refacing Process Kitchen Magic

Cabinet Refacing Process And Cost Compared To Painting

How Does Kitchen Cabinet Refacing Work

How To Resurface Kitchen Cabinets 2024 Guide Forbes Home

Kitchen Cabinet Refacing Review Why We Chose It For Our Home Kaitlin Madden

Cabinet Refinishing An 8 Step Guide For Pro Painters Ppc

Kitchen Cabinet Refacing Makeover A Homeowner S Experience

Refinishing Kitchen Cabinets Modern Refacing Made Easy Wisewood

Cabinet Refacing Vs Painting Which Is Right For You
Related Posts