How To Revamp Old Kitchen Cupboards: A Comprehensive Guide
Kitchen cupboards are a functional and aesthetic cornerstone of any kitchen. Over time, they can become worn, outdated, or simply not suited to evolving tastes. Replacing them entirely can be a significant expense and disruption. Revamping existing cupboards offers a cost-effective and less invasive alternative for achieving a fresh and updated kitchen space.
This article provides a detailed guide to revamping old kitchen cupboards, outlining the necessary preparation, various techniques, and essential considerations for achieving a successful outcome. The information presented aims to empower homeowners to undertake this project independently or to make informed decisions when hiring professionals.
Preparation is Paramount: Cleaning, Inspection, and Planning
Prior to commencing any actual renovation work, thorough preparation is essential. This phase involves comprehensive cleaning, meticulous inspection, and detailed planning. This groundwork sets the stage for a smooth and efficient revamping process.
Cleaning: The first step is to thoroughly clean all cupboard surfaces, both interior and exterior. Remove all items from the cupboards and wipe down shelves, drawers, and doors with a degreasing cleaner. Grease, grime, and accumulated dirt can hinder paint adhesion and overall finish quality. Use a soft cloth or sponge and avoid harsh abrasive cleaners that could damage the existing finish. For stubborn stains, consider using a specialized kitchen cleaner formulated for removing grease and food residue.
Inspection: Once cleaned, conduct a detailed inspection of all cupboard components. Look for any signs of damage, such as loose hinges, warped doors, chipped paint, peeling veneer, or water damage. Identify any areas that require repair or replacement before proceeding with the revamping process. Note any structural issues, such as sagging shelves or damaged cabinet boxes. These issues may require more extensive repairs or even professional attention.
Planning: After cleaning and inspection, develop a detailed plan for the revamp. This includes selecting the desired finish (paint, stain, or a combination), choosing new hardware (knobs, pulls, and hinges), and determining the scope of the project. Consider the overall aesthetic of the kitchen and choose a finish that complements the existing décor. Gather all necessary materials and tools before starting the actual renovation work. A well-defined plan minimizes errors and ensures a more efficient and satisfying outcome.
During the planning phase, it's helpful to create a visual representation of the desired outcome. This could involve creating a mood board with images of kitchens with similar styles or using digital design tools to visualize the finished product. This visual aid helps solidify the design choices and ensures that everyone involved is on the same page.
Techniques for Revamping: Painting, Staining, and Refacing
Several techniques can be employed to revamp old kitchen cupboards. The choice depends on the existing condition of the cupboards, the desired aesthetic, and the homeowner's skill level. The most common techniques are painting, staining, and refacing.
Painting: Painting is a versatile and cost-effective way to refresh old kitchen cupboards. It allows for a wide range of color choices and can be used to cover up imperfections and create a uniform finish. The process typically involves several steps: sanding, priming, and painting. Sanding is essential for creating a smooth surface and improving paint adhesion. Use a fine-grit sandpaper and sand lightly to avoid damaging the wood. Priming is important for sealing the surface and providing a good base for the paint. Choose a high-quality primer that is compatible with the chosen paint. Apply two coats of paint, allowing each coat to dry completely before applying the next. Use a high-quality brush or roller for a smooth and even finish. Consider using a paint sprayer for larger surfaces.
The type of paint used is crucial for achieving a durable and long-lasting finish. Oil-based paints are known for their durability and resistance to chipping and scratching, but they can be more difficult to apply and require more time to dry. Latex-based paints are easier to apply and clean up, but they may not be as durable as oil-based paints. Consider using a kitchen-specific paint that is formulated to withstand moisture and grease.
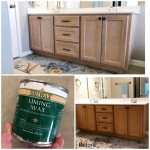
Staining: Staining is a good option for showcasing the natural wood grain and adding warmth to the kitchen. The process involves removing the existing finish (if any), sanding the wood smooth, applying the stain, and sealing with a clear coat. Choose a stain color that complements the existing décor and highlights the natural beauty of the wood. Apply the stain evenly with a brush or cloth, and wipe off any excess. Allow the stain to dry completely before applying the clear coat. The clear coat protects the stained surface from scratches and moisture. Apply two or three coats of clear coat, allowing each coat to dry completely before applying the next. Lightly sand between coats for a smoother finish.
Proper preparation is especially critical when staining. Any imperfections in the wood will be highlighted by the stain. Ensure the wood is sanded smooth and free of any blemishes before applying the stain. Consider using a wood conditioner to help the stain penetrate evenly and prevent blotching.
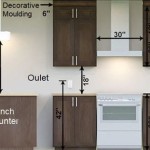
Refacing: Refacing involves replacing the existing cupboard doors and drawer fronts with new ones, while keeping the existing cabinet boxes in place. This is a more extensive and costly option than painting or staining, but it can significantly transform the look of the kitchen. The process typically involves removing the old doors and drawer fronts, measuring the cabinet boxes, ordering new doors and drawer fronts, and installing them. Choose doors and drawer fronts that complement the existing décor and are made of high-quality materials. Consider using a professional installer for this project, as precise measurements and installation are essential for a successful outcome.
Refacing offers the opportunity to completely change the style of the cupboards. Consider switching from traditional raised-panel doors to modern flat-panel doors, or from wood doors to glass-front doors. This allows for a complete transformation of the kitchen's aesthetic without the expense and disruption of replacing the entire cabinet system.
Essential Considerations: Hardware, Lighting, and Organization
Beyond the primary techniques of painting, staining, and refacing, several other factors contribute to a successful kitchen cupboard revamp. These include selecting appropriate hardware, optimizing lighting, and implementing effective organization strategies.
Hardware: New hardware can significantly enhance the look and feel of the revamped cupboards. Choose knobs, pulls, and hinges that complement the chosen finish and style. Consider the size and shape of the hardware in relation to the cupboard doors and drawers. Ensure the hardware is easy to grip and use. There are many different styles of hardware to choose from, including modern, traditional, and transitional. Choose hardware that reflects the overall aesthetic of the kitchen. Replacing the hinges can also improve the functionality of the cupboards, especially if the existing hinges are worn or damaged. Self-closing hinges are a popular option that can add convenience and prevent doors from slamming shut.
Lighting: Proper lighting is essential for both functionality and aesthetics. Consider adding under-cabinet lighting to illuminate countertops and workspaces. This not only improves visibility but also adds a touch of elegance to the kitchen. LED lighting is a popular choice due to its energy efficiency and long lifespan. Consider installing dimmer switches to control the brightness of the lighting and create different moods. Interior cabinet lighting can also be a useful addition, especially for larger cupboards. This makes it easier to find items inside the cupboard and can also add a touch of sophistication.
Organization: Revamping kitchen cupboards presents an excellent opportunity to improve organization. Consider adding pull-out shelves or drawer organizers to maximize storage space and make it easier to access items. Install spice racks or utensil holders to keep countertops clear and organized. Label shelves and drawers to easily identify the contents. Utilize vertical space by adding shelves or hanging organizers. Declutter the cupboards regularly to remove unnecessary items and maintain an organized space. Well-organized cupboards not only improve functionality but also contribute to a more visually appealing and inviting kitchen.
Beyond the basics, consider integrating specialized organizers tailored to specific needs. For example, installing a designated space for pot lids or a pull-out pantry for dry goods can significantly improve kitchen efficiency. Thoughtful organization streamlines the cooking process and reduces clutter.
By carefully considering these aspects, homeowners can transform their old kitchen cupboards into stylish and functional storage spaces that enhance the overall appeal of their kitchen.

15 Ideas To Revamp Your Kitchen Without Breaking The Bank Groomed Home

25 Easy Ways To Update Kitchen Cabinets

40 Easy Diys That Will Significantly Upgrade Your Home Selbstgebaute Küchenschränke Küchenrenovierung Haus Küchen

Home Dzine Kitchen Before And After Renovations

5 Ways To Add New Life Old Cabinets Daniel Kanter

15 Diy Kitchen Cabinet Makeovers Before After Photos Of Cabinets

21 Diy Affordable Ways To Redo Kitchen Cabinets Extra Space Storage

11 Inexpensive Ways To Revamp Your Kitchen Cabinets Sheknows

15 Diy Kitchen Cabinet Makeovers Before After Photos Of Cabinets

How To Paint Kitchen Cabinets Budget Friendly Makeover
Related Posts