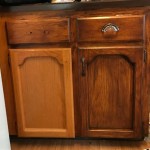
How to Stain Cabinets Darker Without Sanding
Updating kitchen or bathroom cabinets can significantly alter the aesthetic of a space. A common desire among homeowners is to darken existing cabinetry. While traditional methods often involve extensive sanding, there are alternative approaches that minimize this labor-intensive step. This article will outline how to stain cabinets darker without sanding, detailing the necessary preparations, materials, and application techniques for a successful outcome.
Before embarking on the process, it is imperative to assess the existing cabinet finish. The type of finish will influence the choice of staining products and techniques. Lacquered, varnished, or painted cabinets each require specific pre-stain treatments to ensure proper adhesion and color saturation of the new stain. Ignorance of the initial finish can lead to unsatisfactory results, including peeling, uneven coloration, or a lack of stain penetration.
Preparing the Cabinets for Staining
Thorough preparation is paramount to achieving a professional-looking finish. This encompasses cleaning, degreasing, and creating a receptive surface for the stain. While sanding is minimized, it isn't entirely eliminated; rather, it is replaced with chemical abrasion and bonding agents.
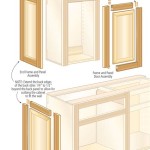
The first step involves removing all hardware, including knobs, pulls, hinges, and any detachable components. This prevents stain from accumulating around these areas and ensures a clean, uniform finish across the cabinet surfaces. Labeling each piece of hardware and its corresponding cabinet door or drawer is crucial for easy reassembly.
Next, the cabinets must be cleaned thoroughly. Use a strong degreaser specifically designed for kitchen cabinets. Grease and grime accumulate over time, hindering stain adhesion. Apply the degreaser liberally, allow it to dwell for the recommended period as per the product instructions, and then wipe it away with clean cloths. Repeat this process if necessary to ensure all traces of grease are removed.
After degreasing, a liquid deglosser or chemical abrasion product should be applied. These products chemically etch the existing finish, creating a slightly porous surface that allows the new stain to adhere properly. Follow the manufacturer's instructions carefully, as improper application can damage the existing finish. Typically, these products are applied with a clean cloth, allowed to dwell for a short period, and then wiped away. No rinsing is usually required.
In some cases, particularly with very glossy or hard finishes, a light scuff sanding may still be necessary. This involves using a fine-grit sanding sponge (220-grit or higher) to lightly roughen the surface. The goal is not to remove the existing finish entirely, but simply to create "tooth" for the stain to grip. After scuff sanding, remove all sanding dust with a tack cloth or a slightly damp lint-free cloth.
Finally, consider applying a bonding primer. Bonding primers are designed to adhere to a variety of surfaces and provide a stable base for subsequent coatings. Select a primer specifically formulated for use with stain. Apply a thin, even coat of primer using a brush or foam roller. Allow the primer to dry completely according to the manufacturer's instructions.
Selecting the Right Stain and Application Method
Choosing the appropriate stain is crucial for achieving the desired darker shade and ensuring compatibility with the prepared surface. Consider the existing wood type and the desired final appearance when selecting the stain type and color.
Gel stains are often recommended for staining over existing finishes without sanding. Gel stains are thicker than traditional stains and sit on the surface, rather than penetrating deeply into the wood. This characteristic makes them ideal for adhering to non-porous or previously finished surfaces. Choose a high-quality gel stain in the desired darker color. Test the stain on an inconspicuous area of the cabinet, such as the inside of a door, to ensure the color and adhesion are satisfactory before applying it to the entire surface.
Another option is to use a stain and finish combination product. These products combine the staining and sealing process into one step, simplifying the overall process. However, it is essential to select a product that is specifically designed for use over existing finishes. Carefully read the product label to ensure compatibility and proper application instructions.
When applying the stain, use a high-quality brush or a foam applicator. Apply the stain in thin, even coats, working with the grain of the wood. Avoid applying too much stain at once, as this can lead to drips, runs, and uneven coloration. After applying the stain, allow it to dwell for the recommended period according to the manufacturer's instructions. The longer the stain dwells, the darker the resulting color will be. However, do not exceed the recommended dwell time, as this can lead to an uneven or sticky finish.
After the stain has dwelled for the appropriate time, wipe away the excess stain with a clean, lint-free cloth. Wipe in the direction of the wood grain to avoid streaks. Be sure to remove all excess stain to prevent a tacky or uneven finish. If the desired color is not achieved with the first coat, allow the stain to dry completely and apply a second coat, repeating the application and wiping process.
Protecting the Newly Stained Cabinets
Once the stain has dried completely, it is essential to apply a protective clear coat to seal the stain and protect the cabinets from moisture, scratches, and wear. This step is crucial for ensuring the longevity and durability of the stained finish.
Choose a clear coat that is compatible with the stain and the existing finish. Polyurethane is a durable and water-resistant option that is suitable for kitchen and bathroom cabinets. Water-based polyurethanes are generally preferred for their low odor and easy cleanup. Oil-based polyurethanes offer superior durability but have a stronger odor and require mineral spirits for cleanup.
Apply the clear coat in thin, even coats using a brush or a spray gun. Avoid applying too much clear coat at once, as this can lead to drips, runs, and an uneven finish. Apply two to three coats of clear coat, allowing each coat to dry completely according to the manufacturer's instructions before applying the next coat. Lightly sand between coats with a fine-grit sanding sponge (320-grit or higher) to remove any imperfections and create a smooth, even surface.
After the final coat of clear coat has dried completely, allow the cabinets to cure for the recommended period before reattaching the hardware and putting them back into use. Curing allows the finish to fully harden and become more resistant to scratches and wear. The curing time can vary depending on the type of clear coat used, so consult the manufacturer's instructions for specific recommendations.
Maintaining the newly stained cabinets is important for preserving their appearance and extending their lifespan. Clean the cabinets regularly with a mild soap and water solution. Avoid using harsh chemicals or abrasive cleaners, as these can damage the finish. Wipe up spills and splatters promptly to prevent staining or water damage. Consider using cabinet liners to protect the inside of the cabinets from scratches and spills.
By following these steps, homeowners can successfully stain their cabinets darker without the need for extensive sanding, achieving a refreshed and updated look for their kitchen or bathroom.

Staining Your Wood Cabinets Darker Young House Love

Gel Stain Kitchen Cabinets Without Sanding Fast Easy Diy

Darken Cabinets Without Stripping The Existing Finish Pneumatic Addict

Staining Your Wood Cabinets Darker Young House Love

How To Refinish Wood Cabinets The Easy Way Love Remodeled

Gel Stain Kitchen Cabinets Without Sanding Fast Easy Diy

Diy Gel Stain Cabinets No Heavy Sanding Or Stripping Maison De Pax

Pickled Oak Bathroom Vanity Before And After Gel Stain Staining Cabinets Kitchen Makeover Wood

Diy Staining Oak Cabinets Eclectic Spark

Painting And Staining Cabinets For Girls Bath Makeover The Palette Muse
Related Posts