How to Stain Oak Kitchen Cabinets White: A Step-by-Step Guide
Staining oak kitchen cabinets white is a popular and relatively simple home improvement project that can give your kitchen a fresh, updated look. Follow these steps for a professional-looking finish.Materials You'll Need:
* Oak kitchen cabinet doors and drawer fronts * Degreaser * Sandpaper (120-grit and 220-grit) * Tack cloth * Wood conditioner * White wood stain * Polyurethane * Paintbrush or foam roller * RagsStep 1: Remove the Doors and Drawer Fronts
Start by removing the doors and drawer fronts from the cabinets. Label each piece with its location to ensure easy reinstallation later.Step 2: Clean and Degrease
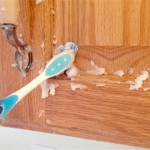
Thoroughly clean the cabinet doors and drawer fronts with a degreaser to remove any dirt, oil, or grease. Allow them to dry completely.Step 3: Sanding
Sand the cabinets lightly using 120-grit sandpaper to remove the existing finish. Wipe away the dust with a tack cloth. Finish by sanding with 220-grit sandpaper to smooth the surface.Step 4: Apply Wood Conditioner
Apply a thin, even coat of wood conditioner to the cabinets. This will help the stain absorb evenly and prevent blotching. Allow the conditioner to dry according to the manufacturer's instructions.Step 5: Stain the Cabinets
Stir the white wood stain thoroughly. Apply a thin coat of stain to a small section of the cabinet door or drawer front using a paintbrush or foam roller. Allow the stain to sit for the recommended amount of time, typically 5-15 minutes. Wipe off any excess stain with a rag.Step 6: Second Coat
Repeat Step 5 until you achieve the desired color intensity. Allow the cabinets to dry completely between coats.Step 7: Apply Polyurethane
Once the stain is dry, apply a clear polyurethane finish to protect the cabinets. Choose a polyurethane with a satin or semi-gloss finish for a durable and easy-to-clean surface. Apply two thin coats, allowing each coat to dry completely before applying the next.Step 8: Reinstall the Cabinets
Once the polyurethane is fully dry, reinstall the cabinet doors and drawer fronts. Admire your newly white oak cabinets and enjoy the fresh look of your kitchen.Tips for Success:
* Always test the stain and polyurethane on a small, inconspicuous area before applying it to the entire cabinet. * Use a light touch when sanding to avoid damaging the wood. * Apply thin, even coats of stain and polyurethane to prevent drips or runs. * Allow each coat to dry completely before applying the next to ensure a durable and professional-looking finish.
Kitchen Renovation How To Mix White And Stained Oak Cabinets Home Bunch Interior Design Ideas

Kitchen Renovation How To Mix White And Stained Oak Cabinets Home Bunch Interior Design Ideas

Farmhouse Check In A What We Chose Edition Stained Wood Or Painted Cabinets Emily Henderson

Kitchen Renovation How To Mix White And Stained Oak Cabinets Home Bunch Interior Design Ideas

Kitchen Renovation How To Mix White And Stained Oak Cabinets Home Bunch Interior Design Ideas

The Best White Wood Stain Options

White Oak Cabinet Stain Kitchen Remodel Redo Home Kitchens

Decorating With Stained Trim Cabinetry Lindsey Putzier

The Comeback Of Wood Kitchen Cabinets Farmhousehub

From To Great A Tale Of Painting Oak Cabinets
Related Posts