How To Transform Your Kitchen Cabinets
Kitchen cabinets often form the visual foundation of a kitchen. Over time, they can become outdated, worn, or simply no longer align with evolving aesthetic preferences. Rather than undertaking a complete kitchen remodel, transforming existing cabinets offers a cost-effective and less disruptive alternative to refresh the space. This article provides a comprehensive guide on various methods for transforming kitchen cabinets, covering preparation, painting, refacing, hardware updates, and other decorative enhancements.
Preparation is Paramount
Successful cabinet transformation hinges on thorough preparation. Inadequate preparation can lead to paint adhesion issues, uneven surfaces, and ultimately, a less-than-desirable outcome. The initial step involves a comprehensive cleaning of all cabinet surfaces. Use a degreasing cleaner to remove accumulated grease, grime, and food splatters. Trisodium phosphate (TSP) is a common option, though alternatives are available that are less harsh. Always follow the manufacturer's instructions and wear appropriate protective gear, such as gloves and eye protection.
Following cleaning, meticulously inspect the cabinets for any damages, such as chips, dents, or loose veneer. Repair these imperfections using wood filler or patching compound. Allow the filler to dry completely and then sand it smooth to blend with the surrounding surface. For areas with significant damage, consider using wood epoxy for a more durable repair.
Sanding prepares the cabinet surface for proper paint adhesion. Use medium-grit sandpaper (around 120-grit) to lightly scuff the existing finish. The goal is not to remove the entire finish, but rather to create a textured surface that the paint can grip onto. For cabinets with a glossy finish, a more aggressive sanding may be necessary to dull the surface. After sanding, thoroughly remove all sanding dust with a tack cloth or a vacuum cleaner with a brush attachment. Dust particles can interfere with paint adhesion and create a bumpy finish.
Protection of the surrounding area is crucial to prevent accidental paint splatters or damage. Cover countertops, floors, and appliances with drop cloths or plastic sheeting. Use painter's tape to mask off areas that should not be painted, such as walls, backsplashes, and the inside edges of cabinet frames. Remove all hardware, including knobs, pulls, and hinges. If hinges are to be reused, label them to ensure they are reinstalled in the correct location.
Painting Kitchen Cabinets: A Step-by-Step Guide
Painting is one of the most popular and cost-effective methods for transforming kitchen cabinets. The choice of paint and application technique significantly impacts the final result.
Selecting the appropriate paint is essential. Acrylic latex paint is a common choice for its durability, ease of application, and low odor. Oil-based paint offers a harder, more durable finish, but it requires longer drying times and emits stronger fumes. For cabinets, consider using a paint specifically formulated for cabinets and trim, as these paints are designed to withstand the wear and tear of everyday use. Opt for a semi-gloss or gloss finish for easier cleaning and a brighter appearance.
Primer is a critical step for achieving a professional-looking paint job. Primer seals the cabinet surface, provides a uniform base for the paint, and improves paint adhesion. Apply a thin, even coat of primer using a brush, roller, or sprayer. Allow the primer to dry completely according to the manufacturer's instructions before proceeding with painting. Oil-based primers are generally recommended for blocking stains and preventing tannin bleed-through from wood cabinets.
Apply the paint in thin, even coats. Multiple thin coats are preferable to one thick coat, as they reduce the risk of drips, runs, and uneven coverage. Use a high-quality brush for edging and detail work and a foam roller for larger surfaces. A paint sprayer can provide a smoother, more even finish, but it requires more skill and preparation. Allow each coat of paint to dry completely before applying the next coat. Lightly sand between coats with fine-grit sandpaper (around 220-grit) to remove any imperfections and create a smooth surface. After the final coat of paint has dried, remove the painter's tape carefully to avoid pulling off any paint.
Reinstall the hardware after the paint has fully cured. Curing time can vary depending on the type of paint used, but typically takes several days to a week. Handle the painted cabinets with care during this period to avoid scratching or chipping the finish.
Refacing Kitchen Cabinets: A More Extensive Transformation
Refacing is a more involved process than painting and involves replacing the cabinet doors and drawer fronts with new ones while keeping the existing cabinet boxes intact. Refacing offers a more dramatic transformation and allows for a change in style and material.
The first step in refacing is to carefully measure each cabinet door and drawer front. Accurate measurements are crucial for ensuring that the new doors and drawer fronts fit properly. Consider the desired style and material for the new doors and drawer fronts. Options include solid wood, wood veneer, laminate, and thermofoil. Each material offers different advantages in terms of aesthetics, durability, and cost.
Prepare the existing cabinet boxes by cleaning and sanding them thoroughly. Fill any holes or imperfections with wood filler and sand smooth. Apply a veneer to the exposed surfaces of the cabinet boxes to match the new doors and drawer fronts. The veneer can be applied using contact cement or a specialized adhesive. Use a roller to ensure that the veneer is properly bonded to the cabinet boxes.
Install the new doors and drawer fronts using new hinges and hardware. Ensure that the doors and drawer fronts are aligned properly and that they open and close smoothly. Adjust the hinges as needed to achieve a perfect fit. Install new knobs or pulls to complete the refacing project. Consider using soft-close hinges and drawer slides for added convenience and functionality.
Updating Hardware and Adding Decorative Touches
Even a simple hardware update can significantly impact the appearance of kitchen cabinets. Replacing old knobs and pulls with new ones can instantly update the look of the kitchen.
Choose hardware that complements the cabinet style and the overall kitchen design. Options include knobs, pulls, handles, and decorative backplates. Consider the finish of the hardware, such as brushed nickel, oil-rubbed bronze, or stainless steel. Ensure that the new hardware is compatible with the existing hole spacing on the cabinet doors and drawer fronts. If necessary, drill new holes to accommodate the new hardware. Use a drill bit that is slightly smaller than the diameter of the screw.
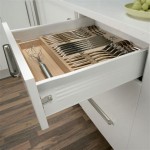
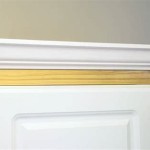
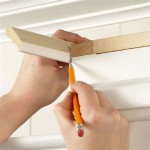
Adding decorative moldings and trim can further enhance the appearance of kitchen cabinets. Crown molding can be installed at the top of the cabinets to create a more finished look. Light rails can be installed underneath the upper cabinets to conceal under-cabinet lighting. Decorative panels can be added to the sides of the cabinets to create a more custom look. Consider adding glass inserts to some of the cabinet doors to display decorative items or glassware. Frosted glass or textured glass can add visual interest and privacy.
Under-cabinet lighting enhances both the aesthetics and functionality of a kitchen. Installing LED strip lights under the upper cabinets provides task lighting for countertops and improves overall visibility. Consider using dimmable LED lights to adjust the brightness as needed. Choose lighting fixtures that complement the cabinet style and the overall kitchen design.

And Easy Diy Tweaks You Can Make To Transform Your Kitchen

And Easy Diy Tweaks You Can Make To Transform Your Kitchen

Kitchen Diy Shaker Style Cabinets Cherished Bliss

25 Easy Ways To Update Kitchen Cabinets

15 Diy Kitchen Cabinet Makeovers Before After Photos Of Cabinets

10 Ways To Totally Transform Your Kitchen Cabinets Without Replacing Them

How To Update Your Kitchen Cabinets For Under 200

Transform Your Kitchen With A Cabinet Makeover From The Home Depot Services Remodel Small Styles Cabinets

Transform Cabinets Into A Custom High End Look

How To Simply Update Your Cabinets With Paint In A Day This Is Our Bliss
Related Posts