How To Update Kitchen Cabinets DIY: A Comprehensive Guide
Updating kitchen cabinets can significantly transform the aesthetic appeal and functionality of a kitchen. A complete cabinet replacement can be costly and disruptive. Fortunately, numerous DIY methods exist to refresh and revitalize existing cabinets without the expense and upheaval of a full renovation. This article provides a detailed guide to various DIY approaches for updating kitchen cabinets, covering preparation, techniques, and considerations for a successful project.
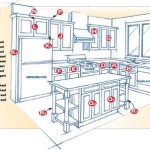
Before embarking on any cabinet update project, a thorough assessment of the existing cabinets is essential. This assessment will determine the most appropriate course of action and identify any underlying issues that need addressing. Examine the cabinet boxes, doors, and hardware for signs of damage, wear, or structural problems. Check for loose hinges, warped doors, peeling veneer, or water damage. Documenting the condition of the cabinets with photographs can be helpful for tracking progress and identifying areas requiring specific attention.
Next, determine the scope of the update. Are you primarily concerned with aesthetics, or are there functional improvements you wish to incorporate? Consider factors such as storage needs, workflow, and desired style. Will you be simply repainting or refacing, or will you be making more substantial modifications, such as adding pull-out shelves or changing the cabinet configuration?
Preparation is Paramount: Cleaning, Sanding, and Priming
Proper preparation is crucial for achieving a professional-looking finish. Neglecting this step can result in adhesion issues, uneven surfaces, and a less-than-satisfactory outcome. The preparation process typically involves cleaning, sanding, and priming the cabinet surfaces.
Begin by removing all hardware, including knobs, pulls, hinges, and handles. Organize the hardware in labeled containers to avoid confusion during reassembly. Next, thoroughly clean the cabinet surfaces to remove grease, grime, and dirt. A degreasing cleaner specifically designed for kitchen cabinets is recommended. Apply the cleaner according to the manufacturer's instructions and wipe down all surfaces with a clean, damp cloth. Rinse thoroughly to remove any cleaner residue. Allow the cabinets to dry completely before proceeding to the next step.
Sanding is essential for creating a smooth, receptive surface for paint or other finishes. The type of sanding required will depend on the existing finish and the desired outcome. For previously painted or varnished cabinets, sanding will help to remove any imperfections and create "tooth" for the new finish to adhere to. If the existing finish is in good condition, a light scuff sanding with fine-grit sandpaper (220-grit or higher) may be sufficient. For cabinets with peeling or damaged finishes, more aggressive sanding with medium-grit sandpaper (120-grit to 180-grit) may be necessary to remove the loose material. Use a sanding block or orbital sander for larger, flat surfaces, and hand sand intricate details and corners. Vacuum up the sanding dust thoroughly after each sanding stage. Wipe down the cabinets with a tack cloth to remove any remaining dust particles.
Priming is a critical step that helps to seal the surface, provide a uniform color base, and improve the adhesion of the topcoat. Choose a primer specifically designed for the type of finish you will be using. For example, if you are painting with latex paint, use a latex-based primer. For oil-based paints, use an oil-based primer. Apply the primer in thin, even coats using a brush, roller, or sprayer. Allow the primer to dry completely according to the manufacturer's instructions before proceeding to the painting or finishing stage. Lightly sand the primed surface with fine-grit sandpaper (320-grit or higher) to remove any imperfections and create an even smoother surface. Wipe down the cabinets with a tack cloth to remove any remaining dust particles before applying the topcoat.
Painting and Refinishing Techniques
Painting and refinishing are popular DIY methods for updating kitchen cabinets. These techniques can transform the appearance of cabinets with minimal cost and effort. The choice between painting and refinishing depends on the existing cabinet material and the desired aesthetic outcome.
Painting is a versatile option that can be used on a variety of cabinet materials, including wood, laminate, and metal. Select a high-quality paint specifically designed for kitchen cabinets. Alkyd or acrylic enamel paints are often recommended for their durability and ease of cleaning. Consider the desired sheen level, such as matte, satin, semi-gloss, or high-gloss. Matte finishes are more forgiving of imperfections, while high-gloss finishes are more durable and easier to clean but can highlight imperfections. Apply the paint in thin, even coats using a brush, roller, or sprayer. Brushing is ideal for small areas and intricate details, while rolling is suitable for larger, flat surfaces. Spraying provides the smoothest, most professional-looking finish but requires more preparation and equipment. Allow each coat of paint to dry completely before applying the next. Two to three coats of paint are typically required for optimal coverage and durability. Lightly sand between coats with fine-grit sandpaper (320-grit or higher) to remove any imperfections and create a smoother surface.
Refinishing involves stripping the existing finish from the cabinets and applying a new stain or varnish. This technique is best suited for solid wood cabinets with attractive grain patterns. Start by stripping the old finish using a chemical stripper or a heat gun. Follow the manufacturer's instructions carefully when using chemical strippers, and wear appropriate protective gear, such as gloves, eye protection, and a respirator. Once the old finish has been removed, sand the cabinets smooth with progressively finer grits of sandpaper. Start with a medium-grit sandpaper (120-grit to 180-grit) to remove any remaining finish or imperfections, and then move to a fine-grit sandpaper (220-grit or higher) to create a smooth, even surface. Stain the cabinets with a wood stain in the desired color. Apply the stain evenly using a brush, rag, or sponge. Wipe off any excess stain after a few minutes to prevent blotching. Allow the stain to dry completely before applying a topcoat of varnish or polyurethane. Apply the varnish or polyurethane in thin, even coats using a brush or sprayer. Sand lightly between coats with fine-grit sandpaper (320-grit or higher) to remove any imperfections and create a smoother surface.
For either painting or refinishing, consider using a paint sprayer for a more professional finish. Investing in a quality sprayer and practicing proper spraying techniques can result in a smoother, more even coat with fewer brush strokes. However, spraying requires more preparation, including masking off surrounding areas and using proper ventilation.
Refacing and Other Hardware Updates
Refacing is a more involved option that involves replacing the cabinet doors and drawer fronts while keeping the existing cabinet boxes in place. This technique can significantly update the look of the kitchen without the expense and hassle of replacing the entire cabinet system.
Begin by carefully measuring all of the existing cabinet doors and drawer fronts. Order new doors and drawer fronts in the desired style, material, and finish. Options include wood, laminate, and thermofoil. Ensure the new doors and drawer fronts are pre-drilled for hinges and hardware. Remove the old doors and drawer fronts and install the new ones using new hinges. Adjust the hinges as needed to ensure the doors and drawer fronts are properly aligned and swing smoothly. Consider adding new hardware, such as knobs, pulls, and handles, to complement the new doors and drawer fronts. Choose hardware that matches the overall style of the kitchen and provides a comfortable grip. Fill any existing holes from old hardware with wood filler and sand smooth before installing the new hardware.
Beyond refacing, simply updating the hardware can create a noticeable difference. Replacing outdated knobs and pulls with modern designs can instantly refresh the look of the cabinets. Consider styles that complement the existing décor and provide a comfortable grip. Options range from sleek and minimalist to ornate and decorative.
Adding organizational elements inside the cabinets can also enhance functionality. Consider installing pull-out shelves, drawer dividers, or spice racks to maximize storage space and improve accessibility. These additions can make a significant difference in the overall usability of the kitchen.
Another method for updating cabinets includes adding decorative trim or molding. Crown molding, baseboard molding, or decorative panels can be added to the cabinet faces to give them a more custom or high-end look. These additions can be particularly effective in transforming plain, builder-grade cabinets into more sophisticated pieces. Proper preparation and installation are essential for achieving a professional-looking result.
Lighting is another key element to consider when updating kitchen cabinets. Adding under-cabinet lighting can not only improve visibility on countertops but also create a more inviting and stylish ambiance. Options include LED strip lights, puck lights, and linear bar lights. Choose lighting that provides adequate illumination and complements the overall style of the kitchen.
Finally, consider the overall color scheme of the kitchen when updating the cabinets. The color of the cabinets should complement the countertops, backsplash, flooring, and appliances. Use color palettes to guide your choices and create a cohesive look. Neutral colors, such as white, gray, and beige, are popular choices for kitchen cabinets because they are versatile and timeless. However, bolder colors can also be used to create a more dramatic and personalized look.

Diy Kitchen Cabinets 25 And Easy Ideas For An Update Joyful Derivatives

Update Kitchen Cabinets For Diy Remodel

Diy Kitchen Cabinet Upgrade With Paint And Crown Molding

Diy Inexpensive Cabinet Updates Kitchen Cabinets Makeover Renovation

Kitchen Diy Shaker Style Cabinets Cherished Bliss

10 Simple Ideas To Update Your Kitchen Cabinets Jenna Sue Design

Upgrade Kitchen Cabinets On A Budget Diy Remodel Upgrades

Diy Painted Oak Kitchen Cabinets Makeover

Budget Friendly Diy Kitchen Cabinet Ideas The Turquoise Home

How To Update Wood Cabinets No Painting Simply Diy Home
Related Posts