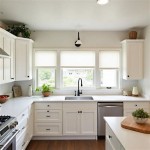
How To Update Laminate Kitchen Cupboards
Laminate kitchen cupboards, while durable and cost-effective, can sometimes appear dated or simply fail to match evolving aesthetic preferences. Fortunately, a complete kitchen remodel is not always necessary. Several techniques can transform laminate cupboards, offering significant visual improvements without the expense and disruption of a full replacement. This article outlines various methods to update laminate kitchen cupboards, detailing the necessary steps, materials, and considerations for achieving a successful outcome.
Cleaning and Preparation: The Foundation for Success
Proper preparation is paramount for any updating method. Laminate surfaces are naturally smooth and non-porous, meaning paint and other finishes may not adhere properly without thorough preparation. The first step involves a rigorous cleaning process.
Begin by removing all hardware, including knobs, pulls, and hinges. This ensures unobstructed access to the entire surface and prevents paint or other materials from accumulating around these areas. Next, use a degreasing cleaner specifically designed for kitchen surfaces. Grease and grime are common on kitchen cupboards, and these substances will hinder adhesion. Apply the cleaner liberally and scrub thoroughly with a non-abrasive sponge or cloth.
After cleaning, rinse the surfaces thoroughly with clean water to remove any cleaner residue. Allowing cleaner residue to remain can interfere with the adhesion of primers and paints. Use a clean, damp cloth to wipe down all surfaces, ensuring no soapiness or streaks remain. Allow the cupboards to air dry completely before proceeding to the next step.
Once dry, lightly sand the laminate surfaces with fine-grit sandpaper (180-220 grit). The objective is not to remove the laminate layer but to create a slightly roughened surface that will provide better adhesion for primer. Sand evenly, applying gentle pressure to avoid scratching or damaging the laminate. After sanding, wipe down the surfaces again with a tack cloth to remove any sanding dust. Dust, even microscopic particles, can compromise the finish.
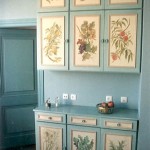
Painting Laminate Cupboards: A Transformation with Color
Painting is a popular and effective method for updating laminate kitchen cupboards. Choosing the right paint and application technique is crucial for a durable and aesthetically pleasing result.
The selection of primer is arguably as important as the paint itself. A high-quality bonding primer is essential for ensuring the paint adheres to the laminate surface. Choose a primer specifically formulated for use on slick or non-porous surfaces. Apply the primer in thin, even coats using a high-quality brush or a foam roller. Avoid applying the primer too thickly, as this can lead to drips and uneven drying. Allow the primer to dry completely according to the manufacturer's instructions, typically 24-48 hours.
Once the primer is fully dry, it is time to apply the paint. Acrylic latex paint is a good choice for kitchen cupboards due to its durability and ease of cleaning. Select a paint with a satin or semi-gloss finish. These finishes are more resistant to moisture and are easier to wipe clean than matte finishes, which makes them ideal for a kitchen environment. Apply the paint in thin, even coats, using the same method as with the primer. Multiple thin coats are preferable to one thick coat, as this minimizes the risk of drips and ensures a smoother, more uniform finish. Allow each coat to dry completely before applying the next.
Two to three coats of paint are typically necessary to achieve full coverage and a durable finish. After the final coat has dried completely, consider applying a clear protective topcoat for added durability and scratch resistance. Allow the topcoat to dry thoroughly before reattaching the hardware.
While specialized spray paints designed for laminate can be used, they often require more specialized equipment and techniques. Spray painting offers a smoother, more professional finish but requires careful masking and ventilation to avoid overspray.
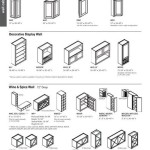
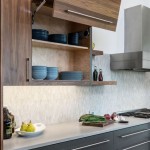
Applying New Laminate or Veneer: A More Extensive Renovation
For a more dramatic update, consider applying new laminate or veneer to the cupboard doors and drawer fronts. This method requires more time and skill but can completely transform the appearance of the cupboards.
Carefully measure each cupboard door and drawer front to determine the size of the laminate or veneer sheets needed. Ensure accurate measurements to minimize waste and ensure a seamless fit. When selecting new laminate or veneer, consider factors such as color, pattern, and texture. Numerous options exist, allowing for a wide range of design possibilities. Both self-adhesive and non-adhesive laminate and veneer options are available.
If using non-adhesive laminate or veneer, apply a thin, even layer of contact cement to both the back of the laminate/veneer and the surface of the cupboard door/drawer front. Allow the contact cement to dry until it is tacky to the touch, usually several minutes. Carefully align the laminate/veneer with the cupboard surface and press firmly into place. A roller can be used to ensure even adhesion and eliminate air bubbles. Trim any excess laminate/veneer with a router or utility knife.
Self-adhesive laminate/veneer simplifies the application process. Simply peel off the backing and carefully apply the sheet to the cupboard surface, pressing firmly to ensure adhesion. Trim any excess material with a utility knife. This method is generally easier for DIYers but may not be as durable as using contact cement.
Edge banding is essential for finishing the edges of the laminate or veneer. Edge banding is a thin strip of material that is applied to the exposed edges of the cupboard doors and drawer fronts. Apply the edge banding using a heat-activated adhesive or contact cement, depending on the type of edge banding used. Trim any excess edge banding with a utility knife and smooth the edges with a sanding block.
Replacing Hardware: A Simple yet Impactful Change
Often, the simplest changes can have the most significant impact. Replacing the existing hardware on laminate cupboards is a cost-effective and straightforward way to update their appearance.
Consider the overall style of the kitchen when selecting new hardware. Modern kitchens may benefit from sleek, minimalist pulls, while traditional kitchens may be better suited to more ornate knobs or handles. Consider the finish of the hardware as well. Brushed nickel, stainless steel, and oil-rubbed bronze are popular choices that can complement a variety of kitchen styles.
Before purchasing new hardware, measure the spacing between the screw holes on the existing hardware. This will ensure that the new hardware will fit properly without requiring additional drilling. If new holes are necessary, use a drill bit that is slightly smaller than the diameter of the screw. Use a level to ensure that the new hardware is installed straight.
Simply unscrew the old hardware and screw in the new hardware. Ensure that the screws are tight but not overtightened to avoid stripping the screw holes. Even a simple change of hardware can dramatically alter the look and feel of laminate cupboards, making them appear more modern and stylish.
In conclusion, updating laminate kitchen cupboards does not require a full-scale renovation. By carefully preparing the surfaces, selecting appropriate materials, and employing the right techniques, significant improvements can be achieved. Whether painting, applying new laminate/veneer, or simply replacing the hardware, homeowners can transform their kitchens without breaking the bank.

How To Add Trim And Paint Your Laminate Cabinets

How To Paint Laminate Kitchen Cabinets Perfect Finish Tips

How To Paint Laminate Cabinets The Interiors Addict

Painting Laminate Cupboards Crowies Paints

Painted Laminate Cupboards Kitchen Painting Cabinets

How To Add Trim And Paint Your Laminate Cabinets

How To Paint Laminate Kitchen Cabinets Angela Marie Made

A Year In Review Of How I Painted My Laminate Cabinets With Two Methods

How To Paint Laminate Cabinets Everything You Need Know

How To Add Trim And Paint Your Laminate Cabinets
Related Posts