How To Update Old Kitchen Cabinets
Kitchen cabinets often form the visual cornerstone of the kitchen. Over time, they can become outdated, worn, or simply no longer aligned with evolving aesthetic preferences. Rather than undergoing a complete kitchen renovation, updating existing cabinets presents a cost-effective and less disruptive alternative to refresh the space. This article will explore several methods for updating old kitchen cabinets, providing a comprehensive guide to achieving a revitalized kitchen aesthetic.
Preparation is Key: Cleaning and Assessment
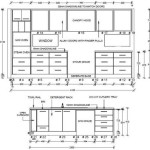
Before initiating any updates, thorough preparation is crucial. This begins with a comprehensive cleaning of the cabinets. Using a degreasing cleaner, remove accumulated grease, grime, and dust from both the interior and exterior surfaces. This step ensures proper adhesion of any subsequent paint, stain, or hardware. After cleaning, conduct a detailed assessment of the cabinet's condition. Examine for any structural damage, such as loose joints, warped doors, or damaged veneer. Identify any areas requiring repair before proceeding. Consider whether the current layout of the cabinets is functional. Updating might involve removing or modifying certain cabinets to improve workflow and storage capacity.
Repairing damaged areas is essential for a lasting update. Loose joints can be re-glued and clamped until dry. Warped doors may require professional straightening or replacement. Damaged veneer can be repaired with wood filler and sanded smooth. For significant structural damage, consult a professional carpenter. Addressing these issues early prevents further deterioration and ensures a structurally sound foundation for the update.
Painting Kitchen Cabinets: A Transformative Option
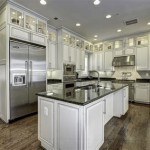
Painting is one of the most popular and impactful methods for updating old kitchen cabinets. It offers a wide range of color options and allows for complete transformation of the kitchen's overall aesthetic. The key to a successful paint job lies in proper preparation and application. Start by removing all hardware, including knobs, pulls, hinges, and latches. This ensures a clean and professional finish. Lightly sand the cabinet surfaces to create a slightly rough texture, promoting better paint adhesion. After sanding, wipe down the cabinets with a tack cloth to remove any remaining dust particles.
Priming is a critical step, especially when painting cabinets a light color over a dark finish. Apply a high-quality primer specifically designed for cabinets. This will block stains, prevent bleed-through, and provide a uniform surface for the paint. Allow the primer to dry completely according to the manufacturer's instructions. Once the primer is dry, apply two coats of a durable cabinet paint, such as alkyd or acrylic enamel. Use a high-quality brush or sprayer for a smooth, even finish. Allow each coat to dry completely before applying the next. After the final coat has dried, re-install the hardware.
When selecting paint, consider factors such as durability, ease of cleaning, and finish. Semi-gloss or gloss paints are generally recommended for kitchen cabinets due to their resistance to moisture and ease of cleaning. However, matte or satin finishes can also be used for a more modern look. Ensure the paint is compatible with the existing cabinet material. Consider spraying cabinets instead of brushing or rolling for a smoother, more professional look. If spraying, use a paint sprayer designed for cabinets and follow the manufacturer’s instructions carefully. Ventilation is essential when spraying paint.
Refacing Kitchen Cabinets: A Significant Upgrade
Refacing involves replacing the cabinet doors and drawer fronts while keeping the existing cabinet boxes. This method provides a significant upgrade without the cost and disruption of a complete cabinet replacement. It is particularly suitable for cabinets with structurally sound boxes but outdated or damaged doors. The process begins with carefully measuring all cabinet doors and drawer fronts. These measurements are crucial for ordering the correct replacement components. Select new doors and drawer fronts that match the desired style and finish. Options include wood, laminate, and thermofoil.
Once the new doors and drawer fronts arrive, remove the old ones. Clean the cabinet boxes thoroughly and repair any minor damage. Install new hinges and drawer slides as needed. Attach the new doors and drawer fronts, ensuring they are properly aligned and functional. Add new hardware, such as knobs and pulls, to complete the transformation. Refacing can include adding new veneer to the exposed cabinet boxes to match the new doors and drawer fronts. Veneer is available in a variety of wood species and finishes. Professional installation is recommended for complex refacing projects.
Consider the cost and time commitment of refacing compared to other options. While refacing is more expensive than painting, it is less expensive than replacing the entire cabinet set. The timeline for refacing can vary depending on the size and complexity of the project. It's crucial to choose a reputable supplier for the doors and drawer fronts, ensuring quality and durability. Explore different door styles, such as shaker, raised panel, and flat panel, to find the perfect match for the kitchen's overall design.
Enhancing Functionality: Hardware and Interior Upgrades
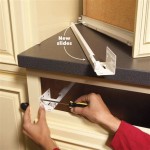
Beyond aesthetics, updating kitchen cabinets can involve enhancing their functionality. Replacing outdated hardware with modern knobs, pulls, and hinges can significantly improve the user experience. Installing soft-close hinges prevents doors from slamming, reducing noise and wear and tear. Adding pull-out shelves or drawer dividers maximizes storage space and improves organization. These upgrades can make the kitchen more efficient and enjoyable to use. Select hardware that complements the cabinet style and finish. Consider the ergonomics of the hardware, ensuring it is comfortable to grip and use.
Interior upgrades can significantly enhance the functionality of kitchen cabinets. Adding pull-out organizers for pots and pans makes it easier to access frequently used items. Installing spice racks keeps spices organized and within reach. Adding under-cabinet lighting illuminates countertops and improves visibility. Line the shelves with non-slip liners to prevent items from shifting and protect the cabinet surfaces. Consider installing a lazy Susan in corner cabinets to maximize storage space and accessibility. These small changes can have a significant impact on the overall functionality of the kitchen.
Incorporating smart storage solutions can transform the usability of the cabinets. Install vertical dividers for baking sheets and cutting boards. Use clear containers to store dry goods, making it easier to see what is on hand. Add a built-in knife block to keep knives organized and safe. By optimizing the interior organization, the kitchen becomes more efficient and enjoyable. Consider the specific needs and habits when designing interior upgrades. Prioritize the items used most frequently and design storage solutions that make them easily accessible.
Minor Modifications: Distressing, Glazing, and Staining
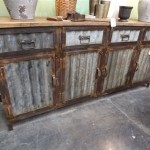
For a more subtle update, consider minor modifications such as distressing, glazing, or staining. Distressing involves creating a worn or aged look on the cabinets. This can be achieved by sanding away some of the paint or stain, creating imperfections that mimic natural wear and tear. Glazing involves applying a thin layer of tinted varnish over the painted surface, highlighting details and adding depth. Staining involves applying a wood stain to the cabinets, enhancing the natural grain and adding warmth to the space.
Distressing techniques can vary depending on the desired look. Sanding, chipping, and even applying a crackle finish can create different levels of distressing. Experiment with different techniques to achieve the desired aesthetic. Glazing is best applied with a brush or rag, wiping away the excess to leave a subtle tint. Choose a glaze color that complements the base paint color. Staining requires careful surface preparation and application. Sand the cabinets smooth before applying the stain, and wipe away the excess stain to achieve the desired color intensity.
These minor modifications can add character and depth to old kitchen cabinets. They are particularly effective for creating a rustic, farmhouse, or vintage aesthetic. Consider the overall style of the kitchen when choosing which modifications to implement. These techniques are often combined with other updates, such as replacing hardware or refacing doors, for a more comprehensive transformation. Always test the chosen technique on a small, inconspicuous area of the cabinet before applying it to the entire surface. Proper ventilation is crucial when working with stains and varnishes.
By carefully considering these methods and tailoring the approach to the specific needs and aesthetic preferences, homeowners can effectively update their old kitchen cabinets, transforming the heart of their home without undertaking a full-scale renovation. Each technique offers a unique balance of cost, effort, and visual impact, allowing for a customized solution that revitalizes the kitchen's overall look and functionality.

25 Easy Ways To Update Kitchen Cabinets

How To Update Old Wood Kitchen Cabinets

10 Simple Ideas To Update Your Kitchen Cabinets Jenna Sue Design

10 Ways To Update Kitchen Cabinets Without Replacing Them

Kitchen Update Without Remodeling Birkley Lane Interiors

How To Make Old Cabinets Look New With Paint

21 Diy Affordable Ways To Redo Kitchen Cabinets Extra Space Storage

How To Diy Open Kitchen Shelves From Old Cabinets A Beautiful Budget Update This Life

How To Update Kitchen Cabinet Doors On A Dime My Blessed Life

10 Simple Ideas To Update Your Kitchen Cabinets Jenna Sue Design
Related Posts