How to Use Gel Stain on Cabinets: A Comprehensive Guide
Gel stain presents a versatile option for updating or revitalizing kitchen or bathroom cabinets. Its thick, gel-like consistency allows for application on various surfaces, including those that might pose challenges for traditional stains. This article provides a detailed guide on how to effectively use gel stain on cabinets, covering preparation, application, and finishing techniques to achieve a professional-looking result.
Before embarking on any staining project, it is crucial to understand the properties of gel stain. Unlike penetrating stains that absorb into the wood grain, gel stain sits on the surface, creating a uniform color. This characteristic makes it an ideal choice for non-porous or previously finished cabinets. It can be applied to wood, veneer, laminate, and even metal cabinets with proper surface preparation. Its opacity also allows for darkening existing finishes or covering minor imperfections.
A successful gel staining project relies heavily on meticulous preparation. Insufficient preparation can lead to poor adhesion, uneven color, and a less than desirable final appearance. The following steps outline the essential preparation process.
Step 1: Thorough Cleaning and Degreasing
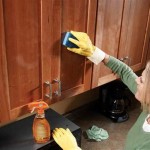
The first step involves removing all hardware from the cabinets, including knobs, pulls, hinges, and any other attached components. Labeling the hardware and its corresponding location on the cabinet doors and drawers is highly recommended to facilitate reassembly. After removing the hardware, a thorough cleaning is necessary. Cabinets, particularly those in the kitchen, often accumulate grease, grime, and dust. Use a strong degreasing cleaner specifically designed for kitchen surfaces. Apply the cleaner according to the manufacturer's instructions and scrub the cabinets thoroughly with a non-abrasive sponge or cloth. Rinse the cabinets with clean water and allow them to dry completely. Residual grease or grime can impede gel stain adhesion and affect the final finish.
Step 2: Scuff Sanding for Adhesion
Gel stain adheres best to surfaces that have a degree of "tooth" or roughness. This is achieved through scuff sanding. Use a fine-grit sandpaper (typically 220-grit or higher) to lightly sand the entire surface of the cabinets. The goal is not to remove the existing finish entirely, but rather to create tiny scratches that will provide a better grip for the gel stain. Apply even pressure while sanding, and avoid pressing too hard in any one area. After sanding, thoroughly remove all sanding dust with a tack cloth or a vacuum cleaner with a soft brush attachment. Dust particles can create an uneven surface and interfere with the adhesion of the gel stain.
Step 3: Priming (Optional but Recommended)
While gel stain can often be applied directly to the prepared surface, priming can significantly improve adhesion and color uniformity, especially on glossy or non-porous surfaces like laminate. Using a high-quality bonding primer specifically designed for difficult-to-adhere-to surfaces is recommended. Apply a thin, even coat of primer using a brush, roller, or spray gun. Allow the primer to dry completely according to the manufacturer's instructions, and then lightly sand it with fine-grit sandpaper (320-grit or higher) to create a smooth surface for the gel stain. Clean the surface again to remove any sanding dust before proceeding.
Once the cabinets are properly prepared, the gel stain application process can begin. Selecting the right application tools and techniques is crucial for achieving a smooth, even, and professional-looking finish.
Step 4: Applying the Gel Stain
Gel stain is best applied in thin, even coats. Using a high-quality natural bristle brush, a foam brush, or a lint-free cloth is recommended. Dip the brush or cloth into the gel stain, being careful not to overload it. Apply the stain to the cabinet surface, working in the direction of the grain (if applicable). If using a brush, work in long, even strokes, and avoid applying too much pressure. If using a cloth, apply the stain in a circular motion, then wipe in the direction of the grain to even out the color. Overlapping strokes are crucial to prevent streaks and ensure uniform coverage. Work in small sections, wiping off excess stain with a clean, lint-free cloth. The amount of stain left on the surface will determine the final color intensity. For a lighter color, wipe off more stain; for a darker color, wipe off less. Remember that multiple thin coats are preferable to a single thick coat, as they dry more evenly and are less prone to drips or runs.
Allow the first coat of gel stain to dry completely, according to the manufacturer's instructions. Drying times can vary depending on the humidity and temperature. It is essential to ensure the stain is completely dry before proceeding to the next coat. A slightly tacky surface indicates that the stain is not fully dry.
Step 5: Applying Additional Coats (If Necessary)
If a deeper or richer color is desired, apply additional coats of gel stain. Lightly sand the first coat with very fine-grit sandpaper (400-grit or higher) to smooth out any imperfections. Clean the surface thoroughly to remove any sanding dust. Apply the second coat of gel stain using the same technique as the first, wiping off excess stain with a clean cloth. Allow the second coat to dry completely. Repeat this process until the desired color intensity is achieved. Remember to always apply thin, even coats and allow each coat to dry completely before proceeding to the next.
After the final coat of gel stain has dried completely, a protective topcoat is essential to enhance durability and protect the finish from scratches, stains, and wear. The choice of topcoat depends on the desired sheen and the level of protection required.
Step 6: Applying a Protective Topcoat
Several types of topcoats are suitable for use over gel stain, including polyurethane, varnish, and lacquer. Polyurethane offers excellent durability and water resistance, making it a popular choice for kitchen cabinets. Varnish provides a warm, amber tone and is also durable. Lacquer dries quickly and provides a smooth, hard finish, but it may require specialized equipment for application. Choose a topcoat that is compatible with gel stain and suitable for the intended use of the cabinets.
Apply the topcoat in thin, even coats using a brush, roller, or spray gun. Follow the manufacturer's instructions for application and drying times. Lightly sand between coats with fine-grit sandpaper (400-grit or higher) to smooth out any imperfections and improve adhesion. Apply at least two coats of topcoat for optimal protection. Ensure that the final coat is allowed to dry completely before reattaching the hardware and reinstalling the cabinet doors and drawers.
Maintaining gel-stained cabinets involves regular cleaning with a mild soap and water solution. Avoid using harsh chemicals or abrasive cleaners, as these can damage the finish. Wipe up spills promptly to prevent staining. Applying a furniture polish or wax occasionally can help protect the finish and enhance its shine.
By following these steps carefully, it is possible to achieve a professional-looking gel stain finish on cabinets. Careful preparation, proper application techniques, and a protective topcoat are key to a successful and long-lasting result.

How To Gel Stain Cabinets With Ease Diva Of Diy

How To Gel Stain Cabinets With Ease Diva Of Diy

How To Use Gel Stain On Cabinets The Good Bad

How To Use Gel Stain On Cabinets The Good Bad

How To Gel Stain Cabinets Printable She Buys He Builds

Gel Stain Kitchen Cabinets Without Sanding Fast Easy Diy

How To Gel Stain Cabinets

Diy Gel Stain Cabinets No Heavy Sanding Or Stripping Maison De Pax

Choosing The Right Dark Gel Stain Java Vs Walnut Kitchen Cabinets Makeover Staining Remodel

How To Glaze Cabinets With Gel Stain Adventures Of A Diy Mom
Related Posts