How to Whitewash Old Kitchen Cabinets: A Comprehensive Guide
Whitewashing kitchen cabinets offers a budget-friendly and aesthetically pleasing way to revitalize the heart of the home. This technique, often associated with farmhouse or rustic styles, allows the original grain of the wood to show through, creating a unique and textured finish. Unlike fully painting cabinets, whitewashing retains the character of the wood while brightening the overall appearance of the kitchen. This article provides a detailed guide on how to effectively whitewash old kitchen cabinets, covering preparation, application, and necessary tools.
Before embarking on the whitewashing project, a thorough assessment of the existing cabinets is crucial. This assessment determines the necessary steps for preparation, including cleaning, sanding, and priming (if required). Consider the type of wood, its condition, and the desired final look. Heavily damaged or excessively stained cabinets might require more extensive preparation than cabinets in relatively good condition.
Key Point 1: Preparation is Paramount
Proper preparation is the foundation of a successful whitewashing project. Neglecting this step can lead to uneven application, poor adhesion, and a less-than-desirable final result. This stage includes removing hardware, cleaning the cabinets, sanding the surfaces, and applying a primer if deemed necessary.
1. Removing Hardware: Begin by removing all knobs, pulls, hinges, and other hardware from the cabinet doors and frames. This prevents paint from getting on the hardware and ensures a clean, professional finish. Store the hardware in a safe place to avoid losing any pieces. Labeling the hardware and its corresponding cabinet is recommended for easy reinstallation.
2. Cleaning the Cabinets: Thoroughly clean all cabinet surfaces with a degreasing cleaner. Kitchen cabinets are often coated with grease, grime, and food splatters, which can interfere with the adhesion of the whitewash paint. Use a strong degreaser and scrub all surfaces, paying particular attention to areas around handles and hinges. Rinse the cabinets with clean water and allow them to dry completely before proceeding.
3. Sanding the Surfaces: Sanding is essential to create a slightly roughened surface that promotes better adhesion of the whitewash. Use 120-grit sandpaper to lightly sand the entire surface of the cabinets. The goal is not to strip the cabinets entirely, but to create a "tooth" for the paint to grip onto. After sanding, wipe down the cabinets with a tack cloth to remove any sanding dust. Dust particles can compromise the finish and create an uneven surface.
4. Applying Primer (Optional): Whether or not to use a primer depends on the type of wood and the existing finish. If the cabinets are made of a dark wood, such as cherry or mahogany, or if they have a glossy finish, applying a primer is highly recommended. Primer helps to block the underlying color from bleeding through the whitewash and provides a uniform surface for the paint to adhere to. Choose a stain-blocking primer and apply it according to the manufacturer's instructions. Allow the primer to dry completely before moving on to the next step.
The decision of whether or not to prime is also contingent upon the desired final appearance. A more opaque whitewash look might benefit from a primer, whereas a more transparent, grain-emphasizing finish may not require it. Consider testing a small, inconspicuous area with and without primer to determine the best approach for achieving the desired aesthetic.
Key Point 2: Whitewash Paint Selection and Mixing
Choosing the right type of paint and mixing it to the appropriate consistency is crucial for achieving the desired whitewashed effect. Typically, latex or chalk paint are preferred for this technique. The key is to dilute the paint with water to create a translucent wash. The ratio of paint to water can be adjusted to control the level of opacity.
1. Paint Selection: Latex paint is a durable and readily available option for whitewashing. It's easy to apply and clean up, and it comes in a variety of sheens. Chalk paint is another popular choice, offering a matte finish and excellent adhesion. It often requires less surface preparation than latex paint. Consider the desired sheen and durability when selecting the paint.
2. Mixing the Whitewash: The standard ratio for mixing whitewash paint is typically 1:1, meaning equal parts paint and water. However, this ratio can be adjusted based on the desired opacity. For a more transparent wash, use a higher ratio of water to paint (e.g., 2:1 or even 3:1). For a more opaque wash, reduce the amount of water. Start with the 1:1 ratio and test the mixture on a small, inconspicuous area of the cabinet. Adjust the ratio as needed to achieve the desired transparency.
3. Tinting the Paint (Optional): While traditional whitewash is white, consider adding a small amount of tint to the paint to create a custom color. For example, adding a touch of gray or beige can create a warmer, more aged look. Use universal colorants and add them gradually, mixing thoroughly after each addition. Test the tinted whitewash on a small area to ensure the desired color is achieved.
When mixing the whitewash, ensure the paint and water are thoroughly combined. Use a paint stick or mixer to blend the mixture until it is smooth and consistent. Avoid creating air bubbles during the mixing process.
Key Point 3: Application and Finishing Touches
The application of the whitewash is where the transformation truly begins. Using the correct techniques and tools is essential for achieving a smooth and even finish. The finishing touches, such as distressing and sealing, can further enhance the look and protect the newly whitewashed cabinets.
1. Applying the Whitewash: Use a brush, rag, or sponge to apply the whitewash to the cabinet surfaces. Apply the whitewash in thin, even coats, working in the direction of the wood grain. For a more rustic look, use a rag to wipe away some of the whitewash immediately after applying it. This allows more of the wood grain to show through. For a smoother finish, use a brush to apply the whitewash and then lightly feather it out with a clean brush.
2. Distressing (Optional): Distressing is a technique used to create a weathered, aged look. This can be achieved by lightly sanding the edges and corners of the cabinets after the whitewash has dried. Use fine-grit sandpaper (220-grit or higher) and gently sand away some of the whitewash, revealing the underlying wood. Focus on areas that would naturally experience wear and tear, such as edges, corners, and around handles. Another distressing technique involves using a damp cloth to wipe away some of the whitewash in random areas. This creates a subtle, uneven finish.
3. Sealing the Cabinets: Sealing the whitewashed cabinets is essential to protect the finish and make them easier to clean. Use a water-based polyurethane sealant, as oil-based sealants can yellow over time. Apply the sealant in thin, even coats, following the manufacturer's instructions. Allow each coat to dry completely before applying the next. Two to three coats of sealant are typically recommended for maximum protection. Lightly sand between coats with fine-grit sandpaper to create a smooth finish.
4. Reinstalling Hardware: Once the sealant is completely dry, reinstall the hardware. Ensure all screws are tightened securely. If the hardware is old or worn, consider replacing it with new hardware to further enhance the look of the cabinets.
Proper drying time is crucial at each stage of the process. Allow ample time for the cleaner, primer (if used), whitewash, and sealant to dry completely before proceeding to the next step. Rushing the drying process can lead to adhesion problems, uneven finishes, and other issues.
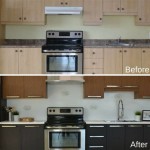
By following these steps, even old and tired kitchen cabinets can be transformed into bright, character-filled focal points. The process of whitewashing allows for creativity and customization, ensuring that the final result reflects the homeowner's individual style and preferences. Careful preparation, thoughtful application, and diligent finishing touches are key to achieving a professional and lasting result. The project requires patience and attention to detail, but the outcome is a revitalized kitchen that adds both value and charm to the home.

Distressed Kitchen Cabinets How To Distress Your

Antique Kitchens Pictures And Design Ideas White Kitchen Cabinets Distressed

Customer Experience With Dixie Belle Paint Hometalk

Armoire Makeover Whitewashing Tutorial Love Grows Wild

Whitewashed Cabinet Makeover Confessions Of A Serial Do It Yourselfer

6 Diy Whitewashed Cabinets For Cozy Shabby Chic Décor Shelterness

Customer Experience With Dixie Belle Paint Hometalk

How To Whitewash Dark Antique Wood Furniture Wife With A Budget

How To Glaze Kitchen Cabinets Diyer S Guide Bob Vila

Traditional Whitewash Kitchen Cabinets 05 Design Ideas Org Modern Custom Kitchens
Related Posts