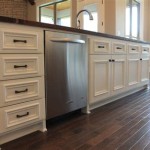
How to Whitewash Paint Kitchen Cabinets
Whitewashing kitchen cabinets is a great way to give them a fresh, updated look without the cost of replacing them. It's also a relatively easy DIY project that can be completed in a weekend.
Here are the steps on how to whitewash paint kitchen cabinets:
Materials You'll Need:
- White latex paint
- Water
- Paintbrush
- Painter's tape
- Sandpaper (optional)
- Tack cloth
Step 1: Clean the Cabinets
The first step is to clean the cabinets to remove any dirt or grease. Use a damp cloth with a mild detergent to wipe down the cabinets and then allow them to dry completely.
Step 2: Tape Off Hardware and Fixtures
Use painter's tape to tape off any hardware or fixtures that you don't want to paint. This includes knobs, handles, and hinges.
Step 3: Sand the Cabinets (Optional)
If your cabinets are glossy or have a lot of built-up grime, you may want to sand them lightly to roughen up the surface and help the paint adhere better. Use a fine-grit sandpaper and sand in the direction of the grain.
Step 4: Mix the Whitewash
In a bucket or large bowl, mix 1 part white latex paint with 1 part water. You can adjust the ratio of paint to water to achieve the desired opacity. For a more opaque finish, use more paint. For a more transparent finish, use more water.
Step 5: Apply the Whitewash
Use a paintbrush to apply the whitewash to the cabinets. Start by painting in the corners and along the edges, and then fill in the rest of the surface. Use long, even strokes and apply the whitewash in thin coats.
Step 6: Remove Painter's Tape
Once the whitewash is dry to the touch, remove the painter's tape. Be careful not to pull off any of the paint.
Step 7: Apply a Clear Finish (Optional)
To protect the whitewash and make it more durable, you can apply a clear finish. Use a polyurethane or varnish that is suitable for use on painted surfaces. Apply the finish according to the manufacturer's instructions.
Tips:
- Test the whitewash on an inconspicuous area first to make sure you're happy with the color and opacity.
- Use a light touch when applying the whitewash. You don't want to apply too much paint, or it will look opaque.
- Allow each coat of whitewash to dry completely before applying the next coat.
- If you're not happy with the opacity of the whitewash, you can add more paint or water to the mixture and reapply it.

Whitewashed Cabinet Makeover Confessions Of A Serial Do It Yourselfer

Whitewashed Cabinet Makeover Confessions Of A Serial Do It Yourselfer

Customer Experience With Dixie Belle Paint Hometalk

Behr Premium 1 Gal Ppu24 12 Whitewash Oak Satin Enamel Interior Exterior Cabinet Door Trim Paint 752001 The Home Depot

Whitewashed Kitchen Cabinets Finishes Ashley Spencer

6 Diy Whitewashed Cabinets For Cozy Shabby Chic Décor Shelterness

Whitewashed Kitchen Cabinets Finishes Ashley Spencer

Whitewash Paint Specifics Recipes Fantastic Handyman

Distressed Kitchen Cabinets How To Distress Your

How To Bleach And White Wash Oak Cabinets
Related Posts