Install Base Kitchen Cabinets: A Comprehensive Guide
Install base kitchen cabinets represent a significant investment in the home. The process involves careful planning, precise measurements, and skilled execution to ensure a functional and aesthetically pleasing kitchen space. This article provides a detailed overview of the key considerations and steps involved in installing base kitchen cabinets, intended for homeowners and contractors alike.
Before embarking on the installation process, a thorough assessment of the existing kitchen is crucial. This assessment should include identifying any structural issues, such as uneven floors or walls. Addressing these issues before installing the cabinets can prevent future problems and ensure a level and stable installation. Furthermore, the location of plumbing and electrical lines must be carefully considered to avoid damage during the installation process. This requires careful planning and consultation with qualified professionals if necessary.
Cabinet selection is a critical aspect of the install base kitchen cabinet project. Base cabinets provide the foundation for countertops and play a significant role in kitchen storage. Available in various styles, materials, and configurations, the choice of cabinets should align with the homeowner’s aesthetic preferences, functional needs, and budget. Common materials include solid wood, plywood, particleboard, and MDF (Medium-Density Fiberboard). Solid wood is known for its durability and aesthetic appeal, while plywood offers a good balance of strength and affordability. Particleboard and MDF are often used for cabinet boxes and doors due to their smooth surfaces and cost-effectiveness. The selection process should also consider the type of cabinet construction. Framed cabinets have a face frame that provides stability and a traditional look, while frameless cabinets offer a more contemporary appearance and greater accessibility.
Proper preparation is paramount for a successful cabinet installation. This includes removing existing cabinets, appliances, and any flooring that will interfere with the installation process. The area should be thoroughly cleaned and any necessary repairs, such as patching holes in the walls or leveling the floor, should be completed. Additionally, it is essential to gather all the necessary tools and materials, including a level, measuring tape, stud finder, drill, screws, shims, and safety glasses. A detailed plan outlining the cabinet layout and installation sequence should also be prepared to streamline the process and minimize errors.
Key Point 1: Accurate Measurement and Layout
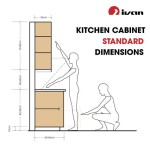
Accurate measurement is the foundation of a successful install base kitchen cabinet project. Precise measurements of the kitchen space are essential to ensure that the selected cabinets will fit properly. This involves measuring the length and width of the walls, as well as the height of the ceiling. It is also important to account for any obstacles, such as windows, doors, and plumbing fixtures. These measurements should be carefully documented and used to create a detailed layout plan. The layout plan should indicate the location of each cabinet, as well as the placement of appliances and fixtures. This plan serves as a roadmap for the installation process, helping to ensure that the cabinets are installed in the correct order and that the overall design is achieved.
The layout plan should also consider the functionality of the kitchen. The placement of cabinets should be optimized for efficiency and ease of use. For example, cabinets near the cooktop should be used to store pots and pans, while cabinets near the sink should be used to store dishes and cleaning supplies. The layout plan should also take into account the flow of traffic in the kitchen. The placement of cabinets should not obstruct walkways or create bottlenecks. A well-designed layout plan will make the kitchen more functional and enjoyable to use.
Before beginning the installation, it is essential to verify the accuracy of the layout plan by dry-fitting the cabinets in the kitchen. This involves placing the cabinets in their intended locations without securing them to the walls. This allows for a final check to ensure that the cabinets fit properly and that the layout plan is accurate. Any necessary adjustments can be made at this stage, before the cabinets are permanently installed.
Locating wall studs is another critical step in the layout process. Wall studs provide the structural support necessary to securely mount the cabinets. A stud finder can be used to locate the studs behind the drywall. Once the studs have been located, their positions should be marked on the wall. These marks will be used as guides for securing the cabinets to the walls.
Key Point 2: Securing Cabinets to the Wall
Securing base cabinets to the wall is a critical step in ensuring their stability and longevity. The cabinets must be securely fastened to the wall studs to prevent them from shifting or collapsing under the weight of the countertop and stored items. This process involves using screws or lag bolts to attach the cabinets to the studs. The type and size of fasteners will depend on the weight of the cabinets and the thickness of the wall studs.
Before securing the cabinets, it is essential to ensure that they are level. A level should be used to check the top, bottom, and sides of each cabinet. If the cabinets are not level, shims can be used to adjust their height. Shims are thin pieces of wood or plastic that can be inserted between the cabinet and the wall to level the cabinet. Once the cabinets are level, they can be secured to the wall studs using screws or lag bolts.
When securing the cabinets, it is important to use screws or lag bolts that are long enough to penetrate the wall studs. The fasteners should be long enough to go through the cabinet backing and into the stud by at least 1.5 inches. This will ensure that the cabinets are securely anchored to the wall. It is also important to use the correct size drill bit for the screws or lag bolts. Using the wrong size drill bit can damage the wall studs or make it difficult to drive the fasteners.
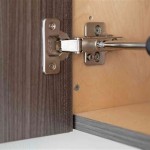
In addition to securing the cabinets to the wall studs, it is also important to connect the cabinets to each other. This can be done using clamps and screws. Clamps are used to hold the cabinets together while the screws are driven. The screws should be driven through the cabinet frames to create a strong and stable connection. Connecting the cabinets to each other will help to prevent them from shifting or separating over time.
Key Point 3: Addressing Plumbing and Electrical Considerations
Installing base kitchen cabinets often involves dealing with existing plumbing and electrical lines. Careful planning and execution are essential to avoid damage and ensure compliance with building codes. This may involve relocating or modifying plumbing and electrical fixtures to accommodate the new cabinet layout. If modifications are required, it is crucial to consult with licensed plumbers and electricians to ensure that the work is done safely and according to code.
Prior to installation, the location of all plumbing and electrical lines should be carefully identified and marked. This will help to avoid accidentally drilling into or cutting through these lines during the installation process. If necessary, the water and electricity should be shut off before beginning any work that could potentially damage these lines.
When installing cabinets around plumbing fixtures, such as sinks and dishwashers, it is important to ensure that there is adequate clearance for the pipes and connections. This may require cutting holes in the cabinet backing or modifying the cabinet design. The holes should be carefully measured and cut to prevent leaks or other problems. Flexible supply lines and drain hoses can be used to make connections easier and more flexible.
Electrical outlets and switches may also need to be relocated or modified to accommodate the new cabinet layout. This should be done by a licensed electrician to ensure that the wiring is done safely and according to code. Ground fault circuit interrupters (GFCIs) should be installed near sinks and other wet areas to protect against electrical shock. All electrical connections should be properly insulated and grounded to prevent hazards.
After the cabinets have been installed, it is important to thoroughly inspect the plumbing and electrical connections to ensure that there are no leaks or other problems. The water and electricity should be turned back on and tested to verify that everything is working properly. Any issues should be addressed promptly to prevent further damage or safety hazards.
Once the base cabinets are installed, the next step is to install the countertops. The countertops should be carefully measured and cut to fit the cabinets. The countertops can be made from a variety of materials, including granite, marble, quartz, and laminate. The choice of countertop material will depend on the homeowner’s aesthetic preferences, budget, and durability requirements. After the countertops are installed, the backsplash can be installed. The backsplash is a decorative panel that protects the wall behind the countertop from water and food splatters. The backsplash can be made from a variety of materials, including tile, glass, and stone.
Following the installation of the countertops and backsplash, the final step involves installing the cabinet hardware. This includes door handles, drawer pulls, and hinges. The choice of cabinet hardware should complement the overall design of the kitchen and provide a functional and aesthetic finishing touch. With careful planning and execution, installing base kitchen cabinets can significantly enhance the functionality and aesthetic appeal of the kitchen space.

How To Install Kitchen Wall And Base Cabinets Builder Supply

How To Install Kitchen Cabinets Diy Family Handyman

Blind Corner Cabinets Step By Guide On How To Install

How To Install Kitchen Cabinets Interiors

How To Install Wall And Base Kitchen Cabinets Using The Best 14 Steps

How To Install Cabinets Like A Pro The Family Handyman

How To Install Base Cabinets The Home Depot With This Old House

How To Install Base Cabinets In Kitchen Insider S K

How To Prepare For A Kitchen Cabinet Installation

How To Build Base Cabinets The Complete Guide Houseful Of Handmade
Related Posts