Installing Flooring Around Kitchen Cabinets
Installing new flooring in a kitchen presents unique challenges, particularly when working around existing cabinets. This task requires careful planning and precise execution to achieve a professional, seamless finish. This article outlines the key considerations and steps involved in installing flooring around kitchen cabinets.
The first decision revolves around whether to remove the cabinets or work around them. Removing cabinets provides unrestricted access, simplifying the flooring installation process. However, this method is more time-consuming and involves the risk of damaging the cabinets during removal and reinstallation. It may also necessitate replacing countertops and backsplashes. For these reasons, most homeowners and contractors opt to install flooring around existing cabinetry.
Working around cabinets requires precise measuring and cutting. Accurate measurements are crucial to ensure the flooring fits snugly against the cabinet base. Begin by measuring the distance from the wall to the cabinet base at several points along its length. Inconsistent measurements may indicate uneven walls or cabinet bases, requiring adjustments during installation. Transfer these measurements to the flooring material, ensuring to account for the expansion gap.
The expansion gap is a critical element in flooring installation. This small space, typically ¼ inch, allows the flooring material to expand and contract with changes in temperature and humidity, preventing buckling and other damage. This gap should be maintained around all fixed objects, including cabinets, walls, and islands.
Choosing the right tools for the job is essential. A high-quality measuring tape, a sharp utility knife or flooring cutter, and a jigsaw are typically required. For intricate cuts around cabinet toe kicks, a multi-tool with a flush-cut blade can be invaluable. Safety glasses and gloves should be worn throughout the process.
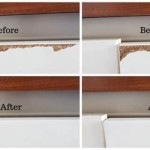
Several methods can be used to achieve a clean, professional finish around cabinet bases. One common approach is to undercut the cabinet toe kicks. This involves carefully removing a small portion of the toe kick with a oscillating multi-tool to allow the flooring to slide underneath. This creates a seamless transition and eliminates the need for transition strips or molding. However, this method requires precise cutting and may not be feasible with all cabinet styles.
Another method is to scribe the flooring to the cabinet base. This involves holding the flooring material against the cabinet base and marking its contours directly onto the flooring. Using a jigsaw or coping saw, the flooring is then cut along the scribed line, creating a perfect fit. This technique is particularly useful for cabinets with intricate profiles or uneven bases.
When working with laminate or engineered wood flooring, it is important to consider the direction of the planks. Ideally, the planks should run parallel to the longest wall in the kitchen for a visually appealing effect. However, if the cabinets run perpendicular to the longest wall, aligning the planks with the cabinets can also create a pleasing aesthetic. Ultimately, the choice depends on the specific layout of the kitchen and personal preference.
For tile installations, considerations differ slightly. Cutting tiles requires a tile cutter or wet saw for accurate, clean cuts. Spacers are essential to ensure consistent grout lines and allow for expansion. When fitting tiles around cabinet bases, it may be necessary to use smaller cut tiles to achieve a snug fit. A tile nipper can be useful for making small adjustments to the shape of tiles.
Regardless of the flooring material chosen, ensuring a level subfloor is paramount. An uneven subfloor can lead to issues with the finished floor, such as squeaking, cracking, or unevenness. Before installing any flooring, the subfloor should be inspected and leveled if necessary using self-leveling compound or other appropriate methods.
After the flooring is installed, the expansion gap around the cabinets should be concealed. Quarter-round molding or shoe molding provides a decorative finish and protects the edges of the flooring. These moldings are available in a variety of materials and finishes to match the flooring and cabinetry.
Finally, meticulous clean-up is necessary. Remove any debris, dust, and leftover adhesive. Vacuum or sweep the floor thoroughly and clean any spills or smudges immediately. This final step completes the installation process and ensures a pristine, professional-looking floor.
Installing flooring around kitchen cabinets requires patience, precision, and attention to detail. By following the proper procedures and using the correct tools, a seamless and beautiful finish can be achieved, enhancing the overall appearance and value of the kitchen.

Do You Install Floating Floor Under Cabinets Wood Flooring

Do You Install Floating Floor Under Cabinets Wood Flooring

How To Install Laminate Flooring Diy Tips And Tricks

Do You Install Floating Floor Under Cabinets Wood Flooring

Installing Vinyl Plank Flooring For Beginners Anika S Diy Life

Great Idea To Add A Ledger Board The Wall Level Base Cabinets Kitchen 9 Installing Laminate Flooring In House Tweaking

Before Or After Cabinet Installation Four Considerations To Help Finalizing Your Flooring Kraftmaid

How To Install Laminate Flooring Around Kitchen Cabinets Global Cool

Can I Use Laminate Flooring Under Cabinets

Do You Install Flooring Before Cabinets Best Practices Reallyfloors America S Est Hardwood
Related Posts