Installing Laminate Flooring Under Kitchen Cabinets
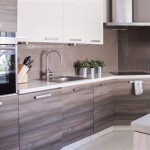
Installing laminate flooring under kitchen cabinets is a common DIY project that can significantly enhance the look and feel of your kitchen. Laminate flooring is a durable and affordable option that offers a variety of styles and colors to complement any kitchen design. This article will guide you through the process of installing laminate flooring under kitchen cabinets, ensuring a seamless and professional finish.
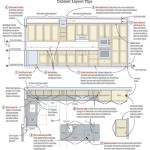
Preparing the Subfloor
Before installing laminate flooring, it's essential to prepare the subfloor to ensure a level and stable surface. Start by removing any existing flooring, including tile, carpet, or wood. Next, inspect the subfloor for any unevenness, cracks, or gaps. If necessary, use a leveling compound to fill in any imperfections. It's also crucial to ensure the subfloor is clean and free of debris. If the subfloor is plywood, consider adding a layer of moisture barrier, such as a vapor barrier or a moisture-resistant underlayment, to prevent moisture damage.
Measuring and Cutting Laminate Flooring
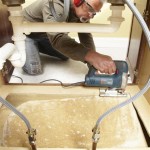
Once the subfloor is prepared, you can begin measuring and cutting the laminate flooring. Start by measuring the area under the cabinets, taking into account any obstacles like pipes or appliances. You can utilize a tape measure and a pencil for accurate measurements. Use a circular saw or a jigsaw to cut the laminate planks to the desired size. Before cutting, remember to account for expansion gaps around the perimeter of the flooring and between planks. These gaps allow for the natural expansion and contraction of the laminate due to temperature and humidity fluctuations.
Installing the Laminate Flooring
The installation process involves laying the laminate planks in rows, starting from one corner of the area under the cabinets. Begin by laying down the first row of planks, making sure to leave the necessary expansion gaps. Secure the first row of planks by tapping them together with a tapping block and a rubber mallet. Ensure the edges of each plank are aligned and tightly fitted. Continue attaching subsequent rows of planks by aligning them with the previous row and tapping them into place. For every row of planks, use a spacer to maintain the expansion gap between the planks and the walls or obstacles. As you reach the end of a row, you might need to cut the last plank to fit the space. Ensure the cut edge aligns with the previous row of planks and use a tapping block to secure it.
Finishing Touch
After installing the laminate flooring under the cabinets, use a transition strip to create a smooth transition from the laminate floor to the existing flooring in the adjacent area. The transition strip conceals the expansion gap and provides a professional finish. Consider installing a shoe molding around the perimeter of the area. This molding not only adds a decorative element but also shields the edges of the laminate flooring from wear and tear. Lastly, clean up any dust or debris and admire your newly installed laminate flooring under the kitchen cabinets.
Tips for Success
Here are some additional tips to ensure a successful laminate flooring installation:
Use a Flooring Taping Block
A tapping block is a useful tool for tapping the laminate planks together without damaging them. The block distributes the force evenly across the plank, preventing the planks from being damaged or scratched.
Ensure the Subfloor is Level
An uneven subfloor can cause the laminate flooring to warp or buckle over time. Use a level to ensure the subfloor is flat before installing the laminate flooring.
Use the Right Tools
Having the right tools can make the installation process much easier and more efficient. Ensure you have a circular saw or jig saw, a tape measure, a pencil, a tapping block, and a rubber mallet.
Maintain Proper Expansion Gaps
Always leave expansion gaps between the laminate planks and the walls or obstacles. These gaps are essential for allowing the laminate flooring to expand and contract due to temperature and humidity fluctuations. Neglecting these gaps can lead to warping or buckling of the flooring.
Wear Safety Gear
Wear safety glasses and gloves to protect yourself from dust and debris during the installation process.
By following these tips and guidelines, you can successfully install laminate flooring under your kitchen cabinets, achieving a beautiful and functional space.

Do You Install Floating Floor Under Cabinets Wood Flooring

Do You Install Floating Floor Under Cabinets Wood Flooring

Do You Install Floating Floor Under Cabinets Wood Flooring

Laminate Flooring In Kitchens Do It Yourself Installation

Can I Use Laminate Flooring Under Cabinets

Iheart Organizing Do It Yourself Floating Laminate Floor Installation

How To Install Laminate Flooring Diy Tips And Tricks

Do You Install Floating Floor Under Cabinets Wood Flooring

How To Install Laminate Flooring Around Kitchen Cabinets Global Cool

Working Around Kitchen Appliances Installing Laminate Flooring Vlog 194
Related Posts