Install Roll Out Shelves in Kitchen Cabinets: A Comprehensive Guide
Kitchen cabinets often present challenges in organization and accessibility. Deep cabinets, in particular, can become storage black holes, making it difficult to reach items at the back. Roll-out shelves, also known as pull-out shelves or sliding shelves, offer a practical solution, significantly improving the efficiency and usability of kitchen storage spaces. This article provides a detailed guide on installing roll-out shelves in kitchen cabinets, covering the benefits, planning, installation process, and considerations for specific cabinet types.
Roll-out shelves transform static cabinet spaces into dynamic storage solutions. They bring items to the user, eliminating the need to bend, reach, and rummage through cluttered cabinets. This increased accessibility is especially beneficial for individuals with mobility limitations or those who simply seek a more organized kitchen environment. The ability to easily view and access stored items also reduces food waste by preventing forgotten items from expiring at the back of the cabinet.
Key Point 1: Evaluating Cabinet Space and Choosing the Right Roll-Out Shelves
Before embarking on the installation process, a thorough assessment of the existing cabinet space is crucial. This evaluation encompasses measuring the interior dimensions of the cabinet, identifying any obstructions, and determining the desired shelf configuration. Accurate measurements are paramount for selecting roll-out shelves that fit properly and function smoothly.
First, measure the width, depth, and height of the cabinet opening. It is essential to measure the narrowest point of the opening, as some cabinets may taper slightly. The depth measurement determines the maximum depth of the roll-out shelf, while the width dictates the shelf's usable storage area. The height allows for stacking multiple shelves within a single cabinet.
Next, inspect the interior of the cabinet for any obstructions, such as pipes, electrical wiring, or structural supports. These obstructions may necessitate modifications to the shelf installation or the selection of a different shelf size or design. Consider the placement of hinges and door frames, ensuring they do not interfere with the shelf's movement.
After obtaining accurate measurements and identifying any obstructions, the next step is to choose the appropriate type of roll-out shelf. Various options are available, differing in material, construction, and features. Common materials include wood, wire, and metal. Wooden shelves offer a classic aesthetic and can be customized to match existing cabinetry. Wire shelves provide excellent ventilation and are suitable for storing items that require airflow. Metal shelves are durable and easy to clean, making them ideal for storing heavy or messy items.
Consider the load capacity of the shelves. Determine the maximum weight the shelves will need to support and select shelves with a corresponding weight rating. Overloading shelves can lead to damage and premature failure.
Roll-out shelves are available in different configurations, including full-extension and partial-extension models. Full-extension shelves extend completely out of the cabinet, providing maximum access to stored items. Partial-extension shelves extend partially, leaving a portion of the shelf inside the cabinet. Full-extension shelves are generally preferred for maximizing accessibility, but partial-extension shelves may be suitable for shallower cabinets or situations where space is limited.
Finally, consider the mounting hardware and installation method. Some roll-out shelves come pre-assembled, while others require assembly. Choose shelves that are easy to install and that include all necessary hardware, such as screws, mounting brackets, and drawer slides. Ensure the chosen hardware is compatible with the cabinet material. Particleboard cabinets, for example, may require different types of screws than solid wood cabinets.
Key Point 2: Preparing the Cabinet and Installing the Drawer Slides
Once the roll-out shelves have been selected, the next step is to prepare the cabinet for installation. This involves cleaning the cabinet interior, marking the shelf placement, and installing the drawer slides. Proper preparation is essential for ensuring a secure and functional installation.
Begin by thoroughly cleaning the interior of the cabinet. Remove any debris, dust, or food particles. This will create a clean surface for the drawer slides to adhere to and prevent any contaminants from interfering with the shelf's movement. Use a vacuum cleaner or a damp cloth to clean the cabinet interior. Allow the cabinet to dry completely before proceeding with the installation.
Next, determine the desired placement of the roll-out shelves within the cabinet. Consider the height of the items being stored and the spacing between shelves. Use a level to ensure that the shelves will be installed evenly. Mark the locations for the drawer slides on the cabinet walls. Use a pencil to make clear and accurate marks. These marks will serve as a guide for aligning the drawer slides during installation.
Before installing the drawer slides, it may be necessary to pre-drill pilot holes. This is particularly important for cabinets made of hardwood or particleboard. Pre-drilling pilot holes prevents the wood from splitting and makes it easier to drive the screws. Use a drill bit that is slightly smaller than the diameter of the screws. Align the drill bit with the marked locations and drill the pilot holes to the appropriate depth.
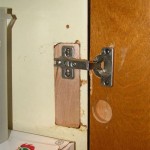
Install the drawer slides according to the manufacturer's instructions. Typically, the drawer slides consist of two parts: a cabinet member and a drawer member. The cabinet member is attached to the cabinet wall, while the drawer member is attached to the roll-out shelf. Align the cabinet members with the marked locations and secure them to the cabinet walls using screws. Ensure that the screws are driven straight and tight. Repeat this process for the other side of the cabinet.
After installing the cabinet members, test the alignment of the drawer slides. Use a level to ensure that the slides are parallel and that they are at the same height. If the slides are not aligned properly, the roll-out shelf may not slide smoothly. Adjust the position of the slides as necessary until they are properly aligned.
Key Point 3: Attaching the Roll-Out Shelf and Testing Functionality
With the drawer slides securely installed, the final step is to attach the roll-out shelf and test its functionality. This involves attaching the drawer members to the shelf, inserting the shelf into the cabinet, and verifying that it slides smoothly and securely. Proper attachment and testing are crucial for ensuring the long-term performance of the roll-out shelf.
Attach the drawer members to the roll-out shelf according to the manufacturer's instructions. Align the drawer members with the pre-drilled holes on the shelf and secure them using screws. Ensure that the screws are driven straight and tight. Repeat this process for the other side of the shelf.
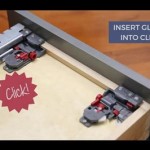
Carefully insert the roll-out shelf into the cabinet. Align the drawer members on the shelf with the cabinet members on the cabinet walls. Gently slide the shelf into the cabinet until it is fully seated. Ensure that the shelf slides smoothly and that it does not bind or catch. If the shelf does not slide smoothly, check the alignment of the drawer slides and adjust them as necessary.
Once the shelf is fully inserted, test its functionality. Extend the shelf fully and retract it completely. Verify that the shelf slides smoothly and that it locks into place when fully extended or retracted. Listen for any unusual noises, such as squeaking or grinding. These noises may indicate that the drawer slides are not properly aligned or that they need to be lubricated.
If the shelf slides smoothly and locks into place, test its weight capacity. Place several heavy items on the shelf and extend and retract it. Verify that the shelf can support the weight without sagging or bending. If the shelf sags or bends, remove some of the weight and consider reinforcing the shelf.
After testing the shelf's functionality and weight capacity, make any necessary adjustments. If the shelf is not level, use shims to level it. If the drawer slides are loose, tighten the screws. If the shelf is squeaking or grinding, lubricate the drawer slides with a silicone-based lubricant.
Repeat this process for each roll-out shelf being installed in the cabinet. Ensure that each shelf is properly installed and that it functions smoothly and securely. Once all of the shelves have been installed and tested, the cabinet is ready for use.
In conclusion, installing roll-out shelves in kitchen cabinets is a relatively straightforward process that can significantly improve the organization and accessibility of kitchen storage spaces. By following these detailed steps, one can transform cluttered and inefficient cabinets into well-organized and easily accessible storage solutions. Proper planning, careful execution, and attention to detail are key to achieving a successful installation and enjoying the benefits of roll-out shelves for years to come.

Installing Pull Out Shelves In Kitchen Cabinets

How To Make Pull Out Shelves For Kitchen Cabinets Ron Hazelton

Installing Sliding Shelves In A Pantry Southern Hospitality

Installing Sliding Shelves In A Pantry Southern Hospitality

Kitchen Organization Pull Out Shelves In Pantry Remodelando La Casa

Install Roll Out Shelf To Base Cabinet Deck

How To Make Simple Easy Sliding Shelves

Installing Sliding Shelves In A Pantry Southern Hospitality

10 Roll Outs For Kitchen Cabinets Ana White

Kitchen Storage Pull Out Pantry Shelves Diy Family Handyman
Related Posts