Installing Crown Molding on Kraftmaid Kitchen Cabinets: A Comprehensive Guide
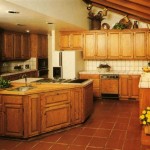
Crown molding is a decorative element that elevates the aesthetic appeal of kitchen cabinets. It creates a finished, polished look by bridging the gap between the cabinets and the ceiling, adding architectural interest and visual weight. Kraftmaid cabinets, known for their quality and diverse styles, often benefit significantly from the addition of crown molding. This article provides a detailed guide on how to install crown molding on Kraftmaid kitchen cabinets, ensuring a professional and aesthetically pleasing result.
Key Point 1: Preparation and Planning
Proper preparation is essential for a successful crown molding installation. This stage involves accurate measurements, material selection, and careful planning to avoid costly errors and ensure a seamless integration of the molding with the Kraftmaid cabinets.
Measuring and Calculating Materials: The first step is to meticulously measure the perimeter of the cabinets where the crown molding will be installed. Measure each run of cabinets individually, accounting for inside and outside corners. Add these measurements together to determine the total length of crown molding needed. It is advisable to add extra material (approximately 10-15%) to account for waste due to cuts, mistakes, and intricate corner miters. When measuring for inside corners, measure the angle of the corner itself with a protractor/angle finder. Also, make a diagram of your kitchen with all the cabinet dimensions to help visualize the cutting angles.
Selecting the Right Crown Molding: Kraftmaid cabinets offer a variety of styles, and the crown molding should complement the existing design. Consider the cabinet's color, finish, and overall aesthetic. Options range from simple, clean lines to more ornate and detailed profiles. Wood crown molding is a popular choice for its versatility and ease of finishing, however, paintable MDF or polyurethane moldings are also viable and often more cost-effective options to consider. Ensure the crown molding's size is proportional to the cabinet height and room dimensions. Too large a molding can overwhelm a small kitchen, while too small a molding may appear insignificant.
Gathering Necessary Tools and Materials: A well-equipped workspace streamlines the installation process. Essential tools include a miter saw (preferably with a compound miter function), a measuring tape, a pencil, a level, a stud finder, a nail gun (or hammer and nails), construction adhesive, wood filler or spackle, sandpaper, paint or stain (to match the cabinets), safety glasses, and ear protection. Furthermore, you'll need backing strips or nailers, which act as a solid base for securing the molding to the cabinets. These are typically made from wood with a similar thickness to the cabinet frame.
Prepping the Cabinets: Inspect the tops of the Kraftmaid cabinets for any imperfections or uneven surfaces. Clean the surfaces thoroughly to remove dust, grease, and debris. Lightly sanding the area where the adhesive will be applied can improve adhesion. If necessary, apply a primer to the cabinet surface where the crown molding will be attached. This will ensure that the adhesive or paint adheres properly, especially on laminate or melamine surfaces.
Key Point 2: Installing Backing Strips and Nailers
Backing strips, also known as nailers, are crucial for providing a solid surface to which the crown molding can be attached. They compensate for the often-thin and angled surface of the cabinet frame and allow for secure nailing or screwing.
Cutting and Installing Backing Strips: Measure and cut the backing strips to fit snugly along the top of the cabinets where the crown molding will be installed. Ensure the strips are long enough to provide ample support while remaining hidden behind the molding. The thickness of the backing strips should be such that, when installed, they create a flat, even surface for the crown molding to rest against. Typically, ¾ inch thick lumber works well. The width should be sufficient to allow for secure attachment to the cabinet frame and adequate nailing surface for the crown molding.
Securing the Backing Strips: Apply construction adhesive to the back of the backing strips and firmly press them against the top of the Kraftmaid cabinets. Use a finish nailer or screws to further secure the strips to the cabinet frame. Ensure the nails or screws are long enough to penetrate the cabinet frame securely, but not so long that they protrude through the inside of the cabinet. If using screws, pre-drill pilot holes to prevent splitting the wood. Regularly check the strips with a level to ensure they are perfectly horizontal. Any inconsistencies at this stage will be amplified when the crown molding is installed.
Addressing Corners: Pay special attention to corners. Ensure the backing strips meet flush and are securely joined at the corners. This will create a solid foundation for the mitered or coped joints of the crown molding. For outside corners, the backing strips should extend slightly beyond the cabinet edges to provide additional support for the molding. For inside corners, ensure the strips create a seamless transition to avoid gaps or uneven surfaces.
Alternative Methods for Backing: If the cabinet design or construction makes it difficult to attach backing strips directly, consider using L-brackets or other metal fasteners to create a secure mounting surface. These brackets can be attached to the cabinet frame and then to the backing strips, providing stability and support. Another option is to use a combination of adhesive and clamps to hold the backing strips in place while the adhesive cures. This method is particularly useful for cabinets with curved or irregular surfaces.
Key Point 3: Cutting and Installing Crown Molding
Cutting and installing crown molding requires precision and attention to detail. Accurate measurements and precise cuts are essential for creating seamless joints and a professional-looking finish.
Determining Miter Angles: Crown molding rests at an angle between the wall and the ceiling, meaning you can't simply cut the molding at 45 degrees for a 90-degree corner. The miter angle depends on the spring angle of the crown molding. A spring angle is the angle at which the molding sits against the wall and ceiling. The manufacturer specifications should state the spring angle. The most common spring angle is 45 degrees, but it's crucial to always confirm the actual angle by temporarily placing a piece of your crown molding into the corner. * For a 45-degree spring angle, the miter angle for a 90-degree corner is typically 45 degrees, but this is on the flat part of the mitter saw(not compound). The compound angle should be set to 35.3 degrees. * For corners that are not 90 degrees, the miter angle is calculated by dividing the corner angle in half. For example, a 100-degree corner would require a 50-degree miter cut on each piece of molding. It is recommended to practice cuts on scrap pieces before cutting the actual crown molding.
Cutting Inside Corner Joints: Inside corners can be addressed with either mitered joints or coped joints. Coped joints are generally preferred for inside corners because they are more forgiving of slight imperfections in the corner angle which aren't always exactly 90 degrees. To create a coped joint, one piece of crown molding is cut square (90 degrees) and fitted snugly into the corner. The second piece is mitered at the appropriate angle, then the back edge of the mitered cut is "coped" – meaning the bulk of the waste is removed creating a profile to match the installed piece for a near-perfect fit. Using a coping saw or a specialized coping tool, carefully remove the material behind the mitered cut, following the profile of the molding. The coped end should fit snugly against the square-cut piece, creating a seamless joint. Fine-tune the fit with a file or sandpaper if needed.
Cutting Outside Corner Joints: Outside corners require mitered joints. Align the crown molding on the miter saw, ensuring it is positioned correctly relative to the fence and blade. Make the miter cut according to the calculated angle. Repeat the process for the second piece of crown molding, ensuring the miter angles are complementary. Test the fit of the mitered joint before applying adhesive and fasteners. If the joint is not perfect, make slight adjustments to the miter angles until a seamless fit is achieved.
Attaching the Crown Molding: Apply construction adhesive to the back of the crown molding where it will contact the backing strips. Position the molding carefully along the top of the cabinets, aligning it with the backing strips. Use a finish nailer to secure the molding to the backing strips, driving nails through the molding and into the wood. Ensure the nails are spaced evenly and driven flush with the molding surface. For larger or heavier moldings, consider using screws in addition to nails for added stability. Countersink the screws and conceal them with wood filler.
Finishing Touches: After the crown molding is installed, inspect the joints and surfaces for any imperfections. Fill any gaps or nail holes with wood filler or spackle. Allow the filler to dry completely, then sand it smooth with fine-grit sandpaper. Apply a coat of primer to the crown molding, if necessary, and then paint or stain it to match the Kraftmaid cabinets. Apply multiple coats of paint or stain for a durable and professional finish. Consider caulking the joint between the crown molding and the ceiling (or wall, if the molding extends to the wall) to create a seamless transition and prevent drafts. Use a paintable caulk that matches the color of the molding.

How To Install Kraftmaid Crown Molding Hunker

Crown Molding Installation Instruction

Kraftmaid 056 Molding Roberts Company Inc

How To Install Crown Molding On Full Overlay Cabinets Kitchen Cabinet

Diy Design Fanatic How To Install Crown Molding On Full Overlay Cabinets

Customize Your Cabinetry Creating Kitchen With Kraftmaid

How To Install Kitchen Cabinets And Remove Them Remodel Pt 1 Crafted Work

Kitchen And Bath Blab Modern Supply S Lighting Trends

Kraftmaid Momentum Cotton Standard Bellamy Starter Moulding Common 96 In X 3 Actual At Com

Installing First Cabinets A Few Quirks With Molding Kitchens Forum Gardenweb Kraftmaid P Kitchen Cabinet Remodel Diy
Related Posts