Installing Crown Molding On Top Of Cabinets
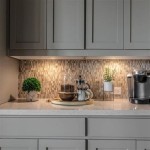
Crown molding adds a touch of elegance and sophistication to any kitchen. Installing it atop kitchen cabinets can enhance the overall aesthetic, creating a seamless transition between the cabinets and the ceiling. This article provides a comprehensive guide to installing crown molding on top of kitchen cabinets, outlining the necessary tools, materials, and step-by-step instructions.
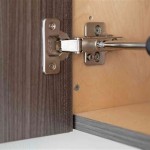
Tools and Materials: Before beginning the installation process, gather the necessary tools and materials. These include a miter saw, coping saw, measuring tape, pencil, safety glasses, stud finder, nail gun, finishing nails, wood glue, caulk, putty knife, sandpaper, primer, and paint. The specific type of crown molding will influence the choice of fasteners and adhesives. Consider the material of the molding, whether it's solid wood, MDF, or PVC, when selecting appropriate nails and glue.
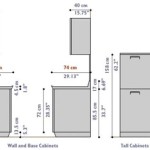
Measurements and Planning: Accurate measurements are crucial for a successful installation. Measure the length of the cabinets where the crown molding will be installed. Account for any corners, both inside and outside. It's recommended to create a simple sketch of the cabinet layout with the measurements noted to ensure accuracy. This plan aids in calculating the required length of molding and determining the necessary angles for cuts.
Cutting the Molding: Cutting crown molding requires precision and understanding of miter angles. For outside corners, the molding is typically cut at a 45-degree angle. Inside corners, however, often necessitate coping, a technique that involves shaping one piece of molding to fit snugly against the profile of the adjoining piece. Practice cuts on scrap pieces of molding are highly recommended, especially for coping, to ensure a perfect fit and minimize material waste.
Dealing with Inside Corners: Coping inside corners, while challenging, provides the cleanest and most professional look. Begin by cutting one piece of molding at a 45-degree angle as if it were an outside corner. Then, using a coping saw, carefully cut along the profile of the mitered edge, following the curves and contours of the molding. This creates a contoured edge that will fit seamlessly against the mating piece. Test the fit and make any necessary adjustments before applying adhesive.
Dealing with Outside Corners: Outside corners are generally simpler to manage. Cut both pieces of molding at 45-degree angles, ensuring the correct orientation for each piece. A miter saw fitted with a sharp blade is essential for achieving clean, accurate cuts. Dry-fit the pieces together to verify the angle and make any slight adjustments before securing them.
Securing the Molding: Before applying adhesive, dry-fit the entire run of molding to ensure all pieces fit correctly. Once satisfied with the fit, apply a thin bead of wood glue to the back edges of the molding. Position the molding against the cabinets and secure it using finishing nails. A nail gun provides the most efficient method for fastening, driving nails accurately and quickly without marring the surface of the molding.
Filling Gaps and Finishing: Minor gaps or imperfections at the joints can be filled using caulk. Apply a small amount of caulk to the gap and smooth it out with a putty knife. Once the caulk is dry, lightly sand any excess to create a smooth, seamless surface. This prepares the molding for priming and painting.
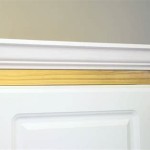
Priming and Painting: Priming the molding seals the surface and provides a better base for the paint to adhere to. Apply a thin, even coat of primer and allow it to dry completely. Once the primer is dry, apply two coats of paint in the desired color, allowing sufficient drying time between each coat. This completes the installation process, leaving a beautifully finished look that elevates the appearance of the kitchen.
Additional Tips: Consider using a paintable caulk that blends seamlessly with the painted finish. When working with long runs of molding, a helper can be invaluable in supporting the molding during installation. Always wear safety glasses when operating power tools. Proper ventilation is essential when working with primers and paints. Invest in quality molding for a more durable and aesthetically pleasing result.
Variations and Considerations: The installation process may vary slightly depending on the specific style of crown molding and the cabinet configuration. For instance, some installations might benefit from using mounting blocks for added support. In situations with uneven ceilings or walls, scribes may be necessary to ensure a tight fit against the adjacent surfaces. Always consult the manufacturer’s instructions for specific recommendations and best practices regarding the chosen molding material.

Adding Crown Molding To Kitchen Cabinets Young House Love

How To Attach Crown Mouldings Frameless Cabinets Stonehaven Life

Diy Kitchen Cabinet Upgrade With Paint And Crown Molding

Installing Kitchen Cabinet Crown Molding

How To Install Crown Molding On Kitchen Cabinets

How To Add Crown Molding Kitchen Cabinets Abby Organizes

How To Attach Crown Mouldings Frameless Cabinets Stonehaven Life

Adding Crown Molding To Kitchen Cabinets Young House Love

Cabinet Crown Molding Rogue Engineer

Adding Crown Molding To The Top Of Bookcases Remodelando La Casa
Related Posts