Installing Kitchen Base Cabinets: A Comprehensive Guide
Installing kitchen base cabinets is a significant undertaking in any kitchen renovation project, whether a complete remodel or simply updating existing features. Proper installation is crucial not only for the aesthetic appeal of the kitchen but also for the functionality, durability, and safety of the cabinets themselves. This guide provides detailed insights and practical advice for successfully installing kitchen base cabinets, ensuring a professional and long-lasting result.
Before initiating the installation process, thorough planning and preparation are essential. This phase involves accurately measuring the kitchen space, selecting appropriate cabinet styles and sizes, and gathering the necessary tools and materials. Neglecting these preliminary steps can lead to significant complications and costly errors later on.
Accurate measurements are paramount for ensuring that the cabinets fit correctly within the designated space. Begin by measuring the length of each wall where cabinets will be installed. Pay close attention to any irregularities in the walls, such as corners that are not perfectly square or pipes and obstructions that may affect cabinet placement. It is advisable to create a detailed floor plan, noting all dimensions and potential obstacles. This plan will serve as a reference throughout the installation process.
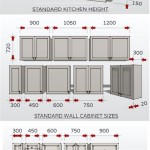
Selecting the appropriate cabinet styles and sizes is another crucial aspect of the preparation phase. Consider the overall design aesthetic of the kitchen, the available space, and the intended storage needs. Base cabinets come in various widths, depths, and heights, offering a range of options for customization. Standard base cabinet height is typically 34.5 inches, allowing for a countertop height of 36 inches when installed. Cabinet depth is usually 24 inches, providing ample storage space. Choose cabinet styles that complement the existing decor and meet the specific requirements of the kitchen.
Gathering the necessary tools and materials is critical for a smooth and efficient installation process. Essential tools include a level (both a standard level and a laser level), a stud finder, a drill with various drill bits, a screwdriver (both manual and powered), a measuring tape, a pencil, a safety glasses, a utility knife, and shims. Materials required include cabinet screws, wood glue, construction adhesive, and any necessary fillers or touch-up paint.
Key Point 1: Establishing a Level Baseline
One of the most critical steps in installing base cabinets is establishing a perfectly level baseline along the wall. This baseline serves as a reference point for aligning all subsequent cabinets, ensuring a uniform and professional appearance. Failure to establish a level baseline can result in cabinets that are misaligned, causing problems with countertop installation and overall functionality.
Begin by locating the highest point on the floor along the wall where the cabinets will be installed. A laser level is the most accurate tool for this task, but a standard level can also be used. Mark the highest point on the wall using a pencil. From this point, measure up 34.5 inches (the standard base cabinet height) and mark a level line along the entire length of the wall. This line represents the top of the base cabinets.
Next, measure down from the level line to determine the height of the cabinet support system. This system typically consists of a 2x4 ledger board attached to the wall. The ledger board provides temporary support for the cabinets while they are being installed. The height of the ledger board will depend on the thickness of the cabinet legs or feet. Ensure that the ledger board is installed perfectly level, using a level to verify its accuracy.
The ledger board should be securely attached to the wall studs using appropriate screws. Use a stud finder to locate the studs and mark their positions on the wall. Pre-drill pilot holes through the ledger board before driving in the screws to prevent the wood from splitting. Ensure that the screws are long enough to penetrate the wall studs securely.
Once the ledger board is installed, verify that it is level and securely attached to the wall. This step is crucial for ensuring that the cabinets are properly supported during the installation process. Any inaccuracies in the ledger board will be amplified as the cabinets are installed, leading to problems with alignment and stability.
Key Point 2: Installing the Corner Cabinets
Corner cabinets often present unique challenges during installation due to their specialized design and position within the kitchen layout. Proper installation of corner cabinets is essential for maximizing storage space and ensuring a seamless transition to adjacent cabinets. The sequence of installation often dictates that corner cabinets are installed first.
Begin by positioning the corner cabinet in its designated location, ensuring that it is properly aligned with the walls. Use shims to level the cabinet from front to back and side to side. The goal is to create a perfectly level and stable platform for the cabinet. Check the level using a standard level and adjust the shims as needed.
Once the cabinet is properly leveled, secure it to the wall using cabinet screws. Pre-drill pilot holes through the cabinet frame and into the wall studs. This will prevent the wood from splitting and ensure a secure connection. Use screws that are long enough to penetrate the wall studs, typically 2.5 to 3 inches in length.
Pay close attention to the alignment of the corner cabinet with adjacent cabinets. The goal is to create a smooth and seamless transition between the cabinets. Use shims to adjust the position of the corner cabinet as needed to achieve perfect alignment. Once the alignment is satisfactory, secure the corner cabinet to the adjacent cabinets using cabinet screws.
For blind corner cabinets, ensure that the swing-out mechanism is properly installed and functioning correctly. Test the mechanism to ensure that it operates smoothly and without any obstructions. Adjust the mechanism as needed to achieve optimal performance.
Key Point 3: Aligning and Securing the Remaining Cabinets
After the corner cabinet is securely installed, the remaining base cabinets can be installed in sequence. Proper alignment and secure attachment are essential for creating a uniform and stable cabinet system. This section will provide detailed instructions for installing the remaining cabinets, ensuring a professional and long-lasting result.
Begin by positioning the first adjacent cabinet next to the corner cabinet, ensuring that it is properly aligned. Use shims to level the cabinet from front to back and side to side, creating a perfectly level and stable platform. Check the level using a standard level and adjust the shims as needed.
Once the cabinet is properly leveled, secure it to the wall using cabinet screws. Pre-drill pilot holes through the cabinet frame and into the wall studs, preventing the wood from splitting and ensuring a secure connection. Use screws that are long enough to penetrate the wall studs.
Clamp the adjacent cabinets together using clamps. This will help to align the cabinets and create a tight seam. Drill pilot holes through the cabinet frames where they meet, and then secure the cabinets together using cabinet screws. Use wood glue between the frames for added strength and stability.
Repeat this process for each remaining base cabinet, ensuring that each cabinet is properly leveled, aligned, and secured to the wall and adjacent cabinets. Pay close attention to the alignment of the cabinet faces, ensuring that they are flush and level. Use shims to make any necessary adjustments.
Once all of the base cabinets are installed, inspect the entire system to ensure that it is level, aligned, and securely attached. Make any necessary adjustments before proceeding to the next step. Remove the ledger board once the cabinets are fully secured.
After removing the ledger board, install the toe kicks. The toe kicks are the strips of wood that cover the gap between the bottom of the cabinets and the floor. Cut the toe kicks to the appropriate length and attach them to the cabinets using construction adhesive and finishing nails. Ensure that the toe kicks are properly aligned and flush with the cabinet faces.
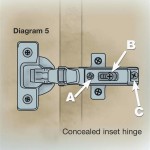
Finally, install the cabinet doors and drawers. Adjust the hinges and drawer slides as needed to ensure that the doors and drawers open and close smoothly. This step completes the installation of the base cabinets, providing a functional and aesthetically pleasing foundation for the kitchen.
Throughout the installation process, it is crucial to maintain attention to detail and accuracy. Double-check all measurements and alignments before securing the cabinets in place. Take the time to make any necessary adjustments to ensure a professional and long-lasting result.
Installing kitchen base cabinets is a challenging but rewarding project. By following these detailed instructions and tips, homeowners can successfully install their own base cabinets, saving money and achieving a professional-quality result. While this guide provides comprehensive information, it is advisable to consult with a professional if you are unsure about any aspect of the installation process.

How To Install Kitchen Cabinets Diy Family Handyman

6 Tips For Kitchen Cabinet Installation

12 Tips For Installing An Kitchen Az Diy Guy

Blind Corner Cabinets Step By Guide On How To Install

10 Tips For Installing Base Cabinets In The Kitchen Bob Vila

How To Build Base Cabinets The Complete Guide Houseful Of Handmade

How To Install Kitchen Cabinets The Wall And Floor With Ease

Blind Corner Cabinets Step By Guide On How To Install

How To Install Kitchen Cabinets The Wall And Floor With Ease

Foolproof Kitchen Cabinet Installation Jlc
Related Posts