Installing Kitchen Cabinet Bases: A Comprehensive Guide
Installing kitchen cabinet bases is an essential component of kitchen renovation or remodeling projects. This comprehensive guide will guide you through the necessary steps and considerations to ensure a successful and professional-looking installation. By following these instructions carefully, you can tackle this project with confidence and achieve a stunning and functional kitchen space.
1. Planning and Preparation
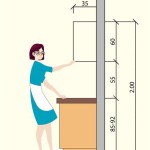
Before commencing the installation, thorough planning and preparation are crucial. First, determine the layout of your kitchen and where the cabinets will be placed. Measure the space accurately, considering the size and configuration of each cabinet. Create a detailed plan that indicates the location of appliances, plumbing, and electrical connections.
2. Assembling the Cabinets
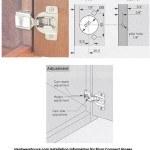
Begin by assembling the cabinet bases according to the manufacturer's instructions. Ensure all pieces fit securely and use wood glue for added strength. Install any necessary hardware, such as drawer slides and hinges.
3. Leveling the Cabinets
Leveling the cabinets is essential for a stable and aesthetically pleasing installation. Place the cabinets in their designated locations and use a level to check their alignment. Adjust the legs or shims beneath the cabinets as needed to achieve a level surface.
4. Securing the Cabinets to the Wall
To prevent the cabinets from tipping forward, secure them to the wall using screws or L-brackets. Drill pilot holes into the walls and stud locations, then drive screws into the holes and tighten them securely.
5. Installing Toe Kicks
Toe kicks cover the gap between the cabinets and the floor, providing a finished look and protection from moisture. Measure and cut the toe kicks to the appropriate length, and attach them to the bottom of the cabinets using screws or adhesive.
6. Connecting Appliances and Fixtures
Once the cabinet bases are in place, connect any appliances or fixtures that will be installed within or on top of the cabinets. For example, install the dishwasher, sink, and oven according to their respective manufacturer's instructions.
7. Finishing Touches
The final step is to install the cabinet doors and drawer fronts. Align them carefully and secure them with screws. Add any decorative elements, such as handles or knobs, to complete the look.
Additional Tips
- Use a rubber mallet to gently tap cabinets into place and avoid damaging the finish.
- Measure and mark pilot holes before drilling to ensure accuracy.
- Consider using a laser level for precise leveling of cabinets.
- Check the level of the cabinets throughout the installation process to prevent any misalignment.
- If you encounter any difficulties, do not hesitate to consult a professional cabinet installer.

How To Install Kitchen Cabinets Diy Family Handyman

Blind Corner Cabinets Step By Guide On How To Install

How To Install Cabinets Like A Pro The Family Handyman

How To Install Base Cabinets Part 1 Of 4 Wmv

How To Install Kitchen Cabinets Interiors

How To Install Kitchen Cabinets The Home Depot

Blind Corner Cabinets Step By Guide On How To Install

Step By Guide To Installing Kitchen Cabinets Diy Cabinetcorp

How To Install Base Cabinets In Kitchen Insider S K

How To Install Wall And Base Kitchen Cabinets Using The Best 14 Steps
Related Posts