Installing Kitchen Wall Cabinets Yourself: A Comprehensive Guide
Installing kitchen wall cabinets is a significant undertaking that can dramatically transform a kitchen's functionality and aesthetic appeal. While often considered a task for professional contractors, a homeowner with intermediate DIY skills and a patient approach can successfully install wall cabinets. This article provides a comprehensive guide to navigate the process, highlighting critical steps and essential considerations for a successful installation.
Proper preparation is paramount. Before commencing any physical work, assess the existing kitchen layout and the new cabinet specifications. This includes verifying the cabinet dimensions, identifying the placement of utilities (electrical wiring, plumbing), and determining the desired height and alignment of the wall cabinets. A detailed plan prevents costly mistakes and ensures a smooth installation process.
Safety is of utmost importance. Always wear safety glasses to protect the eyes from dust and debris. Use appropriate gloves to handle materials and power tools. When working with electrical wiring, ensure the power is turned off at the breaker box. If unfamiliar with electrical work, consult with a qualified electrician. Avoid working on unstable surfaces, ensuring the ladder or scaffolding is securely positioned.
Key Point 1: Planning and Preparation
Planning is the cornerstone of a successful kitchen cabinet installation. This phase involves meticulous measurement, layout planning, and material gathering.
Begin by accurately measuring the kitchen walls, considering any existing architectural features such as windows, doors, and soffits. These measurements will determine the number and size of cabinets that can be installed. Create a detailed layout plan indicating the precise location of each cabinet. Consider the placement of appliances, such as the refrigerator, microwave, and range, as these will influence the cabinet arrangement.
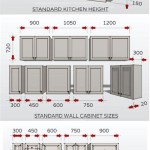
Determine the desired height of the wall cabinets. The standard distance between the countertop and the bottom of the wall cabinets is typically 18 inches. However, this can be adjusted based on personal preference and the height of the users. Use a level to mark a horizontal line on the wall at the desired height. This line will serve as a reference point for aligning the cabinets.
Locate and mark the wall studs using a stud finder. Wall studs provide the necessary support for the cabinets. Mark the location of each stud along the horizontal reference line. These markings will be used to secure the cabinets to the wall. If installing cabinets over a sink or dishwasher, ensure the plumbing and electrical lines are properly routed and protected.
Gather all the necessary tools and materials before starting the installation. This includes a stud finder, level, measuring tape, pencil, drill, screwdriver, safety glasses, gloves, shims, cabinet screws, and construction adhesive. Having all the tools readily available will streamline the installation process and minimize downtime.
Unpack the new cabinets and inspect them for any damage or defects. Verify that all the necessary hardware, such as shelves, hinges, and pulls, are included. If any parts are missing or damaged, contact the manufacturer or supplier for replacement parts.
Finally, clear the work area and protect the floor with drop cloths. This will prevent scratches and damage to the flooring during the installation process.
Key Point 2: Cabinet Installation
The actual installation process requires precision and attention to detail. Following a systematic approach ensures a secure and aesthetically pleasing result.
Begin by installing a temporary support ledger board along the reference line marked on the wall. This ledger board will support the weight of the cabinets while they are being installed. Use construction screws to secure the ledger board to the wall studs. Ensure the ledger board is level to provide a stable platform for the cabinets.
Starting with a corner cabinet, carefully lift the cabinet into place and rest it on the ledger board. Align the top of the cabinet with the reference line. Use shims to level the cabinet if necessary. Once the cabinet is level, use a drill to pre-drill pilot holes through the cabinet's mounting rails into the wall studs. Secure the cabinet to the wall studs using cabinet screws. Ensure the screws are long enough to penetrate the studs securely.
Repeat the process for each subsequent cabinet, ensuring that each cabinet is aligned and level with the adjacent cabinets. Use shims to make fine adjustments as needed. As each cabinet is installed, clamp it to the adjacent cabinet to ensure a tight and even seam. Secure the cabinets together using cabinet screws. This will create a unified and stable cabinet assembly.
If installing cabinets with doors, install the doors after the cabinets have been securely mounted to the wall. Adjust the hinges to ensure the doors are aligned and swing freely. Install the cabinet pulls or knobs according to the manufacturer's instructions.
After all the cabinets have been installed, remove the temporary support ledger board. Fill any screw holes with wood filler and sand smooth. Touch up any paint or stain as needed.
Key Point 3: Addressing Common Challenges
Kitchen installations are seldom without their challenges. Anticipating and preparing for potential hurdles is crucial for a successful outcome.
One common challenge is dealing with uneven walls. Walls are rarely perfectly straight or plumb, which can make it difficult to align the cabinets. Use shims to compensate for any irregularities in the wall. Place shims behind the cabinet mounting rails to create a level surface. Check the alignment of the cabinets frequently using a level.
Another challenge is locating wall studs accurately. Stud finders can be unreliable, especially on older homes with plaster walls. If the stud finder is not working properly, try using a small nail to probe for the studs. Drive the nail into the wall at regular intervals until you locate a stud. Once you have located a stud, use a marker to indicate its location.
When installing cabinets over a sink or dishwasher, be careful not to damage the plumbing or electrical lines. Before drilling any holes, carefully inspect the area for any pipes or wires. If you are unsure of the location of the utilities, consult with a qualified plumber or electrician.
Dealing with tight spaces can also be challenging. If the kitchen is small or has limited space, it may be difficult to maneuver the cabinets into place. Use a helper to assist with lifting and positioning the cabinets. If necessary, remove any obstacles that are blocking the way.
Finally, ensure that all cabinet doors and drawers function properly. Adjust the hinges and drawer slides as needed to ensure smooth and easy operation. If the doors or drawers are rubbing against each other, use a screwdriver to adjust the position of the hinges or slides.
By proactively addressing potential challenges and maintaining a meticulous approach, a homeowner can confidently install kitchen wall cabinets, achieving a professional-looking and functional kitchen space.
Ensuring proper ventilation is crucial, especially if range hoods or other appliances are being installed within the cabinet system. Follow manufacturer's instructions regarding ventilation requirements to prevent fire hazards and ensure optimal appliance performance.
Cabinet lighting can significantly enhance the functionality and ambiance of a kitchen. Plan for under-cabinet lighting or in-cabinet lighting during the installation process, running electrical wiring as needed before the cabinets are fully secured. Consider LED lighting options for energy efficiency and longevity.
Regularly check the plumbness and levelness of the cabinets throughout the installation process. Small deviations can accumulate and result in a noticeable misalignment at the end. Employing a high-quality level and taking frequent measurements will ensure a professional-looking result.

How To Install Kitchen Cabinets Diy Family Handyman

How To Install Cabinets Like A Pro The Family Handyman

Here S How Install New Upper Kitchen Cabinets

Installing Kitchen Cabinets Momplex Vanilla Ana White

How To Install Upper Kitchen Cabinets By Yourself The Handyman

Wall Of Cabinets Installed Plus How To Install Upper By Yourself Addicted 2 Decorating

How To Install Kitchen Cabinets All By Yourself Re

Kitchen Cabinet Installation

How To Install Cabinets Like A Pro The Family Handyman

How To Install Kitchen Cabinets
Related Posts