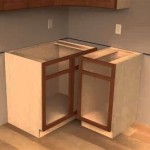
Installing Toe Kick On Kitchen Cabinets: A Comprehensive Guide
Toe kicks are an essential part of any kitchen cabinet installation, providing both functionality and aesthetics. They cover the gap between the bottom of the cabinets and the floor, protecting the cabinets from damage and making cleaning easier. Installing toe kicks is a relatively simple task that can be completed in a few hours with the right tools and materials.
Materials You'll Need
- Toe kick material (usually made of wood or plastic)
- Circular saw or miter saw
- Drill
- Screws
- Wood filler
- Caulk
Step 1: Measure and Cut the Toe Kick
Begin by measuring the length of the space under the cabinets where you will be installing the toe kick. Cut the toe kick material to the desired length using a circular saw or miter saw. If you have any corners, you will need to cut miter joints for a seamless fit.
Step 2: Install the Toe Kick Brackets
Most toe kicks come with pre-drilled holes for brackets. These brackets will help secure the toe kick in place. Hold the toe kick in position against the bottom of the cabinets and mark the locations of the holes. Drill pilot holes and then attach the brackets to the cabinets using screws.
Step 3: Attach the Toe Kick
Once the brackets are installed, it's time to attach the toe kick. Hold the toe kick in place and align it with the brackets. Drive screws through the toe kick and into the brackets. Make sure to countersink the screws slightly so that they are flush with the surface of the toe kick.
Step 4: Fill and Caulk
Once the toe kick is attached, fill any gaps or holes with wood filler. Allow the wood filler to dry completely. Finally, apply a bead of caulk along the seam between the toe kick and the floor. Smooth out the caulk with a damp cloth.
Tips for Success
- Use a level to ensure that the toe kick is installed evenly.
- If you have any gaps between the toe kick and the floor, you can fill them with foam weatherstripping.
- For a more finished look, you can paint or stain the toe kick to match the cabinets.
- Installing toe kicks is a great way to add a touch of style and protection to your kitchen cabinets.

How To Add Toe Kicks A Window Sill Young House Love

How To Install Kitchen Cabinets And Remove Them Remodel Pt 1 Crafted Work

How To Add Toe Kicks A Window Sill Young House Love

Do You Need Toe Kick Trim Or Molding In Your Kitchen

Kitchen How To Install Toe Kicks

How To Build Under Cabinet Drawers Increase Kitchen Storage Diy Family Handyman

Diy Cabinet Toe Kicks

Before Or After Cabinet Installation Four Considerations To Help Finalizing Your Flooring Kraftmaid

How To Make Cabinet Toe Kicks Stonehaven Life

Design Install Your Dream Kitchen An Ultimate Guide Diy House
Related Posts