Installing Trim on Kitchen Cabinets: Essential Considerations
Installing trim on kitchen cabinets can enhance their appearance and functionality. By adding a finishing touch, trim complements the overall design of the kitchen and conceals unsightly gaps or uneven edges. However, it's crucial to approach this task with precision to achieve a professional-looking result.
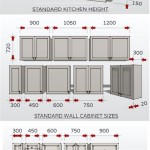
Types of Trim
Various types of trim are available to suit different cabinet styles and personal preferences. Some popular choices include:
- Casing: A frame-like trim that surrounds the outside edges of cabinets, adding a classic and elegant touch.
- Crown: A decorative trim installed along the top of cabinets, creating a more elaborate and visually appealing finish.
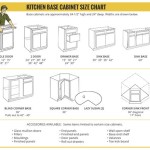
- Base: A flat or curved trim installed at the bottom of cabinets, covering the baseboard and providing a seamless transition to the floor.
- Toe Kick: A low-profile trim installed along the bottom front edge of cabinets, protecting the base from kicks or damage.
Materials and Tools
The choice of trim material depends on factors such as durability, appearance, and cost. Common choices include:
- Wood: Offers a classic and natural look, available in various species and finishes.
- MDF (Medium-Density Fiberboard): A cost-effective option that can be painted or stained to match the cabinets.
- PVC (Polyvinyl Chloride): Durable and moisture-resistant, suitable for areas prone to spills or humidity.
Essential tools for trim installation include:
- Miter saw
- Brad nailer
- Measuring tape
- Carpenter's square
- Wood filler
Measuring and Cutting
Accurately measuring and cutting the trim is crucial for a precise fit. Measure the length of each cabinet edge where the trim will be installed. Use a miter saw to cut the trim pieces at 45-degree angles for corners. Ensure the cuts are clean and square using a carpenter's square.
Installation
Install the trim pieces by nailing them into the cabinet frames using a brad nailer. Countersink the nails slightly below the surface of the trim. Fill any gaps or nail holes with wood filler to create a smooth finish. Sand the wood filler once dry and paint or stain the trim to match the cabinets.
Tips
For a seamless appearance, use pre-primed or pre-painted trim that matches the color of the cabinets. Consider using a biscuit joiner for stronger corner joints. When installing crown molding, a crown molding jig can assist in achieving precise angles. Always double-check measurements before cutting to avoid errors.
By following these essential considerations, you can enhance the aesthetics and functionality of your kitchen cabinets with professionally installed trim. Remember to approach the task with patience, precision, and attention to detail to achieve a stunning result.

Adding Crown Molding To Cabinets Young House Love

How To Add Crown Molding Kitchen Cabinets Abby Organizes

Diy Kitchen Cabinet Upgrade With Paint And Crown Molding

Adding Moldings To Your Kitchen Cabinets Remodelando La Casa

Install Trim Above Cabinets Madness Method Kitchen Cabinet Crown Molding

How To Add Crown Molding Kitchen Cabinets Abby Organizes

Moldings Finish And Trim With Gary Striegler Part 14

Diy Kitchen Cabinet Upgrade With Paint And Crown Molding

Installing Crown Molding On Kitchen Cabinets Diy Cabinet

Installing Crown Molding On Kitchen Cabinets Diy Cabinet