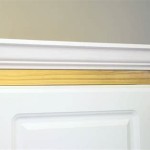
Installing Trim Under Kitchen Cabinets
Adding under-cabinet trim provides a polished, finished look to any kitchen. It conceals under-cabinet lighting and wiring while adding a decorative touch. This article outlines the steps involved in installing this type of trim effectively.
Planning and Preparation
Proper planning is crucial for a successful installation. This includes accurate measurements, selecting appropriate materials, and gathering necessary tools.
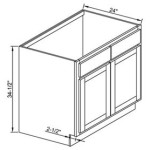
- Measure the cabinets: Carefully measure the length of the underside of each cabinet section where the trim will be installed. Precise measurements are essential for minimizing waste and ensuring a seamless fit.
- Choose the right trim: Select trim that complements the existing cabinetry and overall kitchen style. Consider material (wood, MDF, PVC), profile (shape), and size.
- Gather tools and materials: Assemble the necessary tools, including a miter saw, measuring tape, finishing nails, wood glue, safety glasses, a nail gun (optional), and wood filler.
- Prepare the surface: Ensure the underside of the cabinets is clean and free of any obstructions that might interfere with the trim installation.
Cutting the Trim
Accurate cuts are essential for a professional-looking finish. This section details the process of cutting the trim pieces to the correct size and angles.
- Transfer measurements: Mark the measured lengths onto the trim pieces using a pencil and measuring tape.
- Make straight cuts: For straight runs, use a miter saw to make square cuts at the marked lines. Ensure the saw blade is sharp for clean cuts.
- Cutting inside corners: For inside corners, miter the trim pieces at a 45-degree angle. Test fit the pieces before applying adhesive to ensure a tight fit.
- Cutting outside corners: For outside corners, also miter the trim at a 45-degree angle, but in the opposite direction of inside corner cuts. Again, dry fit the pieces before securing.
Installing the Trim
This section describes the process of attaching the trim to the underside of the kitchen cabinets.
- Apply adhesive: Apply a thin bead of wood glue to the back of the trim piece where it will contact the cabinet.
- Position and secure: Carefully position the trim piece against the cabinet, aligning it with the edge. Use finishing nails to secure the trim, spacing them approximately every 12 inches.
- Counter-sink nails: Gently tap the nail heads slightly below the surface of the trim using a nail set. This will allow for smooth filling and finishing.
- Repeat for remaining pieces: Continue installing the remaining trim pieces, ensuring tight joints at corners and consistent spacing along the cabinet run.
Finishing Touches
The final steps involve filling nail holes, caulking gaps, and painting or staining the trim for a seamless and polished appearance.
- Fill nail holes: Apply wood filler to the countersunk nail holes using a putty knife. Allow the filler to dry completely according to the manufacturer's instructions.
- Sand smooth: Once dry, lightly sand the filled areas with fine-grit sandpaper until smooth and flush with the trim surface.
- Caulk gaps: Apply a thin bead of paintable caulk along any gaps between the trim and the cabinet or wall. This seals the gaps and provides a more finished look.
- Paint or stain (optional): If desired, paint or stain the trim to match the cabinets or create a contrasting accent. Apply multiple thin coats for a durable and even finish. Allow each coat to dry completely before applying the next.
Troubleshooting
Addressing common issues can ensure a successful installation. This section provides solutions to potential problems.
- Gaps at corners: If gaps appear at mitered corners, use wood filler to fill the voids, then sand smooth and repaint or stain as needed.
- Uneven surfaces: If the underside of the cabinets is uneven, use shims behind the trim to create a flush surface before securing.
- Trim splitting: Pre-drilling pilot holes before nailing can prevent the trim, especially harder woods, from splitting.
Safety Precautions
Safety should always be a priority during any home improvement project. Observe the following safety precautions during installation.
- Eye protection: Always wear safety glasses when using power tools like miter saws to protect your eyes from dust and debris.
- Proper ventilation: Ensure adequate ventilation when working with paints, stains, or adhesives.
- Read instructions: Carefully read and follow the manufacturer's instructions for all tools, materials, and adhesives used in the project.

Moldings Finish And Trim With Gary Striegler Part 14

Adding Moldings To Your Kitchen Cabinets Remodelando La Casa

How To Cabinet Molding Kitchen Cabinets Makeover Under Lighting

Adding Molding To Cabinets Make Them Look Built In Young House Love

Adding Molding To Cabinets Make Them Look Built In Young House Love

Light Rail Molding The Ultimate Guide

Adding Moldings To Your Kitchen Cabinets Remodelando La Casa

How To Add Molding Cabinets For A Gorgeous Finish Inspiration Moms

Adding Toe Kicks A Window Sill Young House Love

10 Types Of Kitchen Cabinet Molding For Your Home
Related Posts