Installing Upper Kitchen Cabinets: A Comprehensive Guide
Installing upper kitchen cabinets can be a significant undertaking, requiring careful planning, precise measurements, and a steady hand. This process can enhance your kitchen's functionality and aesthetics, but it's essential to approach it with the right tools and techniques. This comprehensive guide will walk you through the steps involved in installing upper kitchen cabinets, equipping you with the knowledge to complete this project successfully.
1. Planning and Preparation
Before you start, thorough planning and preparation are crucial for a successful upper kitchen cabinet installation. This phase involves gathering the necessary tools, materials, and information to ensure a smooth and efficient process. Here's a breakdown of key considerations:
a) Gathering Materials and Tools
A well-stocked toolbox is essential for cabinet installation. Ensure you have the following tools on hand:
- Stud finder
- Tape measure
- Level
- Pencil
- Circular saw or jigsaw
- Drill with various bits
- Screwdriver
- Safety glasses and gloves
- Ladder or step stool
- Wood shims
- Caulk
- Cabinet screws
- Cabinet mounting plates (if required)
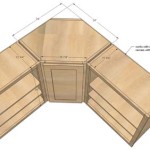
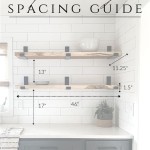
b) Determining Cabinet Placement and Layout
Accurate measurements are paramount for proper cabinet placement. Determine the desired height and width of the cabinets, considering factors like counter height, appliances, and available space. Mark the positions on the wall using a level and pencil, ensuring they align with the layout of your kitchen design.
c) Preparing the Wall
A smooth and clean wall is essential for a secure cabinet installation. Remove any existing obstacles like wall paper, trim, or uneven surfaces. If necessary, use drywall compound or spackle to fill in any gaps or holes, ensuring a flat and level surface for the cabinets.
2. Installation Process
After careful planning and preparation, you can proceed with the actual cabinet installation. This section will guide you through the step-by-step process, emphasizing safety precautions and best practices:
a) Attaching Mounting Plates (If Necessary)
Some cabinet models come with pre-attached mounting plates, while others may require separate installation. Mounting plates provide added support and stability. Follow the manufacturer's instructions for attaching these plates to the wall, ensuring they are level and secure.
b) Securing the Cabinets to the Wall
Using a level, carefully position the first cabinet onto the mounting plate. Ensure the cabinet is flush with the wall and at the desired height. Use a pencil to mark the screw locations through the cabinet's pre-drilled holes. Drill pilot holes slightly smaller than the screw diameter to prevent splitting the wood. Attach the cabinet securely using cabinet screws, ensuring the screws are driven in straight and flush.
c) Installing Additional Cabinets
Once the first cabinet is secured, install the remaining cabinets, aligning them with the first cabinet. Use shims to ensure they are level and flush with the wall. Attach the cabinets to the wall using the same method as the first cabinet, ensuring the screws are driven in straight and securely.
d) Securing Cabinets to Each Other
If you have multiple cabinets, they need to be securely attached to each other for added stability. Use cabinet screws or appropriate fasteners to connect the cabinets at the sides and top, taking care to align them properly. Depending on the cabinet design, you may need to use a level and shims to ensure proper alignment and stability.
3. Finishing Touches
After installing the cabinets, there are essential finishing steps to enhance their appearance and functionality:
a) Filling Gaps and Caulking
Small gaps between cabinets and walls are common. Fill these gaps with caulk or wood filler, smoothing it out and creating a clean and seamless finish. Allow the caulk to dry completely before painting or staining.
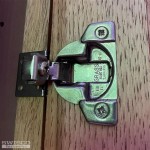
b) Installing Cabinet Hardware
Attach the cabinet hardware, such as hinges, doors, and drawer pulls. Ensure they are aligned and secure, providing smooth operation and a polished look.
c) Painting or Staining
To complete the installation, you may choose to paint or stain the cabinets to match your kitchen decor. Prepare the cabinets with a thorough cleaning and light sanding before applying any paint or stain. Follow the manufacturer's instructions for proper application and drying time.
Installing upper kitchen cabinets is a labor-intensive process requiring meticulous planning, accurate measurements, and a steady hand. By following these steps, you can achieve a professional-looking installation. Remember to prioritize safety and invest in the right tools to ensure a successful project that enhances the functionality and aesthetics of your kitchen.

How To Install Upper Cabinets Like A Pro Cabinetselect Com

Here S How Install New Upper Kitchen Cabinets

How To Install Kitchen Cabinets Diy Family Handyman

How To Install Cabinets Like A Pro The Family Handyman

How To Install Kitchen Wall Cabinets Lowe S

How To Install Upper Cabinets Like A Pro Cabinetselect Com

Installing Kitchen Cabinets Momplex Vanilla Ana White

Kitchen Cabinet Installation

How To Install Upper Cabinets Like A Pro Cabinetselect Com

Installing Framed Cabinets
Related Posts