Installing Vinyl Plank Around Kitchen Cabinets: A Comprehensive Guide
Installing vinyl plank flooring can dramatically improve the aesthetics and functionality of a kitchen. When the installation involves working around existing kitchen cabinets, the process requires careful planning, precise cuts, and attention to detail. This article provides a comprehensive guide to successfully installing vinyl plank flooring around kitchen cabinets.
Preparing for Installation: Assessment and Material Acquisition
The initial stage of any flooring project involves thorough preparation. In the context of a kitchen with cabinets, this preparation is even more critical. The first step is to meticulously assess the existing subfloor. Vinyl plank flooring requires a smooth, level, and clean subfloor for optimal performance. Any imperfections, such as unevenness, cracks, or debris, must be addressed before commencing installation.
If the subfloor is uneven, self-leveling compound may be necessary to create a flat surface. Cracks should be filled with a suitable patching compound. All dust, dirt, and debris must be thoroughly removed, ideally with a vacuum cleaner and a damp mop. Allow the subfloor to dry completely before proceeding.
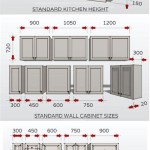
Once the subfloor is prepared, accurately measure the dimensions of the kitchen floor, including the areas under and around the cabinets. Consider the placement of appliances like refrigerators and dishwashers, which may influence the cutting and fitting of the planks. Add approximately 10% to the total square footage to account for waste due to cuts and potential errors. This surplus ensures sufficient material to complete the project without encountering shortages.
Acquire all necessary materials and tools. These typically include:
*Vinyl plank flooring (sufficient quantity plus waste allowance)
*Underlayment (if required by the vinyl plank manufacturer and subfloor conditions)
*Measuring tape
*Pencil
*Utility knife with sharp blades
*Straight edge or T-square
*Chop saw or hand saw (for precise cuts)
*Tapping block and rubber mallet (for locking planks together)
*Spacers (to maintain consistent expansion gaps)
*Safety glasses and gloves
*Caulk (for sealing gaps around cabinets and pipes)
*Transition strips (for transitioning to adjacent flooring types)
Allow the vinyl plank flooring to acclimate to the kitchen's temperature and humidity for at least 48 hours before installation. This acclimation period minimizes expansion and contraction issues after installation. Store the planks in the room where they will be installed, ideally laid out flat.
Navigating Cabinet Obstacles: Precise Cutting and Fitting
Working around kitchen cabinets presents unique challenges that require careful planning and execution. Prior to cutting any planks, establish a starting point for the installation. Typically, the longest straight wall in the kitchen is chosen as the reference point. Mark a straight line along this wall, ensuring it is parallel to the wall using a level. This line will guide the placement of the first row of planks.
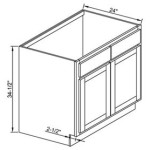
When approaching the cabinets, precise measurements are crucial. Use a measuring tape to determine the exact distance from the starting line to the cabinet base. Transfer these measurements accurately onto the vinyl plank. Remember to account for any expansion gaps required by the manufacturer, typically around ¼ inch.
The utility knife and straight edge are essential tools for making clean, accurate cuts. Score the surface of the vinyl plank multiple times with the utility knife before snapping the plank along the scored line. For more complex cuts, such as those required to fit around corners or pipes, use cardboard templates. Create a template that matches the shape of the cutout needed, then transfer the template onto the vinyl plank. This minimizes errors and prevents wasting material.
A chop saw or hand saw can be used for intricate cuts or for cutting planks at angles. When using a saw, secure the plank firmly to prevent movement and ensure a clean, straight cut. Protective eyewear is essential when using saws.
Maintain consistent expansion gaps around the cabinets. These gaps allow the flooring to expand and contract with temperature and humidity changes without buckling or warping. Use spacers to maintain the correct gap size during installation. Once the planks are installed, these gaps will be concealed by baseboards or quarter-round molding.
In situations where the cabinet overhangs the floor, undercutting the cabinet base may be necessary. This involves carefully trimming the base of the cabinet to allow the vinyl plank to slide underneath. Use an oscillating multi-tool with a flush-cut blade for this purpose. Exercise caution to avoid damaging the cabinet.
Securing and Finishing: Locking, Sealing, and Trimming
Most vinyl plank flooring utilizes a click-lock system for joining the planks together. This system allows for a floating floor installation, where the planks are not glued or nailed to the subfloor. Follow the manufacturer's instructions carefully when locking the planks together. Typically, the planks are angled and then pressed down to engage the locking mechanism. Use a tapping block and rubber mallet to gently tap the planks into place, ensuring a tight and secure fit.
Pay particular attention to the planks around the cabinets. Ensure that the planks are properly locked together and that the expansion gaps are maintained. If necessary, use a pull bar tool to help lock planks in tight spaces.
Once the flooring is installed, seal any gaps around the cabinets, pipes, or other fixtures with caulk. Choose a caulk color that complements the flooring. Apply the caulk evenly and smoothly, using a caulk gun and a smoothing tool. This sealing prevents water damage and enhances the appearance of the installation.
Install transition strips at doorways or where the vinyl plank flooring meets other types of flooring. Transition strips provide a smooth and safe transition between different floor heights and materials. Choose transition strips that match the flooring and are appropriate for the specific transition situation.
Finally, install baseboards or quarter-round molding around the perimeter of the room to conceal the expansion gaps and provide a finished look. Attach the baseboards or molding to the wall, not to the flooring, to allow the flooring to move freely. Use finishing nails or construction adhesive to secure the baseboards or molding.
Inspect the entire installation carefully, paying attention to any areas where the planks are not properly locked together or where the expansion gaps are insufficient. Correct any issues promptly to prevent future problems.
Clean the newly installed flooring with a damp mop and a mild detergent. Avoid using harsh chemicals or abrasive cleaners, which can damage the flooring. Follow the manufacturer's recommendations for cleaning and maintenance to prolong the life of the vinyl plank flooring.
Properly disposing of waste materials is an important aspect of any construction project. Vinyl plank scraps and other materials should be disposed of according to local regulations. Consider recycling options for materials such as cardboard and plastic packaging.
By carefully following these steps and paying attention to detail, a successful vinyl plank flooring installation around kitchen cabinets can be achieved. The result is a durable, attractive, and easy-to-maintain floor that enhances the functionality and beauty of the kitchen.

Do You Install Floating Floor Under Cabinets Wood Flooring

Do You Install Floating Floor Under Cabinets Wood Flooring

Do You Install Floating Floor Under Cabinets Wood Flooring

Working Around Kitchen Appliances Installing Laminate Flooring Vlog 194

What Is A Floating Floor Diamond Kitchen And Bath

Installing Laminate Flooring Around Kitchen Cabinets

What Comes First Flooring Or Cabinets

Diy Luxury Vinyl Plank Installation

House Tweaking

How To Install Laminate Flooring Around Doors And Cabinets
Related Posts