```html
Kaboodle Kitchen Kickboard Height: A Comprehensive Guide
Kickboards, sometimes referred to as plinth boards, are the horizontal panels that run along the bottom of kitchen cabinets, concealing the legs or base supports and creating a finished, seamless look. Within the Kaboodle kitchen system, understanding kickboard height is crucial for achieving the aesthetic and functional outcome desired. This article provides a comprehensive guide to Kaboodle kitchen kickboard height, covering standard dimensions, factors influencing height selection, installation considerations, and troubleshooting common issues.
Understanding Standard Kaboodle Kickboard Heights
Kaboodle kitchen systems generally adhere to standard industry measurements, simplifying the design and installation process. The standard kickboard height for Kaboodle cabinets is typically around 150mm (approximately 6 inches). This height provides ample space for leveling the cabinets and accommodating minor floor imperfections. It also contributes to a visually balanced appearance, preventing the cabinets from appearing too low or too high off the ground.
It is important to note that while 150mm is a standard height, some slight variations may exist depending on the specific cabinet range or project requirements. Always refer to the Kaboodle product specifications for the exact dimensions before ordering or installing kickboards. Accurate measurements are key to ensuring a proper fit and a professional finish.
Beyond the standard 150mm, different heights might be achieved by cutting the kickboard. Modifying the kickboard height allows for customisation, although, it is important to consider the limitations imposed by the material and the overall design integrity of the kitchen.
Factors Influencing Kickboard Height Selection
While the standard kickboard height provides a good starting point, several factors can influence the optimal height for a specific Kaboodle kitchen installation. These factors relate to both aesthetic preferences and practical considerations.
Floor Leveling: One of the primary functions of kickboards is to conceal the adjustable legs of the cabinets, which are used to level the kitchen on uneven floors. If the floor is significantly out of level, a taller kickboard may be necessary to adequately hide the adjustable legs. Conversely, if the floor is perfectly level, a slightly shorter kickboard might be acceptable.
Appliance Placement: The height of appliances, particularly dishwashers and ovens, can influence the required kickboard height. Dishwashers, for example, often have specific clearance requirements at the base to allow for proper ventilation and drainage. The kickboard must be cut to accommodate these requirements, ensuring that the appliance can be installed correctly and function efficiently. The same applies to ovens; ensure proper ventilation is accounted for.
Aesthetic Preferences: Personal preferences also play a role in kickboard height selection. Some homeowners prefer a more minimalist look with shorter kickboards, while others prefer a more substantial appearance with taller kickboards. The choice should complement the overall style of the kitchen, considering factors such as cabinet door style, countertop material, and backsplash design.
Accessibility Considerations: In situations where accessibility is a concern, such as for individuals using wheelchairs, a lower kickboard height may be desirable. This allows for easier access to the countertop and sink. However, any modifications to the standard kickboard height should be carefully considered to ensure structural integrity and compliance with accessibility standards.
Matching Existing Kitchen Elements: If the Kaboodle kitchen is being installed in conjunction with existing cabinetry or design elements, matching the kickboard height to those existing features can create a cohesive and visually appealing space. This approach is particularly relevant during renovations or extensions designed to seamlessly blend with the original structure.
Installation Considerations and Best Practices
Proper installation of Kaboodle kickboards is essential for achieving a professional and long-lasting result. Several considerations and best practices should be followed to ensure a successful installation.
Accurate Measurement and Cutting: Before installing the kickboards, meticulously measure the required length for each section. Use a precise cutting tool, such as a circular saw or a miter saw, to ensure clean, straight cuts. A slight discrepancy in length can lead to unsightly gaps or unevenness.
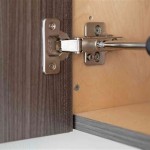
Secure Attachment: Kickboards are typically attached to the cabinet legs or base frames using clips or screws. Ensure that the attachment points are secure and evenly spaced to prevent the kickboards from buckling or warping. Use appropriate screws or clips recommended by Kaboodle to maintain the integrity of the cabinet system. Kaboodle often uses a clip system, making the installation process relatively straightforward.
Sealing and Protection: To protect the kickboards from moisture and spills, apply a sealant or edge banding along the bottom edge and any exposed cut edges. This helps to prevent water damage and prolong the lifespan of the kickboards. Silicone sealant is a good option for creating a waterproof barrier.
Ventilation: As mentioned previously, ventilation is a critical factor to consider, especially when installing kickboards around appliances. Ensure that there is adequate airflow to prevent overheating and maintain the efficiency of the appliances. Consider incorporating ventilation grilles into the kickboards if necessary.
Coping with Uneven Floors: When dealing with uneven floors, use shims or adjustable legs to level the cabinets properly. The kickboards can then be scribed to match the contours of the floor, creating a seamless and professional finish. Scribing involves carefully cutting the kickboard to fit the uneven floor, creating a custom fit and disguised the floor imperfections.
Joining Kickboards Seamlessly: When joining multiple kickboard sections, use biscuit joints or dowels to create a strong and seamless connection. Apply wood glue to the joints for added stability. Alternatively, consider using pre-made corner pieces or joiners available from Kaboodle to simplify the process.
Troubleshooting Common Issues
Despite careful planning and execution, some common issues may arise during or after the installation of Kaboodle kickboards. Understanding these issues and knowing how to troubleshoot them can save time and frustration.
Gaps Between Kickboard and Floor: This issue is often caused by uneven floors. Use shims to level the cabinets and then scribe the kickboards to match the floor’s contours. Alternatively, apply flexible sealant to fill the gaps and create a waterproof barrier.
Kickboards Buckling or Warping: This can be caused by excessive moisture or inadequate support. Ensure that the kickboards are properly sealed and that the attachment points are secure and evenly spaced. Consider using thicker kickboards for added rigidity in areas prone to moisture.
Difficulty Installing Kickboards Around Appliances: This often arises due to insufficient clearance. Carefully measure the appliance dimensions and adjust the kickboard height accordingly. Use a power saw to make precise cuts around the appliance housing, ensuring adequate ventilation.
Mismatched Kickboard Colors: While highly unlikely with pre-finished Kaboodle products, sometimes the colour of the kickboard might not match the cabinets perfectly. This can be due to variations in batch colour or lighting conditions. If the mismatch is noticeable, consider replacing the kickboards with a matching set or applying a coat of paint or stain to blend the colours.
Loose or Detached Kickboards: This is commonly caused by improper attachment. Ensure that the screws or clips are securely fastened to the cabinet legs or base frames. If the screw holes are stripped, use a wood filler to repair the holes and re-drill them. Consider using larger screws for added security.
By carefully considering the factors influencing kickboard height, following best installation practices, and addressing potential issues proactively, a visually appealing and functionally sound Kaboodle kitchen can be created.
```
Maximum Length Of Kickboards Kaboodle Kitchen

What If My Cabinets Don T Fit Space Kaboodle Kitchen

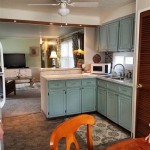
Kaboodle Kitchen Renovation A Country Beauty Better Homes And Gardens

N Standard Kitchen Dimensions Renomart

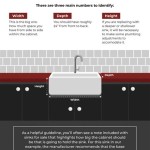
How To Achieve A Farmhouse Sink Kaboodle Kitchen

Frequently Asked Questions Kaboodle Kitchen

Kaboodle Kitchen Renovation A Country Beauty Better Homes And Gardens

Attaching Kickboards Kaboodle Kitchen

How To Create A Window Seat Kaboodle Kitchen

Kitchen Measurements
Related Posts