Kitchen Cabinet Crown Molding Installation Guide: A Comprehensive Guide to Achieving a Professional Finish
Crown molding is an elegant and sophisticated addition to any kitchen, adding a touch of architectural detail and elevating the overall aesthetic appeal. While it may seem like a daunting task, installing kitchen cabinet crown molding is a project that can be tackled with the right preparation and guidance. This comprehensive guide will provide you with a step-by-step overview of the essential aspects of kitchen cabinet crown molding installation, ensuring you achieve a professional-looking finish.
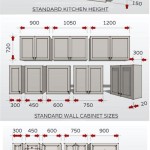
1. Planning and Measurements
Before embarking on the installation process, it's crucial to plan meticulously and take precise measurements. Determine the length of the molding required for each cabinet and the angles at which it will be cut. Use a measuring tape to ensure accurate measurements and mark these points on the molding using a pencil or marking tool.
2. Cutting the Crown Molding
To achieve clean and precise cuts, use a miter saw or a specialized crown molding cutter. For inside corners, cut the molding at a 45-degree angle on both sides. For outside corners, the angles will be reversed, with one side cut at a 45-degree angle and the other at a 135-degree angle. Ensure the cuts are clean and free of any splinters or imperfections.
3. Dry Fitting and Adjustments
Before applying adhesive, dry fit the molding to ensure proper alignment and fit. This step allows you to make any necessary adjustments to the cuts or angles. Hold the molding in place and check for any gaps or misalignments. Adjust the cuts accordingly until you achieve a perfect fit.
4. Applying Adhesive and Installation
Use a construction adhesive specifically designed for crown molding. Apply the adhesive to the top of the cabinets and the back of the molding. Carefully place the molding in position and press firmly to ensure a secure bond. Use a level to ensure the molding is straight and aligned.
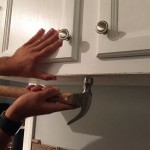
5. Securing with Nails
To reinforce the adhesive bond, use small finishing nails to secure the molding further. Drive the nails at an angle, ensuring they are countersunk slightly below the surface of the wood. Countersinking the nails will hide them and maintain the clean appearance of the molding.
6. Filling Nail Holes and Touch-Ups
Once the nails are in place, fill the holes with wood filler or caulk. Use a putty knife or your finger to apply the filler and smooth it out. Allow the filler to dry completely, then sand lightly to create a flush surface. If necessary, touch up any areas with paint or stain to match the existing cabinetry.
7. Finishing Touches
To enhance the durability and appearance of the crown molding, apply a coat of clear sealant or varnish. This will protect the molding from moisture, dirt, and wear and tear. Allow the sealant or varnish to dry completely before using the cabinets.
Conclusion
Installing kitchen cabinet crown molding can transform the look of your kitchen, adding a touch of elegance and sophistication. By following this comprehensive guide, you can achieve a professional-looking finish that will elevate the overall aesthetic appeal of your space. Remember to take your time, measure accurately, and pay attention to the details throughout the process. With proper planning, precision, and care, you can successfully install crown molding in your kitchen and enjoy the stunning results for years to come.

How To Attach Crown Mouldings Frameless Cabinets Stonehaven Life

Installing Kitchen Cabinet Crown Molding

How To Install Crown Molding On Cabinets Young House Love

Kitchen Cabinet Crown Molding Part 2

How To Install Crown Mouldings American Hardwood Information Center

How To Install Crown Molding On Kitchen Cabinets Sawdust Girl

How To Add Crown Molding Kitchen Cabinets Abby Organizes

How To Install Crown Molding On Kitchen Cabinets

Kitchen Cabinet Crown Molding Part 2

Kitchen Cabinet Crown Molding Part 1
Related Posts