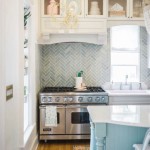
Kitchen Cabinet Crown Moulding: Enhancing Aesthetics and Value
Kitchen cabinet crown moulding is a decorative trim installed atop wall cabinets, bridging the gap between the cabinet and the ceiling. This seemingly small detail can significantly impact the overall aesthetic of a kitchen, adding sophistication, elegance, and a finished look. Beyond its visual appeal, crown moulding can also contribute to a home's value and perceived quality.
The installation of crown moulding is not strictly necessary for functional kitchen cabinetry. However, its absence can leave a space feeling incomplete or visually awkward. The gap between the cabinets and ceiling, often exhibiting irregular drywall or uneven surfaces, can detract from an otherwise well-designed kitchen. Crown moulding effectively covers these imperfections, creating a seamless transition and a more polished appearance.
Selecting the appropriate crown moulding involves considering various factors, including the kitchen's style, cabinet design, ceiling height, budget, and personal preferences. A wide range of materials, profiles, and finishes are available, allowing for customization to perfectly complement any kitchen aesthetic.
Material Options for Kitchen Cabinet Crown Moulding
The material choice for crown moulding is a crucial decision, influencing both the appearance and durability of the trim. The most common materials used are wood, medium-density fiberboard (MDF), polyurethane, and PVC. Each material possesses unique characteristics that make it suitable for different applications.
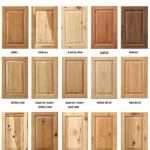
Wood: Wood is a traditional and highly versatile material for crown moulding. It offers a natural warmth and beauty, and it can be stained or painted to match any cabinet finish. Common wood species used for crown moulding include oak, maple, cherry, and poplar. Hardwoods like oak and maple are known for their durability and resistance to dents and scratches, while softer wood like poplar is easier to work with and often used for painted applications. Wood is susceptible to moisture damage and expansion/contraction due to humidity changes. This makes it less suitable for kitchens with high humidity levels without proper sealing and finishing. The cost of wood crown moulding is typically higher than MDF or PVC, especially for hardwoods.
Medium-Density Fiberboard (MDF): MDF is an engineered wood product made from compressed wood fibers and resin. It offers a smooth, uniform surface that is ideal for painting. MDF is less expensive than solid wood and is less prone to warping or cracking. However, MDF is more susceptible to water damage than wood and is not suitable for areas with high moisture exposure. It is also heavier than wood, which can make installation more challenging. MDF is often used in kitchens where a painted finish is desired and where moisture levels are moderate.
Polyurethane: Polyurethane crown moulding is a synthetic material that is lightweight, durable, and resistant to moisture, insects, and rot. It is an excellent choice for kitchens with high humidity or where exposure to water is a concern. Polyurethane is also easy to cut and install, and it can be painted to match any cabinet finish. While polyurethane is more expensive than MDF, its durability and moisture resistance make it a worthwhile investment in certain situations. It is a good choice for kitchens with intricate moulding designs, as it can be easily molded into complex shapes.
PVC: PVC crown moulding is another synthetic material that is known for its moisture resistance and durability. It is a good choice for kitchens that are prone to spills or leaks. PVC is also resistant to insects and rot, and it can be cleaned easily. PVC moulding is typically available in white or off-white and can be painted, but it is more difficult to paint than wood or MDF. PVC is a cost-effective option for kitchens where moisture resistance is a primary concern.
Crown Moulding Profiles and Styles
The profile of the crown moulding refers to its shape and design. Numerous profiles are available, ranging from simple and understated to elaborate and ornate. The choice of profile should complement the overall style of the kitchen and the design of the cabinets. Common crown moulding profiles include:
Simple Cove: A simple cove moulding features a concave curve that creates a subtle and elegant transition between the cabinet and the ceiling. It is a versatile profile that works well in a variety of kitchen styles.
Ogee: An ogee moulding features a double curve, with a convex curve flowing into a concave curve. It adds a touch of sophistication and is often used in traditional or transitional kitchens.
Dentil: A dentil moulding features a series of small, rectangular blocks that resemble teeth. It adds a classic and formal look and is often used in more traditional kitchen designs.
Step: A step moulding incorporates a series of stepped layers, creating a more substantial and architectural look. It can add visual interest and is often used in contemporary or transitional kitchens.
Built-Up: A built-up moulding is created by combining multiple pieces of trim moulding, creating a larger and more elaborate profile. This allows for greater customization and can be used to create a unique and dramatic look.
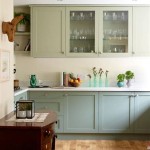
In addition to the profile, the style of the crown moulding should also be considered. The style refers to the overall aesthetic of the moulding, such as traditional, modern, or rustic. Traditional crown moulding often features ornate details and classic profiles, while modern crown moulding tends to be simpler and more streamlined. Rustic crown moulding may have a more textured or distressed finish.
The size of the crown moulding should also be proportional to the size of the kitchen and the height of the ceiling. In general, larger kitchens and higher ceilings can accommodate larger crown moulding, while smaller kitchens and lower ceilings require smaller and more delicate moulding.
Installation Considerations for Kitchen Cabinet Crown Moulding
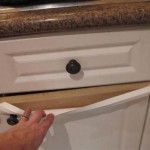
Installing crown moulding requires careful planning, precise measurements, and basic carpentry skills. While it is possible to install crown moulding as a DIY project, it is often recommended to hire a professional installer, especially for complex profiles or challenging installations. Proper installation is crucial to ensure that the crown moulding is secure, level, and visually appealing.
Before beginning the installation, it is essential to gather the necessary tools and materials, including a miter saw, measuring tape, level, nail gun, wood glue, and paint or stain. The miter saw is used to cut the crown moulding at the correct angles for corners and joints. Accurate measurements are essential to ensure that the pieces fit together seamlessly. A level is used to ensure that the crown moulding is installed straight and level. A nail gun is used to secure the crown moulding to the cabinets and walls. Wood glue can be used to reinforce joints and prevent them from separating. Finally, paint or stain is used to finish the crown moulding and match the cabinet finish.
The first step in the installation process is to measure and cut the crown moulding pieces to the correct lengths and angles. Crown moulding is typically installed in long runs, with corner joints cut using a miter saw. The most common corners are inside corners and outside corners, which require different miter angles. It is important to practice cutting the crown moulding on scrap pieces before cutting the actual pieces. Cutting the crown molding upside down and backwards provides the most accurate cuts. This allows the bottom edge to lay flat against saw for a more precise cutting angle.
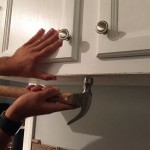
Once the crown moulding pieces are cut, they can be installed using a nail gun and wood glue. The crown moulding should be positioned carefully and secured to the cabinets and walls with nails. Wood glue can be applied to the joints to reinforce them and prevent them from separating. It is important to countersink the nails and fill the holes with wood filler before painting or staining.
After the crown moulding is installed, it should be caulked along the top and bottom edges to seal any gaps and create a seamless transition. The caulk should be applied smoothly and evenly and allowed to dry completely before painting or staining. The crown moulding can then be painted or stained to match the cabinet finish.
Proper ventilation is crucial when working with paints, stains, and adhesives. Ensure adequate airflow to avoid inhaling harmful fumes. Safety glasses and gloves should always be worn when cutting or installing crown moulding to protect against dust, splinters, and chemicals.
When working on a ladder, ensure it is placed on a level surface and that you maintain three points of contact at all times. Avoid overreaching and have someone spot you if necessary. Electrical safety is also paramount. Make sure to turn off the power to any circuits in the area where you are working to prevent electrical shock.
By carefully considering the material, profile, and installation requirements, homeowners can select and install the perfect crown moulding to enhance the beauty and value of their kitchen.

3 Ways To Enhance Your Kitchen With Crown Molding

11 Kitchen Cabinet Crown Molding Ideas For Your

Adding Crown Molding To Kitchen Cabinets Young House Love

3 Ways To Enhance Your Kitchen With Crown Molding

Crown Moulding The Recently Rediscovered Kitchen Solution

Crown Molding For Shaker Kitchen Cabinets

Diy Kitchen Cabinet Upgrade With Paint And Crown Molding

Decorative Molding Timberlake Cabinetry

Crown Molding For Kitchen Cabinets Fine Homebuilding

Cabinet Crown Molding Rogue Engineer
Related Posts