Kitchen Cabinet Hinge Repair Plate: A Comprehensive Guide
Kitchen cabinets are essential components of any home, providing storage and contributing to the overall aesthetic of the kitchen. Over time, the constant opening and closing of cabinet doors can put significant stress on the hinges, leading to wear and tear, loosening, and eventual failure. A common problem is the stripping of screw holes in the cabinet frame where the hinge is mounted. Instead of replacing the entire cabinet or door, a kitchen cabinet hinge repair plate offers a practical and cost-effective solution. This article provides a comprehensive guide to understanding, selecting, and utilizing kitchen cabinet hinge repair plates to restore the functionality and longevity of your kitchen cabinets.
The purpose of a hinge repair plate is to reinforce the damaged area around the hinge mounting point. When screws lose their grip due to stripped wood, the door may sag, rub against the cabinet frame, or even detach entirely. A repair plate provides a new, solid surface with pre-drilled holes for attaching the hinge using fresh screws. These plates are typically made of durable materials like stainless steel or heavy-duty metal, ensuring a strong and reliable repair.
Understanding the Need for Hinge Repair Plates
Several factors contribute to the loosening and stripping of screw holes in cabinet frames. The repeated stress of opening and closing doors is a primary cause. Cheaply manufactured cabinets may use low-density particleboard or MDF, which are more susceptible to damage than solid wood. Humidity and temperature fluctuations can also cause wood to expand and contract, further weakening the screw holes. Over-tightening screws during the initial installation or subsequent adjustments can also exacerbate the problem.
Identifying the need for a hinge repair plate is crucial for preventing further damage and ensuring the proper functioning of your kitchen cabinets. Common signs that indicate the need for repair include:
- Loose cabinet doors that wobble or sag.
- Visible gaps between the cabinet door and frame.
- Stripped screw holes or crumbling wood around the hinge mounting point.
- Doors that are difficult to open or close properly.
- Unusual noises, such as creaking or grinding, when opening or closing the doors.
Addressing these issues promptly with a hinge repair plate can prevent the problem from escalating, saving you time and money in the long run. Ignoring these signs may result in the need for more extensive repairs or even replacement of the entire cabinet.
Selecting the Right Hinge Repair Plate
Choosing the appropriate hinge repair plate is essential for a successful and lasting repair. Several types of repair plates are available, each designed for specific hinge types and mounting configurations. Understanding the different options and their features will help you select the best plate for your needs.
Firstly, it's important to identify the type of hinge you're working with. Common types include:
- European Hinges (Concealed Hinges): These hinges are hidden when the door is closed and are typically adjustable in multiple directions. Repair plates for European hinges often come in two parts: one that attaches to the cabinet frame and another that attaches to the door.
- Butt Hinges: These are traditional hinges with two rectangular leaves that are mortised into the cabinet frame and door. Repair plates for butt hinges are typically flat and rectangular, with pre-drilled holes for screw attachment.
- Overlay Hinges: These hinges allow the cabinet door to overlay part of the cabinet frame. Repair plates for overlay hinges are designed to accommodate this overlay configuration.
- Inset Hinges: These hinges allow the cabinet door to sit flush with the cabinet frame. Repair plates for inset hinges are designed to maintain this flush alignment.
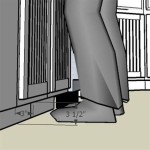
After identifying the hinge type, consider the size and shape of the repair plate. Measure the area around the hinge mounting point to determine the appropriate size of the plate. The plate should be large enough to cover the damaged area and provide a solid surface for attaching the hinge. Also, check the screw hole patterns on the existing hinge and compare them to the patterns on the repair plate. Ideally, the screw holes on the plate should align with the existing holes on the hinge, minimizing the need for additional drilling.
Material is another important factor to consider. Stainless steel is a popular choice due to its durability and resistance to corrosion. Heavy-duty metal plates are also a good option, especially for cabinets that experience heavy use. Avoid using plastic repair plates, as they may not provide sufficient strength and durability for long-term repairs.
Finally, consider the finish of the repair plate. While functionality is the primary concern, choosing a plate with a finish that matches the existing hardware can improve the overall aesthetic of your kitchen. Common finishes include brushed nickel, chrome, and bronze.
Step-by-Step Guide to Installing a Hinge Repair Plate
Installing a hinge repair plate is a relatively straightforward process that can be accomplished with basic tools and a few simple steps. By following these instructions carefully, you can restore the functionality of your kitchen cabinets and extend their lifespan.
Step 1: Gather Your Tools and Materials
Before starting the installation, gather the necessary tools and materials. You will need:
- The appropriate hinge repair plate for your hinge type and size.
- Screwdriver (matching the screw head type on your hinges).
- Drill (optional, for pilot holes).
- Drill bits (matching the screw size and wood type).
- Pencil.
- Safety glasses.
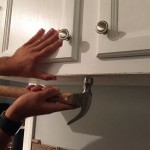
Step 2: Remove the Existing Hinge
Carefully remove the screws that secure the hinge to the cabinet frame. If the screws are stripped or difficult to remove, try using a screw extractor or a rubber band to provide extra grip. Once the screws are removed, detach the hinge from the cabinet frame.
Step 3: Prepare the Damaged Area
Clean the area around the stripped screw holes to remove any debris or loose wood. If necessary, fill the stripped holes with wood filler or small wooden dowels. Allow the filler to dry completely before proceeding to the next step. This provides a more solid base for the repair plate.
Step 4: Position and Align the Repair Plate
Position the repair plate over the damaged area, aligning the screw holes on the plate with the existing holes on the hinge. Use a pencil to mark the location of the screw holes on the cabinet frame through the openings in the repair plate. Ensure the plate is level and properly aligned with the existing hinge position.
Step 5: Drill Pilot Holes (Optional)
If the cabinet frame is made of hardwood or if you are using self-tapping screws, drill pilot holes at the marked locations. Use a drill bit that is slightly smaller than the diameter of the screws. Drilling pilot holes can prevent the wood from splitting and make it easier to drive the screws straight.
Step 6: Attach the Repair Plate to the Cabinet Frame
Using the screws provided with the repair plate, attach the plate to the cabinet frame. Start by inserting screws into the top and bottom holes, and then fill in the remaining holes. Ensure the screws are tightened securely, but avoid over-tightening, which could strip the new screw holes.
Step 7: Reattach the Hinge to the Repair Plate
Align the hinge with the repair plate and reattach it using the original screws or new screws if necessary. Tighten the screws securely, ensuring the hinge is properly aligned and the cabinet door is functioning smoothly.
Step 8: Test the Cabinet Door Functionality
Open and close the cabinet door several times to check for any rubbing, sagging, or misalignment. If necessary, adjust the hinge position or tighten the screws to ensure the door is functioning properly. If using European hinges, utilize the adjustment screws on the hinge itself to fine-tune the door's position.
Step 9: Repeat for Other Hinges (If Necessary)
If multiple hinges on the same cabinet door are loose or damaged, repeat the above steps for each hinge. Repairing all the affected hinges will ensure the door is properly supported and functioning optimally.
By following these steps, you can successfully install a hinge repair plate and restore the functionality of your kitchen cabinets. This simple repair can save you the cost and hassle of replacing entire cabinets or doors.

Hafele Hinge Repair Kit Toolstation

Hinge Repair Plate Cabinet Brackets Kitchen Cupboard Door Kits

Nes Home 90mm Hinge Repair Plate Rust Resistant Steel Furniture Cupboard Mount Set Diy At B Q

Hafele Hinge Repair Plates Fix

Stainless Steel Hinge Repair Plate Upgrade Cabinet Furniture Temu

Hinge Repair Kit Brackets Plate Kitchen Cabinet Door Tool 6 Pack Com

10pair Cabinet Hinge Repair Tool Plate Close Hinges Kitchen Cupboard Door Fix Ing Com

Furneo Hinge Repair Plate Kitchen Unit Carcass Cupboard Cabinet Door Zinc Diy At B Q

10pcs Cabinet Hinge Repair Tool Plate Close Hinges Kitchen Cupboard Door Fixing Com

Hinge Repair Kit Brackets Plate Kitchen Cabinet Door Tool 6 Pack Com
Related Posts