Essential Tools for Kitchen Cabinet Installation
Installing kitchen cabinets is a significant home improvement project that demands precision, careful planning, and the right tools. While professional installation is always an option, many homeowners choose to undertake this project themselves to save on costs and gain a sense of accomplishment. Successful cabinet installation hinges on having access to the appropriate tools and understanding how to use them effectively. This article outlines the essential tools needed for a smooth and accurate kitchen cabinet installation.
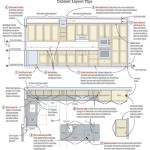
Before even considering the tools, meticulous planning is critical. This involves accurate measurements of the kitchen space, accounting for appliance placement, and verifying that the chosen cabinets fit the dimensions. A well-thought-out plan minimizes errors and ensures a more efficient installation process. Purchasing all necessary materials, including cabinets, hardware, fasteners, and shims, is another pre-installation necessity.
Measuring and Layout Tools
Accuracy in measurement is paramount throughout the cabinet installation process. Inaccurate measurements can lead to misaligned cabinets and significant rework. The following tools are indispensable for precise layout and measurement:
Measuring Tape: A high-quality measuring tape, preferably one that extends at least 25 feet, is essential for determining cabinet placement, wall lengths, and overall dimensions. Look for a tape measure with clear markings and a durable casing.
Laser Level: A laser level projects a horizontal or vertical beam of light, allowing for accurate leveling and alignment of cabinets, especially when installing upper cabinets. This tool is far more efficient and accurate than traditional bubble levels, particularly for longer runs.
Bubble Level: While a laser level is highly recommended, a traditional bubble level is still a valuable tool for verifying that cabinets are level and plumb. Different sizes are useful for different situations. A shorter level is ideal for checking individual cabinets, while a longer level is better for ensuring that a row of cabinets is aligned.
Stud Finder: Locating wall studs is crucial for securely attaching cabinets to the wall. A stud finder uses sensors to detect changes in density behind the wall, indicating the presence of a stud. Electronic stud finders are generally more accurate than magnetic stud finders. When using a stud finder, mark the location of each stud clearly with a pencil.
Pencil: A standard pencil is used for marking stud locations, cabinet positions, and cut lines. Keep several pencils on hand and ensure they are sharpened regularly for clear and precise markings. Consider using a carpenter's pencil, which has a wider lead that is less likely to break.
Square: A square, such as a combination square or a speed square, is used for ensuring that corners are square and for drawing accurate right angles. This is particularly useful for scribing cabinets to fit against walls that are not perfectly square.
Fastening and Assembly Tools
Once the layout is established, the next step is to assemble and install the cabinets. This phase requires tools that can securely fasten the cabinets together and to the wall. Using the correct fasteners and techniques is essential for a stable and long-lasting installation.
Drill/Driver: A cordless drill/driver is an indispensable tool for cabinet installation. It is used for pre-drilling pilot holes, driving screws, and attaching hardware. Choose a drill/driver with adjustable torque settings to prevent stripping screws. A drill with a hammer function can be useful for drilling into masonry walls, if necessary.
Impact Driver: An impact driver provides more torque than a standard drill/driver, making it ideal for driving long screws into studs and for assembling cabinet frames. An impact driver is particularly useful for installing heavy upper cabinets.
Screwdrivers: A set of screwdrivers, including both Phillips head and flat head screwdrivers, is necessary for various tasks such as adjusting hinges and tightening screws. Ensure the screwdrivers have comfortable handles for prolonged use.
Clamps: Clamps are used to hold cabinets together while they are being fastened. Bar clamps, pipe clamps, and face frame clamps are all useful for different aspects of cabinet assembly and installation. Clamps ensure that cabinets are flush and secure before screws are driven.
Shims: Shims are thin, tapered pieces of wood used to level cabinets and fill gaps between cabinets and walls. They are essential for achieving a professional-looking installation, especially in older homes where walls and floors may not be perfectly level or plumb. Use a level to determine where shims are needed, and then trim the excess shim material with a utility knife.
Nail Gun (Optional): A nail gun, such as a brad nailer or a finish nailer, can be used to attach cabinet face frames or to secure trim. While not essential, a nail gun can speed up the assembly process and provide a more professional finish. Be sure to use the appropriate nail size for the material being fastened.
Cutting and Modification Tools
In many kitchen cabinet installations, it is necessary to modify cabinets to fit specific spaces or to accommodate plumbing and electrical fixtures. These modifications require cutting tools that can produce clean and accurate cuts.
Circular Saw: A circular saw is used for making straight cuts in cabinet panels and trim. It is essential for cutting cabinets to size or for creating cutouts for appliances. Use a sharp blade designed for cutting plywood or melamine to minimize chipping.
Jigsaw: A jigsaw is used for making curved or irregular cuts in cabinet panels. It is particularly useful for cutting out sink openings or for scribing cabinets to fit against uneven walls. Use a fine-tooth blade for clean cuts and to prevent splintering.
Multi-Tool: A multi-tool, also known as an oscillating tool, is a versatile tool that can be used for a variety of tasks, including cutting, sanding, and scraping. It is particularly useful for making small, precise cuts in tight spaces, such as cutting out notches for pipes or electrical wires.
Utility Knife: A utility knife is used for scoring cabinet panels before cutting, for trimming shims, and for other general-purpose cutting tasks. Use a sharp blade and wear safety glasses to prevent injury.
Hole Saw Kit: A hole saw kit includes a variety of hole saws used for drilling large holes in cabinet panels for pipes, electrical wires, or other fixtures. Choose a kit with hole saws that are the appropriate sizes for common plumbing and electrical applications.
Additional Useful Tools and Materials
In addition to the essential tools listed above, several other tools and materials can make the cabinet installation process easier and more efficient.
Safety Glasses: Protecting your eyes from flying debris is crucial when using power tools. Always wear safety glasses when cutting, drilling, or hammering.
Work Gloves: Work gloves protect your hands from splinters, cuts, and abrasions. Choose gloves that provide a good grip and allow for dexterity.
Dust Mask: When cutting or sanding wood, wear a dust mask to protect your lungs from harmful dust particles. A respirator is recommended for prolonged exposure to dust.
Caulk Gun and Caulk: Caulk is used to seal gaps between cabinets and walls, creating a clean and professional finish. Choose a caulk that is paintable and mildew-resistant. A caulk gun is necessary for applying caulk smoothly and evenly.
Wood Filler: Wood filler is used to fill nail holes and other imperfections in cabinet surfaces. Choose a wood filler that is paintable and stainable. Apply the filler with a putty knife and sand smooth when dry.
Touch-Up Paint or Stain: Touch-up paint or stain is used to repair scratches or chips in cabinet finishes. Choose a color that closely matches the cabinet finish. Apply the touch-up paint or stain with a small brush or cotton swab.
Cabinet Installation Screws: Use high-quality cabinet installation screws that are specifically designed for attaching cabinets to studs. These screws typically have a larger head and a coarser thread than standard screws.
Key Considerations Before Starting
Safety First: Before commencing any work, always prioritize safety. Wear appropriate safety gear, including safety glasses, gloves, and a dust mask. Be mindful of electrical hazards and disconnect power to any circuits that may be affected by the installation.
Read Instructions: Carefully read the instructions provided with the cabinets and hardware. Familiarize yourself with the assembly and installation procedures before starting. Ignoring instructions can lead to errors and delays.
Plan for Obstacles: Anticipate potential obstacles, such as plumbing pipes, electrical wiring, and uneven walls. Have a plan for dealing with these obstacles before starting the installation. Consult with a professional if you are unsure about how to handle a particular situation.
Take Your Time: Cabinet installation is a complex project that requires patience and attention to detail. Do not rush the process. Take your time to ensure that each step is done correctly. A well-installed kitchen can greatly enhance the value and enjoyment of a home.
By carefully selecting the appropriate tools and following recommended procedures, homeowners can successfully install their own kitchen cabinets. The satisfaction of completing this project and the cost savings realized make the effort worthwhile.

How To Install Upper Cabinets Like A Pro Cabinetselect Com

Cabinet Installation Kitchen Rta Cabinets Orange County Pre Made Whole Quartz Countertop Slab Prefab Granite

20 Essential Cabinet Installation Tools That Make The Job Easy Electronicshub

How To Install Cabinet Hardware With Young House Love

Must Have Tools For Cabinet Making And Furniture Building

How To Install Hang Cabinets By Yourself Using The Stand In

Cabinetizer Cabinet Lift Model 76 Assembly And Training

How To Install Hang Cabinets By Yourself Using The Stand In

Kitchen Design Ideas Com Installing Cabinets Upper

How To Install Kitchen Cabinets Young House Love