Kitchen Cabinet Kick Plate Dimensions: A Comprehensive Guide
Kick plates, also known as toe kicks, are the recessed panels that form the base of kitchen cabinets. They serve both a functional and aesthetic purpose, creating a shadow line that makes cabinets appear to float and providing space for feet while working at the countertop. Understanding the standard dimensions and variations in kitchen cabinet kick plate design is crucial for planning a successful kitchen renovation or new construction project. This article explores the standard dimensions of kick plates, factors that influence these dimensions, and considerations for installation and customization.
Standard Kick Plate Dimensions
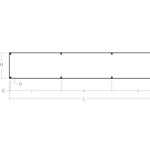
The industry standard for kitchen cabinet kick plate height is 4 inches (approximately 10.2 cm). This height provides adequate space for comfortable foot positioning while working at the countertop. This standard is generally adhered to by most cabinet manufacturers and is also often replicated in custom cabinet designs. This allows for a balance between functionality and visual appeal. A 4-inch kick plate is low enough to be unobtrusive but high enough to prevent damage from everyday wear and tear, such as scuffs from shoes or cleaning supplies.
The depth or recess of the kick plate, which is the distance it is set back from the cabinet face, is typically 3 inches (approximately 7.6 cm). This depth allows sufficient room for feet without making the cabinets appear unstable or overly recessed. The 3-inch recess creates the shadow line effect, adding visual interest and a sense of spaciousness to the kitchen. It also provides a practical amount of space for comfortably standing close to the countertop.
It's important to note that these dimensions are generally considered the 'finished' dimensions. This means the 4-inch height refers to the visible portion of the kick plate after installation. The actual material used may be slightly larger to account for attachment to the cabinet base and the flooring, as will be discussed in later sections.
Factors Influencing Kick Plate Dimensions
While the standard dimensions provide a general guideline, several factors can influence the final dimensions of kitchen cabinet kick plates. These factors include considerations for accessibility, flooring materials, and design preferences.
Accessibility is a primary consideration, especially when designing kitchens for individuals with mobility challenges. The Americans with Disabilities Act (ADA) provides guidelines for accessible kitchen design, including requirements for knee and toe clearance under countertops. For wheelchair users, a minimum knee clearance height of 27 inches (approximately 68.6 cm) and a toe clearance depth of 9 inches (approximately 22.9 cm) are typically required. This translates to a modified kick plate design with a reduced height and increased depth. In accessible kitchens, the kick plate may be as low as 2 inches or even eliminated entirely in certain areas to maximize accessibility.
Flooring materials can also affect the perceived height of the kick plate. If the flooring material is significantly thicker than anticipated, it can reduce the visible height of the kick plate. For instance, installing a thick tile or stone floor after the cabinets have been installed can reduce the 4-inch standard height by an inch or more. Therefore, it is essential to account for the flooring material's thickness during the planning phase to ensure the final kick plate height meets the desired aesthetic and functional requirements. This sometimes necessitates the use of adjustable cabinet legs to compensate for flooring variations.
Design preferences play a crucial role in determining the aesthetic characteristics of the kick plate. While adhering to functional requirements, homeowners and designers may opt for non-standard kick plate heights or depths to achieve a particular look. For example, modern kitchens may feature sleeker, lower kick plates, while traditional kitchens may incorporate taller, more ornate kick plates. The material used, the finish, and the style of the kick plate can all contribute to the overall design aesthetic.
Installation and Customization Considerations
The installation and customization of kitchen cabinet kick plates involve several practical considerations. These include the method of attachment, material selection, and the integration of features such as lighting or ventilation.
Kick plates are typically attached to the cabinet base using screws, nails, or adhesive. The choice of attachment method depends on the cabinet construction, the material of the kick plate, and the desired level of permanence. Screws provide a more secure and easily removable attachment, while nails are quicker to install but less easily removed. Adhesive can be used for a clean, seamless look, but careful selection of the adhesive type is paramount to ensure long-term adhesion.
The material used for the kick plate should be durable, water-resistant, and aesthetically consistent with the cabinets. Common materials include plywood, MDF (medium-density fiberboard), and solid wood. Plywood is a cost-effective option with good strength and water resistance, making it suitable for most kitchen environments. MDF provides a smooth surface for painting or laminating but is less water-resistant than plywood. Solid wood offers a premium look and feel but is more expensive and requires careful sealing to prevent moisture damage.
Customization options for kick plates are extensive and can include adding decorative molding, painting or staining the kick plates to match or complement the cabinets, or incorporating functional features. LED lighting can be integrated into the kick plate to provide subtle illumination and enhance the visual appeal of the kitchen. Ventilation can also be incorporated into the kick plate to improve air circulation and prevent moisture buildup under the cabinets. These additions can significantly elevate the design and functionality of the kitchen.
Proper installation is crucial for the stability and longevity of the kitchen cabinets. The kick plates should be securely attached to the cabinet base and properly aligned to create a seamless and visually appealing finish. Uneven kick plates can detract from the overall look of the kitchen and can also create tripping hazards. It is recommended to use a level and a measuring tape to ensure accurate placement and alignment during installation.
Beyond standard dimensions and typical construction, there are specialized applications. For example, some kitchens, especially those with islands, opt for furniture-style legs rather than continuous kick plates. In this case, the dimensions of the legs become the critical factor, and they are chosen to provide adequate support and the desired aesthetic. The "toe kick" function is then effectively transferred to the design and placement of the legs themselves.
Another variation arises in kitchens with peninsula designs. Here, the kick plate may wrap around the exposed end of the peninsula, requiring mitered corners for a clean, finished look. The dimensions of this wrapping kick plate must be carefully considered to ensure a seamless transition from the standard cabinet base.
Finally, the design of the kick plate can impact the ease of cleaning. A perfectly flush kick plate, while aesthetically pleasing, can be difficult to clean underneath. A slight reveal or a small gap between the floor and the kick plate is often preferred to allow for easy sweeping or vacuuming. The dimensions of this gap are typically small, around 1/4 inch to 1/2 inch, but they are essential for maintaining a clean and hygienic kitchen environment. These small modifications highlight the importance of considering both the aesthetic and practical aspects of kick plate design.
Ultimately, selecting the appropriate kitchen cabinet kick plate dimensions is a balance between standard practices, functional requirements, and design preferences. Careful attention to detail during the planning and installation phases will ensure a successful outcome that enhances the beauty and functionality of the kitchen.

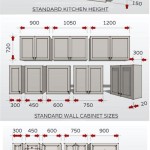
Standard Cabinet Dimensions

N Standard Kitchen Dimensions Renomart

How To Make Cabinet Toe Kicks Stonehaven Life

How To Make Cabinet Toe Kicks Stonehaven Life

How To Build A Kitchen Cabinet With Wood S Sawdust Girl

Bathroom Vanity Definitions What Is A Toe Space And Ki Wide Canvas

3ds Max Design Tutorials Using Basic Polygon Editing To Create A Base Cabinet

How To Build A Kitchen Cabinet With Wood S Sawdust Girl

Home Dzine Kitchen Make Your Own 4 Drawer Unit

Kitchen Cabinet Dimensions
Related Posts