Kitchen Cabinet Not Closing: Troubleshooting and Solutions
A kitchen cabinet that refuses to close properly is a common household frustration. The problem can range from a minor annoyance to a significant disruption, affecting the functionality and aesthetics of the kitchen. Addressing the issue promptly and effectively is essential to prevent further damage and maintain the integrity of the cabinet. This article explores potential causes for a kitchen cabinet not closing and provides comprehensive troubleshooting steps, along with practical solutions.
Several factors can contribute to a cabinet door or drawer failing to close correctly. These factors encompass issues related to the hinges, the cabinet frame, the door or drawer itself, and the surrounding environment. Understanding the underlying cause is the first step toward implementing a suitable repair strategy.
Identifying Common Causes
Determining the root cause of the problem is crucial for selecting the appropriate solution. A systematic approach to inspecting the cabinet and its components will help pinpoint the issue. Some of the most frequent culprits include:
Loose or Damaged Hinges: Hinges are the essential components that allow cabinet doors to swing open and closed. Over time, screws that hold the hinges in place can loosen, causing the door to sag or misalign. In extreme cases, the hinges themselves can bend, crack, or break, rendering them ineffective. The constant use of the cabinet door puts strain on the hinges, making them a common source of problems.
Misaligned Cabinet Frame: The cabinet frame provides the structural support for the entire cabinet assembly. If the frame is not perfectly square or if it has shifted due to settling or other factors, the door may not align properly with the frame opening. This misalignment can prevent the door from closing fully or causing it to rub against the frame, hindering smooth closure.
Warped or Swollen Door: Wood is a natural material that is susceptible to changes in humidity. Excessive moisture can cause cabinet doors to warp or swell, altering their shape and dimensions. A warped door may not fit snugly within the frame opening, preventing it from closing properly. Similarly, a swollen door may be too large for the opening, resulting in a tight fit or preventing closure altogether.
Obstructed Door or Drawer Path: Obstructions within the cabinet or drawer can impede the closing mechanism. Items stored inside the cabinet may shift and block the door's path, preventing it from closing fully. Similarly, debris or objects caught in the drawer slides can hinder smooth movement and prevent the drawer from closing completely.
Loose or Stripped Screws: Screws are used to secure various components of the cabinet, including hinges, drawer slides, and decorative hardware. Over time, these screws can loosen due to vibration or wear and tear. In some cases, the screw holes may become stripped, rendering them unable to hold the screws securely. Loose or stripped screws can compromise the stability and alignment of the cabinet components, leading to closure problems.
Faulty Latches or Catches: Some cabinets feature latches or catches that help secure the door in the closed position. If these mechanisms are damaged or misaligned, they may not engage properly, allowing the door to swing open or remain ajar. Latches and catches are often made of plastic or metal and can degrade or break with repeated use.
Troubleshooting Steps and Solutions
Once the potential causes have been identified, a systematic approach to troubleshooting is necessary to pinpoint the specific issue and implement the correct solution. The following steps provide a guide to diagnosing and resolving common cabinet closure problems:
Step 1: Visual Inspection: Begin by conducting a thorough visual inspection of the cabinet door, frame, and hinges. Look for any obvious signs of damage, such as cracks, bends, or loose screws. Pay close attention to the alignment of the door in relation to the frame. Is the door sitting flush against the frame, or is there a gap on one side? Check for any obstructions that may be blocking the door's path.
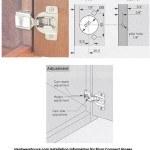
Step 2: Hinge Examination and Adjustment: Inspect the hinges closely. Are the screws tight? Are the hinges securely attached to both the door and the frame? If the screws are loose, try tightening them with a screwdriver. If the screw holes are stripped, consider using longer screws or filling the holes with wood glue and toothpicks before re-inserting the screws. If the hinges are bent or damaged, they may need to be replaced.
To adjust the hinges, loosen the screws slightly and reposition the door until it is properly aligned. Then, tighten the screws securely. Some hinges have adjustment screws that allow for fine-tuning of the door's position. Consult the hinge manufacturer's instructions for specific adjustment procedures. If the hinge is an adjustable concealed hinge, use a screwdriver to adjust the depth, side, and height of the door to reach the optimal alignment. This involves small adjustments to each screw, testing the closure each time, until the door fits properly. Ensure that each hinge is equally adjusted to prevent uneven pressure on the door.
Step 3: Frame Assessment: Use a level to check the cabinet frame for squareness. If the frame is out of square, it may be necessary to shim the cabinet to correct the alignment. Shims are thin pieces of wood or plastic that can be inserted between the cabinet and the wall to level the frame. Alternatively, the house itself may have settled causing a misshapen opening. Consult a professional if the frame is significantly out of alignment and cannot be corrected with shims.
Step 4: Door Examination: Examine the door for warping or swelling. If the door is warped, it may be difficult to correct without professional assistance. However, you can try to flatten the door by placing it on a flat surface and weighting it down with heavy objects. If the door is swollen, try to reduce the moisture content by using a dehumidifier or placing the door in a dry environment. However, it's important to note that severe warping or swelling may require replacing the door.
Step 5: Obstruction Removal: Check the inside of the cabinet and the drawer slides for any obstructions that may be preventing the door or drawer from closing properly. Remove any items that are blocking the path and clean the drawer slides with a damp cloth to remove any debris. Ensure that all items inside the cabinet are properly organized and stored to prevent them from shifting and blocking the door's path.
Step 6: Latch and Catch Repair: Inspect the latches or catches for damage or misalignment. If the latch is loose, try tightening the screws that hold it in place. If the latch is broken or damaged, it may need to be replaced. Ensure that the latch is properly aligned with the strike plate so that it engages smoothly when the door is closed. If it is magnetic, ensure the magnet is still strong and the metal plate is clean and free of debris.
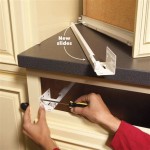
Step 7: Hardware Replacement: If the existing hardware, such as hinges or latches, is beyond repair, it may be necessary to replace it. When replacing hardware, choose components that are compatible with the existing cabinet design and dimensions. Ensure that the new hardware is securely attached and properly aligned to ensure smooth and reliable operation. Consider upgrading to soft-close hinges for added convenience and reduced noise.
Preventative Maintenance for Cabinets
Regular preventative maintenance can help extend the lifespan of kitchen cabinets and prevent closure problems from occurring. These practices can ensure the longevity and functionality of kitchen cabinet systems:
Regular Cleaning: Wipe down cabinet doors and frames regularly with a damp cloth to remove dirt, dust, and grease. Avoid using harsh chemicals or abrasive cleaners, as these can damage the finish. Keeping the cabinets clean helps prevent the accumulation of debris that can interfere with the closing mechanism.
Humidity Control: Maintain a stable humidity level in the kitchen to prevent warping or swelling of the cabinet doors. Use a dehumidifier during periods of high humidity and ensure that the kitchen is properly ventilated. Avoiding dramatic temperature and humidity fluctuations will help preserve the cabinet's shape and dimensions.
Hardware Tightening: Periodically check the tightness of screws on hinges, latches, and other hardware components. Tighten any loose screws to prevent them from loosening further and causing alignment problems. This simple task can prevent minor issues from escalating into major repairs.
Proper Storage: Organize items inside cabinets to ensure that they do not obstruct the door's path. Avoid over-packing cabinets, as this can put strain on the hinges and door. Distribute weight evenly within the cabinet to prevent sagging or misalignment.
Professional Inspection: Consider having a professional cabinet installer or repair technician inspect the cabinets periodically. A professional can identify potential problems early on and recommend preventative measures to avoid costly repairs. Regular professional inspections can help ensure that the cabinets remain in optimal condition.
Addressing a kitchen cabinet that won't close requires careful diagnosis and a systematic approach to repair. By understanding the common causes of cabinet closure problems and following the troubleshooting steps outlined above, homeowners can effectively resolve a wide range of issues and restore the functionality and beauty of their kitchen cabinets. If the problem persists or is beyond the scope of DIY repair, seeking professional assistance is recommended.

How To Adjust Kitchen Cabinet Doors That Won T Close

How To Adjust Your Kitchen Cupboard Doors Made Easy

How To Adjust Kitchen Cabinet Doors Checkatrade

Soft Close Kitchen Cabinet Door That Does Not Softly Anymore

Closing The Space Above Kitchen Cabinets Remodelando La Casa

Why Soft Close Cabinets Might Not Be Worth The Money

Tec Soft Close Adjustment

How To Fix Soft Close Runners On Kitchen Bunnings Work Community

Soft Close Hinge Not Working Common Issues And Fixes Maxave

How To Fix Soft Close Runners On Kitchen Bunnings Work Community
Related Posts