Kitchen Cabinet Painting Techniques: A Comprehensive Guide
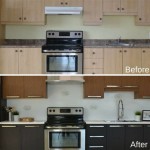
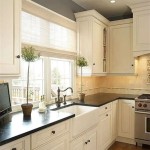
The kitchen is often considered the heart of the home, and the cabinets are a dominant feature that significantly impacts the overall aesthetic. Updating kitchen cabinets through painting is a cost-effective alternative to a full remodel, allowing homeowners to refresh their space without incurring significant expense. However, achieving a professional-looking finish requires careful planning, the right materials, and a meticulous application process. This guide will explore essential kitchen cabinet painting techniques, providing insights into preparation, painting methods, and ensuring long-lasting results.
Surface Preparation: The Foundation for a Flawless Finish
Proper preparation is arguably the most critical stage in cabinet painting. The longevity and appearance of the painted surface directly correlate to the quality of the preparation. Neglecting this step can lead to paint chipping, peeling, and an uneven finish, ultimately diminishing the value of the project. The preparation process involves several key steps.
1. Removal and Labeling: Begin by removing all cabinet doors, drawers, and hardware, including hinges, knobs, and pulls. Use a labeling system (e.g., painter's tape and a marker) to clearly identify each piece and its corresponding location. This will simplify reassembly and prevent confusion later. Taking photographs of the original layout can also be helpful.
2. Cleaning: Thoroughly clean all cabinet surfaces. Grease, grime, and food residue are common in kitchens and can interfere with paint adhesion. Use a degreasing cleaner or a mixture of warm water and trisodium phosphate (TSP) to remove all contaminants. Rinse thoroughly with clean water and allow the cabinets to dry completely.
3. Repairing Imperfections: Inspect the cabinet surfaces for any damage, such as chips, dents, or scratches. Use wood filler to repair these imperfections, ensuring a smooth and even surface. Allow the filler to dry completely according to the manufacturer's instructions, and then sand it smooth.
4. Sanding: Sanding is essential for creating a surface that paint can properly adhere to. Use medium-grit sandpaper (e.g., 120-grit) to lightly sand the cabinets, focusing on removing any existing gloss or imperfections. For previously painted cabinets, sanding will help to create a "tooth" for the new paint to grip. After sanding, thoroughly remove all dust with a tack cloth or a vacuum cleaner with a brush attachment.
5. Priming: Applying a primer is a crucial step in achieving a durable and uniform finish. Primer seals the surface, blocks stains, and provides a consistent base for the paint. Choose a high-quality primer specifically designed for cabinets, such as a bonding primer or a stain-blocking primer. Apply the primer evenly, following the manufacturer's instructions, and allow it to dry completely before proceeding to the painting stage.
Selecting the Right Paint and Application Methods
The choice of paint and application method significantly impacts the final appearance and durability of the painted cabinets. Different paint types offer varying levels of durability, sheen, and ease of application. Similarly, different application methods will produce different finishes.
1. Paint Type: Several paint options are suitable for kitchen cabinets, each with its own advantages and disadvantages.
- Acrylic Latex Paint: This is a popular choice for its durability, ease of cleanup, and low odor. Acrylic latex paint adheres well to primed surfaces and is available in a wide range of colors and sheens.
- Alkyd Paint: Alkyd paint, also known as oil-based paint, is known for its hardness and durability, making it a good choice for high-traffic areas. However, it requires mineral spirits for cleanup and has a stronger odor than acrylic latex paint. Alkyd paints tend to yellow over time, especially in areas with limited sunlight.
- Acrylic Enamel Paint: Enamel paints create a hard, durable finish that is resistant to chipping and scratching. They are often used for cabinets and trim due to their ability to withstand wear and tear.
2. Sheen: The sheen of the paint refers to its level of gloss. Different sheens offer different levels of durability and aesthetic appeal.
- Matte: Matte paint has the lowest sheen and provides a soft, non-reflective finish. It is good at hiding imperfections but is less durable and more difficult to clean.
- Eggshell: Eggshell paint has a slightly higher sheen than matte and is more durable and easier to clean. It provides a subtle sheen that is less reflective than satin.
- Satin: Satin paint has a moderate sheen and is a good balance between durability and aesthetic appeal. It is easy to clean and provides a smooth, velvety finish.
- Semi-Gloss: Semi-gloss paint has a high sheen and is very durable and easy to clean. It is often used for trim and cabinets in high-traffic areas.
- Gloss: Gloss paint has the highest sheen and is extremely durable and easy to clean. However, it is very reflective and can highlight imperfections.
3. Application Methods: Several methods can be used to apply paint to kitchen cabinets, each with its own advantages and disadvantages.
- Brush: Brushing is a traditional method that is suitable for small areas and detailed work. Use a high-quality synthetic brush for best results. It's important to use even strokes.
- Roller: Rolling is a faster method for covering large surfaces. Use a small, dense foam roller for a smooth finish.
- Sprayer: Spraying is the best method for achieving a smooth, professional-looking finish. Use an airless sprayer or a high-volume, low-pressure (HVLP) sprayer for optimal results. Requires proper ventilation and safety measures.
Whatever method is chosen, it is crucial to apply thin, even coats of paint, allowing each coat to dry completely before applying the next. Multiple thin coats are preferable to one thick coat, as they will result in a smoother, more durable finish.
Techniques for Achieving a Professional Finish
Beyond preparation and material selection, certain techniques can elevate the quality of the painted cabinets and contribute to a professional-looking finish. These techniques involve careful attention to detail and a commitment to precision.
1. Proper Spraying Techniques: If using a sprayer, maintain a consistent distance and angle from the cabinet surface. Overlap each pass of the sprayer by approximately 50% to ensure even coverage. Avoid spraying too much paint in one area, as this can lead to runs and drips. Adjust the sprayer settings to match the paint being used and the desired finish. Always test the sprayer on a piece of cardboard before applying paint to the cabinets.
2. Achieving a Brush-Free Finish with Brushing and Rolling: A common concern with brushing and rolling is the potential for brush strokes or roller stipple to be visible in the finished paint job. To minimize these imperfections, use a high-quality brush or roller and apply the paint in thin, even coats. After applying the paint, gently "tip off" the surface with a dry brush to smooth out any brush strokes. For rolling, use a technique called "laying off" to smooth the paint and eliminate roller marks. This involves lightly rolling over the freshly painted surface in a single direction to even out the finish.
3. Sanding Between Coats: Lightly sanding between coats of paint helps to create a smooth, uniform surface and improves the adhesion of subsequent coats. Use fine-grit sandpaper (e.g., 320-grit or higher) to lightly sand the painted surface after it has completely dried. Remove all sanding dust with a tack cloth before applying the next coat of paint.
4. Protecting the Finish: After the final coat of paint has dried, consider applying a clear coat of polyurethane or varnish to protect the finish and enhance its durability. This is especially important for cabinets in high-traffic areas. Choose a clear coat that is compatible with the paint being used and apply it according to the manufacturer's instructions.
5. Reassembly and Hardware Installation: Once the paint has fully cured, carefully reassemble the cabinets, reinstalling the hardware and doors. Ensure that all screws are tightened securely but not over-tightened, which could damage the wood. Consider replacing old hardware with new hardware to further enhance the look of the cabinets. Clean the painted surface of any fingerprints or smudges to complete the project.

Popular Cabinet Painting Techniques Cabinets Painted Furniture Makeover

7 Expert Tips For Flawless Kitchen Cabinet Painting

How To Paint Kitchen Cabinets In 7 Simple Steps

Faux Painting Kitchen Surfaces Walls Cabinets Floors Countertops
How To Paint Kitchen Cabinets In 7 Simple Steps

How To Paint Kitchen Cabinets Forbes Home

Faux Painting Kitchen Surfaces Walls Cabinets Floors Countertops

Avoid These Mistakes How To Paint Cabinets That Are Already Painted Grace In My Space

6 Tips For Painting Your Kitchen Cabinets

How To Prep And Paint Kitchen Cabinets Lowe S
Related Posts